
Configure VMware VSAN 6 on the Intel NUC Skull Canyon


A couple of weeks ago I decided to replace my single node home lab environment. My previous hardware, which I was using before; the HP ML310 Gen8, a tower server products of HP, doesn’t longer fits my needs anymore. The replacement of my lab had 4 requirements; one was more efficiency, the second; smaller device, third; more performance and the last one: low noise to succeed the WAF (Wife Acceptance Factor). There is also a Wikipedia website about it, if you don’t believe me, look over here ;-).
I was always curious about the Intel NUCs as Software Defined Storage hypervisor, but I’ve waited till the i7 Sky lake processor become supported (Q1 this year). After some research I found out that the newest NUCs are working (after changing some bios settings) with VMware ESX 6u2. The first big plus is that the setup is very simple to expand, so when I want more resources on my homelab i simply buy another NUC and add it to the VSAN cluster. The second plus is the size, they are small enough to fit my meter cupboard at home, all these advantages convinced me enough to make the final decision that this must be my new homelab setup!
The NUCS have an Intel® Core™ i7-6770 HQ processor onboard and are already m.2 NVMe supported, after reading a lot of benchmarks on the web the NVMe EVO 950 test results convinced me enough to be the caching tier that fit my needs. The only “small” limitation is that they only have 1 onboard gigabit NIC, what results in buying some extra StarTech USB 3.0 Single and Dual Network cards to fits the technical requirements for VSAN and vMotion.
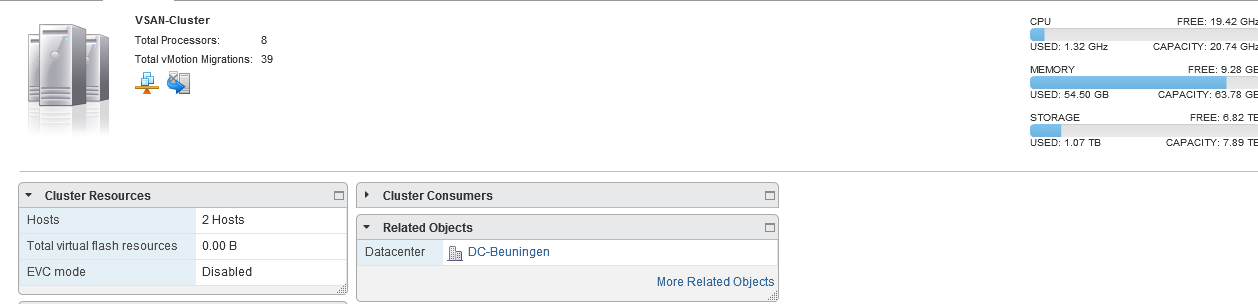
Don’t look to serious at the total storage size because my 7 TB Synology was added as NFS datastore before taking the screenshot.
Hardware:
- 2x Intel NUC Skull Canyon NUC6i7KYK
- 4x Kingston 16gb HyperX DDR4 RAM
- 2x Startech USB 3.0 Single Network USB NIC
- 2x Startech USB 3.0 Dual Network USBNIC
- 2x Samsung 950 Pro 256gb m2 SSD NVMe (caching tier)
- 2x Samsung 850 EVO 500gb m2 SSD (capacity tier)
- 2x Sandisk 8Gb USB 3.0 Stick for the ESXi installation
Networking layer
- 1x Cisco SG300-200 L3 switch – 28 ports
Pre-steps
Install ESX 6.0 u2 (at moment of writing) on the 2 NUCs hostmachines. To complete the ESX installation, the following UEFI BIOS settings are required to setup, if you don’t do it you will get an PSOD (Purple screen of Death).
BIOS\Devices\USB
- disabled – USB Legacy (Default: On)
- disabled – Portable Device Charging Mode (Default: Charging Only)
- not change – USB Ports (Port 01-08 enabled)
BIOS\Devices\SATA
- disabled – Chipset SATA (Default AHCI & SMART Enabled)
- M.2 Slot 1 NVMe SSD: Samsung MZVPV256HDGL-00000
- M.2 Slot 2 NVMe SSD: Samsung MZVPV512HDGL-00000
- disabled – HDD Activity LED (Default: On)
- disabled – M.2 PCIe SSD LEG (Default: On)
BIOS\Devices\Video
- IGD Minimum Memory – 64MB (Default)
- IGD Aperture Size – 256MB (Default)
- IGD Primary Video Port – Auto (Default)
BIOS\Devices\Onboard Devices
- disabled – Audio (Default: On)
- LAN (Default)
- disabled – Thunderbolt Controller (Default: On)
- disabled – WLAN (Default: On)
- disabled – Bluetooth (Default: On)
- Near Field Communication – Disabled (Default is Disabled)
BIOS\Devices\Onboard Devices\Legacy Device Configuration
- disabled – Enhanced Consumer IR (Default: On)
- disabled – High Precision Event Timers (Default: On)
- disabled – Num Lock (Default: On)
Performance\Processor
- disabled Real-Time Performance Tuning (Default: On)
Power
- Select Max Performance Enabled (Default: Balanced Enabled)
Secondary Power Settings
- disabled – Intel Ready Mode Technology (Default: On)
- disabled – Power Sense (Default: On)
Prepare the Intel NUC Custom Driver for VMware
Step 1: Add the StarTech USB 3.0 custom driver to the ESX VIB Library (see this link)
Step 2: Setup an ADDS domain server (if you did not already) and install and configure vCenter 6.0 server or Appliance
Install VMware vSAN
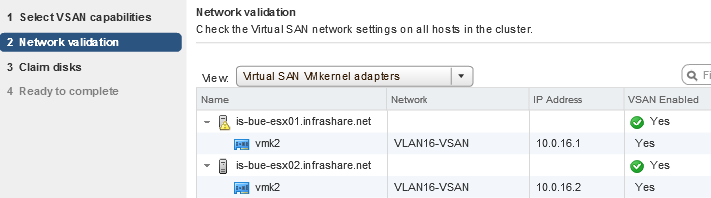
Step 3: Connect to your vCenter Web Portal and create the extra VMkernel network: Manage->Networking->VMkernel Adapters->Add Host Networking on both NUCs hosts, give them a network address in a separated VLAN and activate the VSAN service

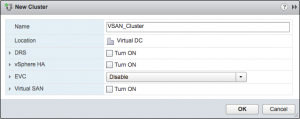
Step 4: Create a Cluster in vCenter (Name it something like VSAN-Cluster)
Step 5: Make sure that all your local disks you want to use in the tiering capacity are not associate to one of more Datastores. They have to be unallocated!
Note: I installed my ADDS server on my Synology Shared NFS Datastore, and moved it back with vMotion after the configuration.
Step 6: After completing the steps the configuration process in vCenter for VSAN can begin. The steps are quite easy and in several mouse clicks you have VSAN up and running!
Step 7: Login to vCenter, go to the Cluster Settings->General and click on the menu Virtual SAN to turn ON

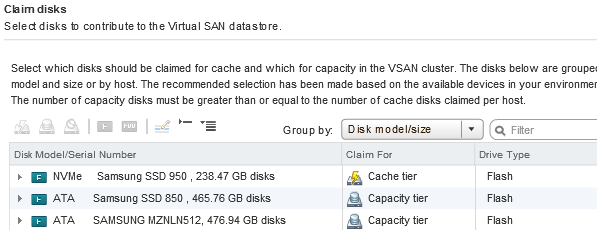
Step 8: Now we have to create the disks usage for the VSAN cluster. First set the disk claiming on Manual, otherwise the disks will be automatically be assigned to the VSAN Datastore without user interaction.

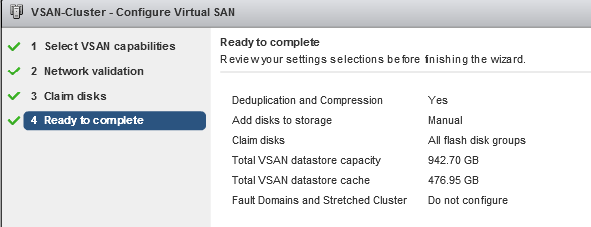
Step 9: Enable Data-Duplication if you have all flash drives (preferred), this one is preffered. Go to the Virtual SAN Cluster and enable it at the Edit Virtual SAN Settings screen. Once deduplication has been activated, all hosts and disk groups in the cluster will be activated for deduplication; ““Deduplication and compression will improve the total cost of ownership by reducing the data stored on your physical disks. Deduplication and compression best practice is all-flash disk groups. Creating hybrid disk groups is not allowed when Deduplication and compression is turned on”.

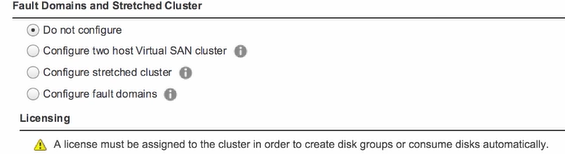
Step 10: At the fault domain option, you can choose to use to have an witness server in an other site, for my home lab its not needed. So i choose for the Do not Configure option.
Step 11: In the pre-requirement steps you already created a VMKernel network for VSAN. I pre-created already an isolated VLAN with no gateway address.
Step 12: Claim you disks, set the fastest one to the caching tier, and one for bulk storage to capacity tier (lower speed).
Step 13: A summery will follow, check your settings and click finished.
Step 14: Now the preparion will start and the vsandatastore will be available when finished. After the process you can rename the datastore that fits your own personal needs and your good to go!


Optimizations
The NUCs are officially not supported by VMware so you will get some HCL errors after the configuration. You can Disabling device monitoring of the SSD devices, because its not official supported. With this command you can ignore this warning:
esxcli system settings advanced set -o /LSOM/VSANDeviceMonitoring -i 0
Power usage
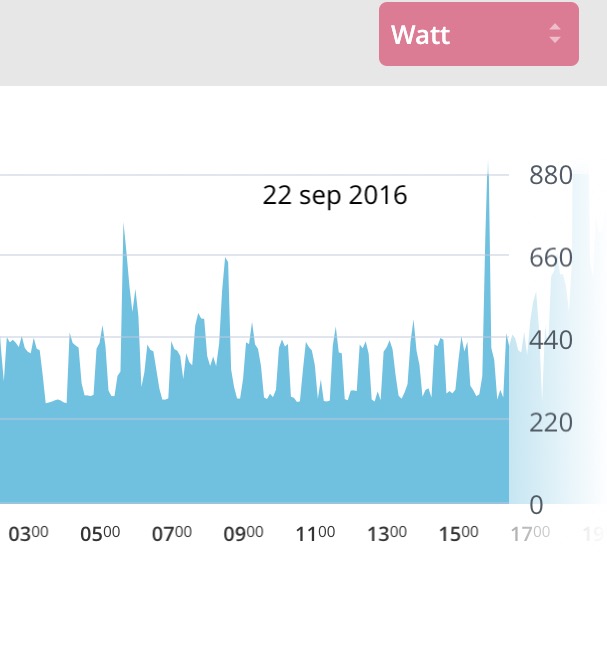
After the setup I exported my power usage data out my smart home thermostat, and the power consumption of the 2 NUCs will be at 180 Watt in Idle state what exceeds all my expectations. The 30-40 Watt that lefts is my Synology 1515+ that is in sleep mode.
Troubleshooting
If the error “Misconfiguration detected” network status error comes around, make sure that you have Promiscuous Mode enabled (accepted) on the Port Group/vSwitch of the VMkernel.

Cupboard result

Some links that I found useful: