Configure a Citrix XenApp 7.x Server in Microsoft Azure Resource Manager, including hybrid IPsec VPN configuration


Since Citrix released their XenApp and XenDesktop 7.11 version, the software did get supported for the Azure Resource Manager Host Connection. What actually means that your on-premises desktop delivery controller can now deploy machines in Azure ARM, based on the MCS imaging strategy. Citrix already introduced this feature 2 months earlier to the Citrix Cloud, as they introduced the Cloud first release policy we had to wait. I personally think that all the new upcoming features will be released first to the Citrix Cloud after it go public to customers.
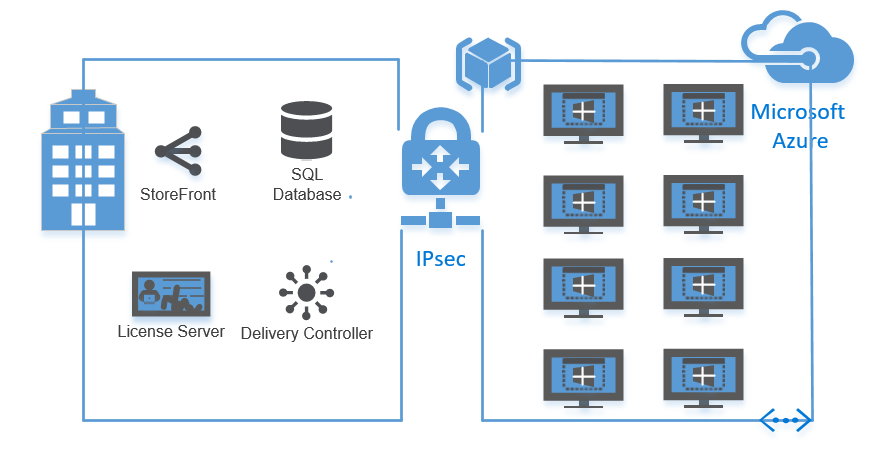
In this blog article I describe in 3 sections how you can create a IPsec VPN tunnel from a pfsense firewall to the Azure Public Cloud, the configuration of an Azure ARM Host connection and the creation of a Machine Catalog and Delivery group to final the XenApp Published Application/Desktop setup of Azure Cloud (ARM platform).
If you already have an active IPsec VPN to Azure and only want to know how to setup an Azure ARM Host Connection and a Citrix XenApp Desktop or configure Published Apps in Azure ARM, then skip to Step 13.
Note: This article is based on the Azure Resource Manager platform (v2), not the classic platform (v1).
Requirements
- Citrix XenDesktop 7.11 or XenApp 7.11
- Azure subscription account
- Azure service administrator account
- Azure Resource Group
- Azure storage account
- IPsec supported VPN device at your on-prem site (in this article I will use a virtual pfsense)
See this article to check all the supported devices, like NetScaler CloudBridge/SD-WAN!
Create a IPsec VPN tunnel to Azure
Step 1: First you need to have an VPN connection to Azure, otherwise your XenApp servers cannot register succesfull to the on-premises broker server. So let’s log in to the Azure Portal https://portal.azure.com/
Step 2: Create a Resource Group to bundle all your Azure resources. The name can be random

Step 3: If you not created an Azure virtual network already, you need to do this first. Do not choose the same subnet as your on-premises network, its technically not possible on a layer 2 connection to extend the network. Configure the subnet mask to your needs, I suggest to make it large, to create more flexibility in subnets for future usage
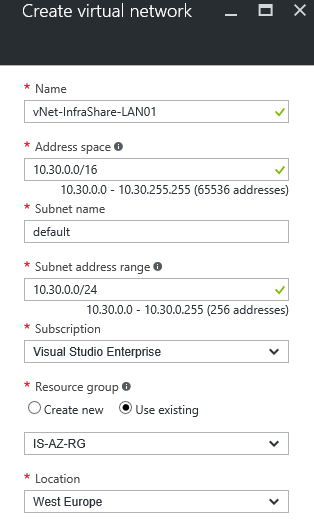
Step 3: After the creation we need to create a new GatewaySubnet, this is the route subnet that is needed to configure the IPsec VPN network.To do so, open the vNet settings, go to Subnets and tick on the + next to Gateway subnet. The subnet must be at least /27 (32 addresses).

Step 4: Create a Virtual Gateway in Azure, name the gateway like Gateway-Organization choose for Gateway type VPN and VPN type Route-Based. Setup the just created Virtual Network and create a new Public IP to use as Public Gateway IP that your on-premises IPsec tunnel will need to connect to.
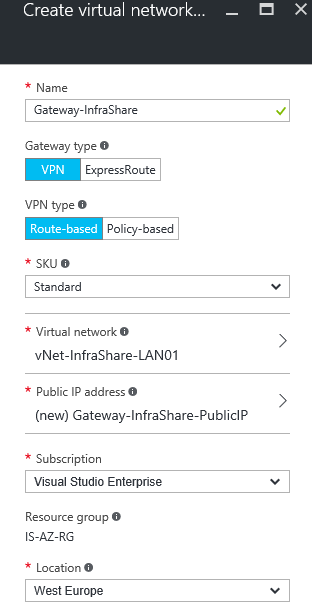
Note: This process can take a while (20-40 minutes), in the meanwhile we can proceed step 6 and 7.
Step 6: We need to create a new local network gateway, in here we define the on-premises subnets and the public IP of you on-premises IPsec gateway. So let’s fill in the name of the local network, enter the public IP of your on-premises IPsec gateway in the IP address field and configure all the local on-premises networks in Address space that you want to use in Azure and vice versa.

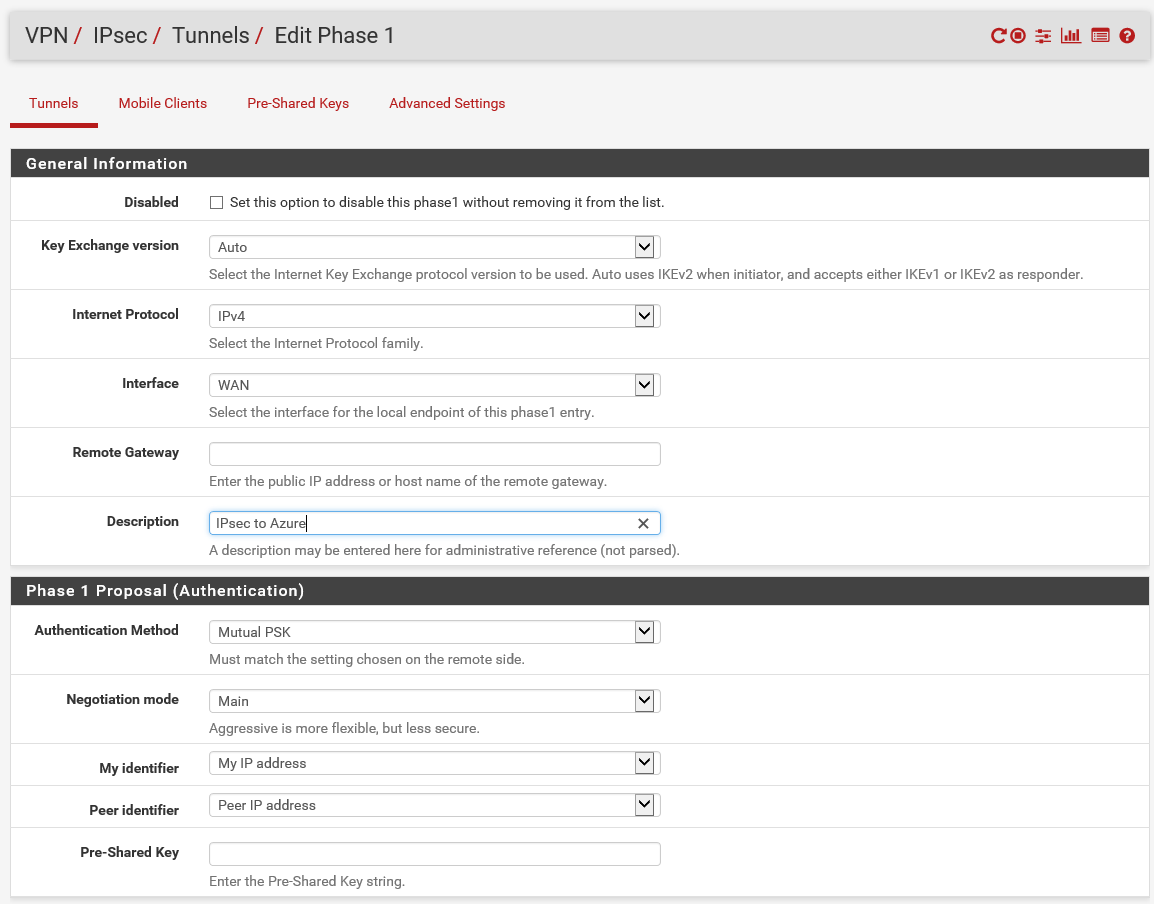
Step 5: Now we need to prepare the on-premises IPsec VPN device for Azure usage. For my homelab environment I use a pfsense (v2.3) device. So if you familiar with pfsense it’s very simple, first you need to configure the IPsec that is in the menu accessible at the VPN part.
Step 6: Setup the following general information settings. Where the Remote Gateway is the Azure Public IP address (from step 4). You can check this on the Virtual Gateway Essentials screen (after the creation of the Virtual Gateway is completed). Create an Pre-Shared key, you can use your own key generator or personal password for this one, save it at a secure place.
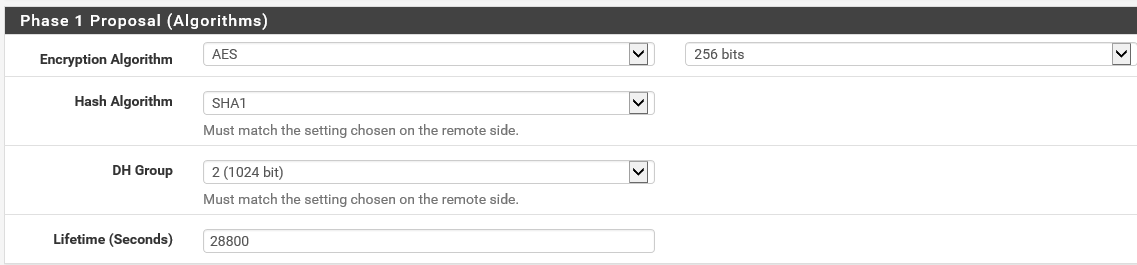
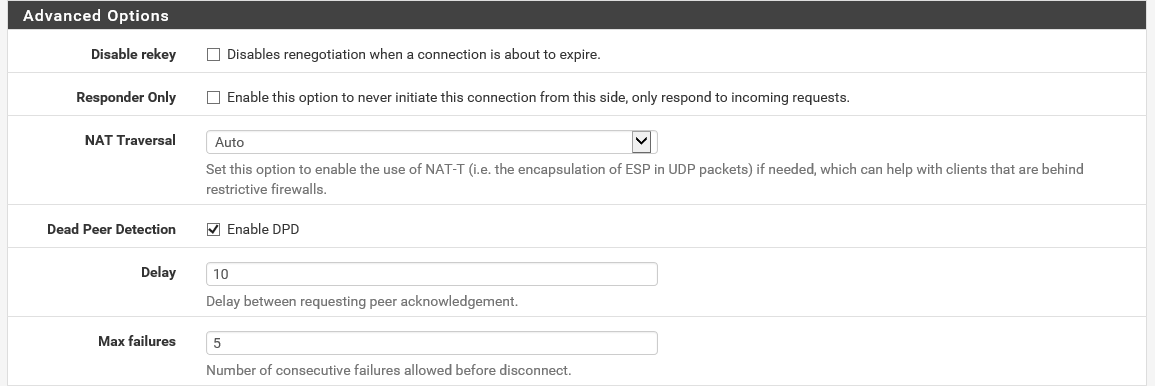
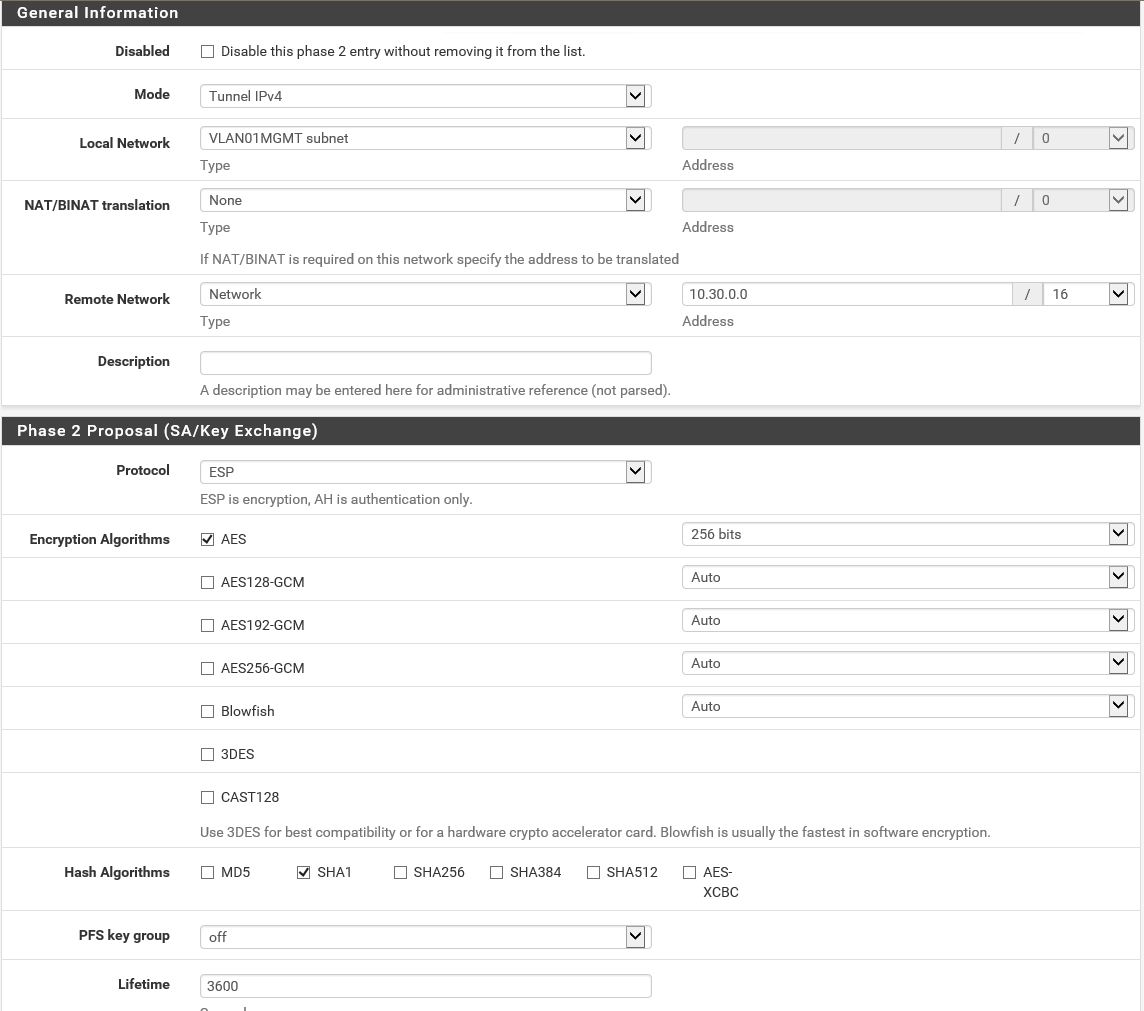
Step 7: Now we need to create the Phase 2 section, where all the local and remote connection settings will be needed. Fill in your local network, and the overall vNet subnet of Azure in the Remote Network settings. Set ESP as protocol and AES as algorithms – 256 bits.
Note: If you have more networks (VLANS), you can copy this phase 2 settings and update only the Local Network field and your good to go. If you add a new VLAN, you also need to update your Local Network Gateway in the Azure portal!
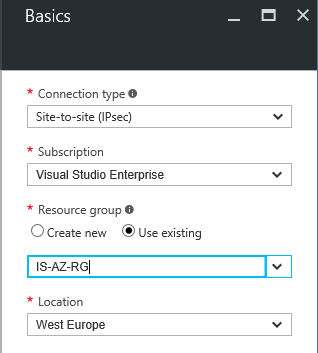
Step 8: After this step we need to go back to the Azure portal and need to create a new Connection. So add a Connection, as connection type Site-to-site (IPsec), choose a resource group and location and press Ok
Step 9: Now you need to make the connection between the earlier created vNet and Local Network Gateway. Give the connection a name like Organisation-IPsec-Connection and enter the same PSK (Pre Shared Key) as you did in step 6

Step 10: A connection summary will follow, if all the names are setup correctly you can click on the Ok button
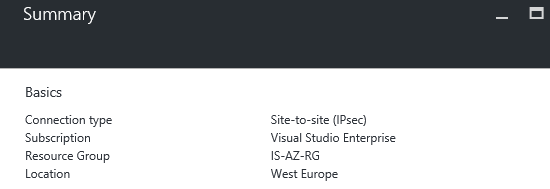
Step 11: If all the settings are setup correctly the connection is now established and the Connection status will be Connected
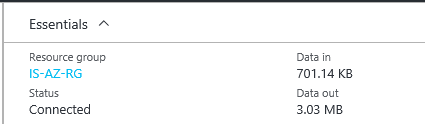
Note: If you already have a VM in Azure up and running in the new created vNet, you can try to ping or RDP the machine, it should be working!

Note: You also check the IPsec Status in pfsense (status menu->IPsec) if everything went well, the status ESTABLISHED needs to come around
Step 12: Go in the Azure Portal to the menu option Subscriptions and save your Azure Subscription ID to the clipboard or paste it in Notepad
![]()
Create an Azure ARM Host Connection
Step 13: Now we need to start the Citrix Studio (on-premises), go to Configuration->Hosting and choose add Connection and Resources
![]()
Step 14: Choose for Create a new Connection, with the type Microsoft Azure and paste your Azure Subscription ID into the text field Subscription ID. Give in a name for the Connection, like Azure Resource Manager Connection and click on Create New

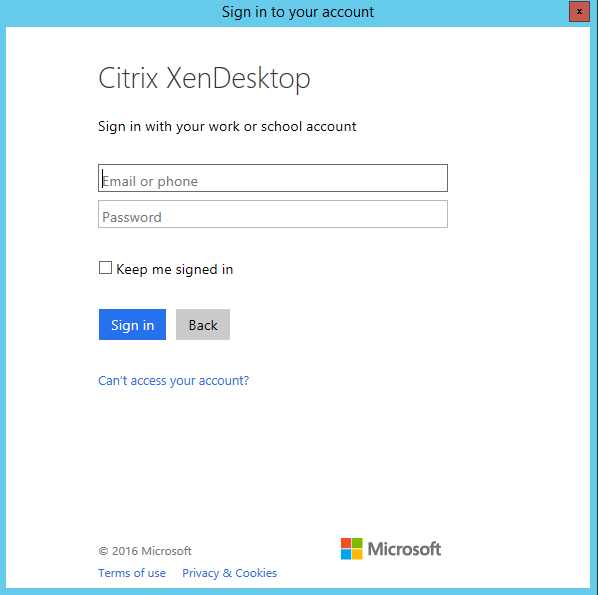
Step 15: Now the connection to the subscription needs to be proceeded, these actions need to be done by an (minimum of rights) Azure Service Administrator (or CO-Administator)
Step 16: After a successful sign in, XenDesktop needs to be approved on your Azure subscription. To go further, click on Accept
Details screen: Application published by: Citrix XenDesktop
You should grant permission only if you trust the application publisher with your data, and if you selected this application from a store or website you trust. Ask your admin if you’re not sure about granting permission.

Step 17: All the authorization settings are proceeded, please wait..

Step 18: If all steps went well a little Connected mark will show up, if so, click on the Next button
![]()
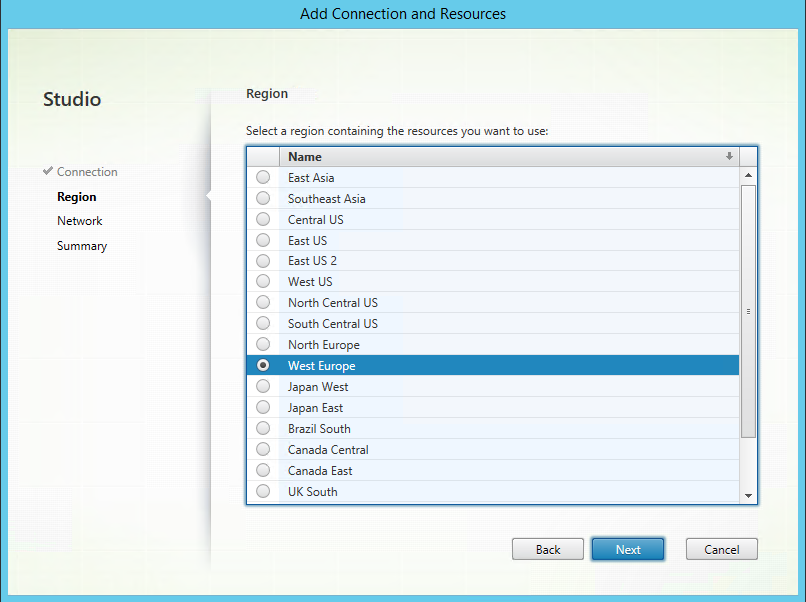
Step 19: Select your Azure region, this is the place where your future MCS Virtual Machines will be deployed to. In my case is select West Europe and click on Net
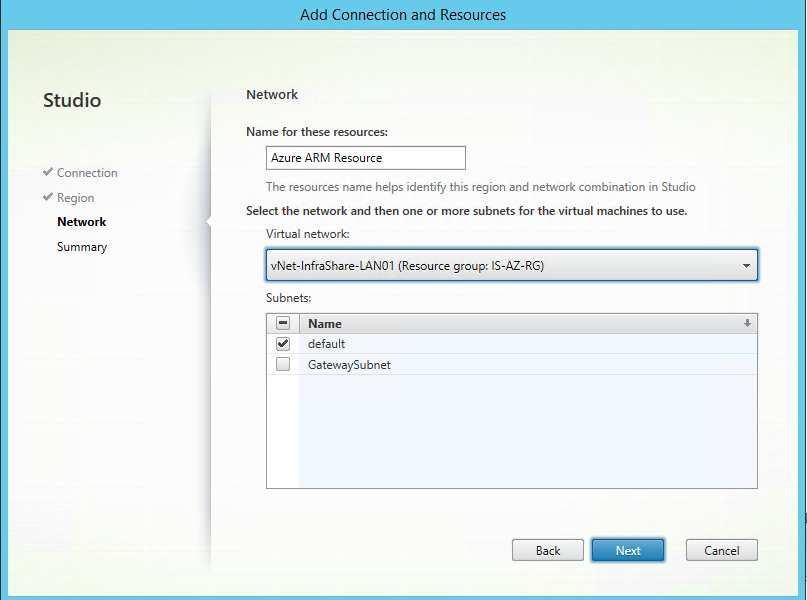
Step 20: Give in a name for the resource, like Azure ARM Resource. Setup the earlier created vNet, otherwise the Virtual Machine will not be part of the Site-to-Site IPsec VPN tunnel. Select the subnet, in my case it’s the default and click next
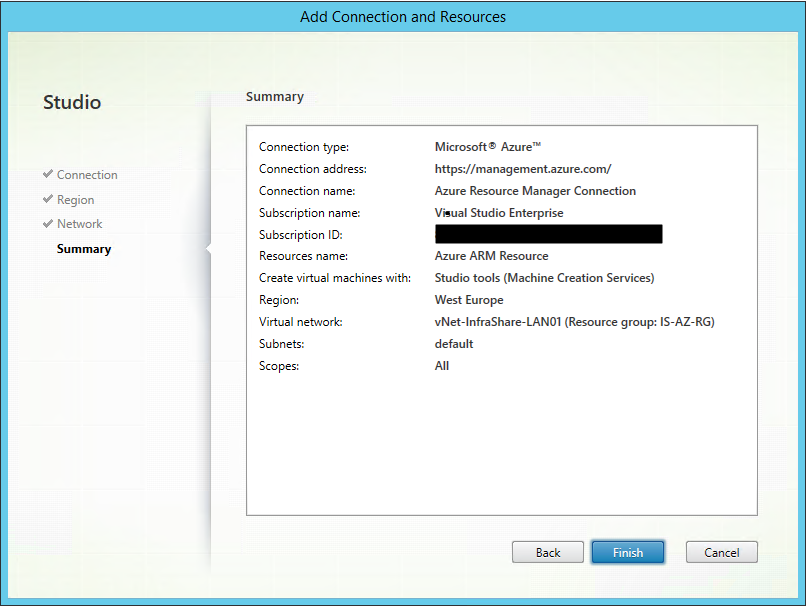
Step 21: A summary will follow, check all your settings and click Finish
Create a Virtual Machine in Azure Virtual Machine (XenApp / MCS)
Step 22: Go to the Azure marketplace and look for the Server OS that you want to use, I choose for Windows Server 2012 R2 Datacenter, but Windows Server 2016 is also supported from day 1!
Step 23: Setup the machine with all the personal settings. Name the machine something like Organisation-XA-MASTER01, if the steps are correct all green correction marks will follow
Note: If you choose for VM disk type SSD, you need to setup a premium storage account.

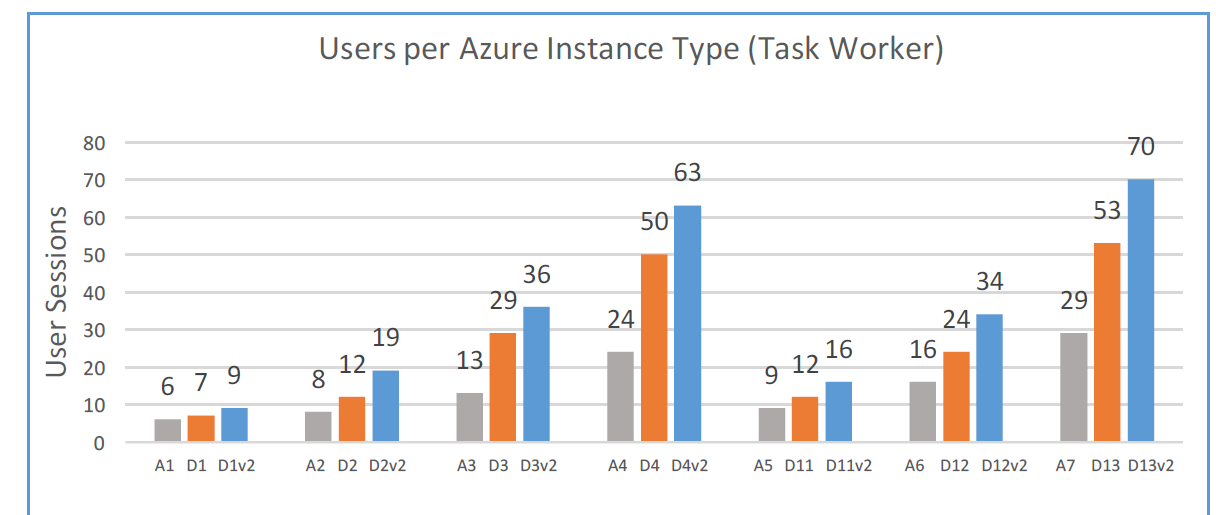
Step 24: Choose your (sku) virtual machine size, I choose for the DS12v2 machine
Note: Look at these benchmarks that are published earlier by Citrix making your choice easier..
Step 25: Setup your storage account (vhd location), setup your vNet, the subnet earlier created and NSG (Network Security Group), use the default settings of you only want to make RDP accessible from outside. Public IP is not needed; you have an IPsec VPN/internal IP that does that for you

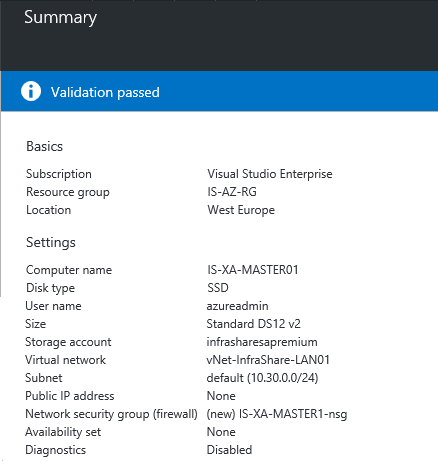
Step 25: A summary will follow, if the validation status is Passed, you can click on Ok and the deployment will be started
Step 26: After the Virtual Machine is deployed and is running you can RDP the machine by internal network address. Go to the machine settings, open the Network Interface tab and check what internal IP the machine received
Step 27: Join the server to your organization domain, restart the server and unpack\mount the ISO to the Virtual Machine and start the XenApp Deliver applications setup
Note: I suggest to unpack/unrar the ISO to a temp location, the ISO is unmounted after the reboot

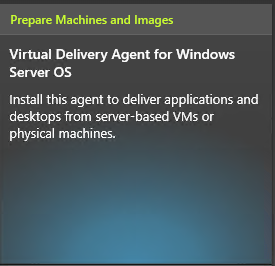
Step 28: Choose to install the Virtual Delivery Agent for Windows Server OS
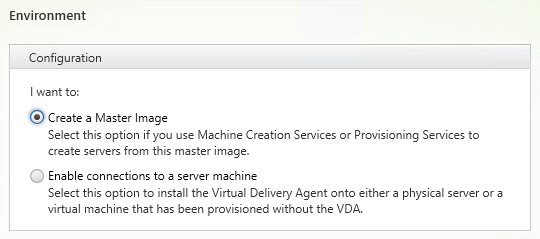
Step 29: Select Create a Master Image, only then the MCS image strategy will be usable, click next
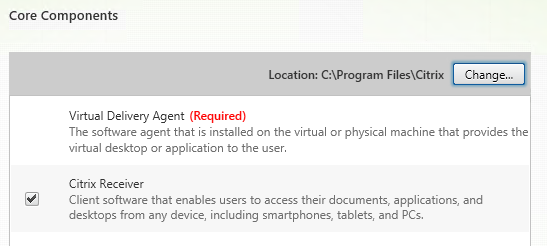
Step 30: Install all the Core Components, click next
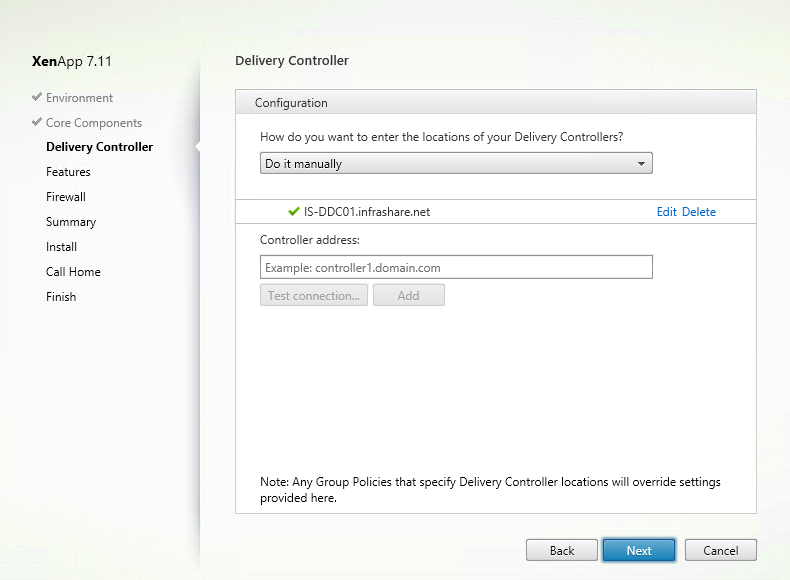
Step 31: Configure the Delivery Controller Setup, fill in the on-premises Brokering server FQDN name, test the connection and click Next of a green mark shows up. Click next
Step 32: Select the features that fits your own needs, for this tutorial I select all the features, click Next

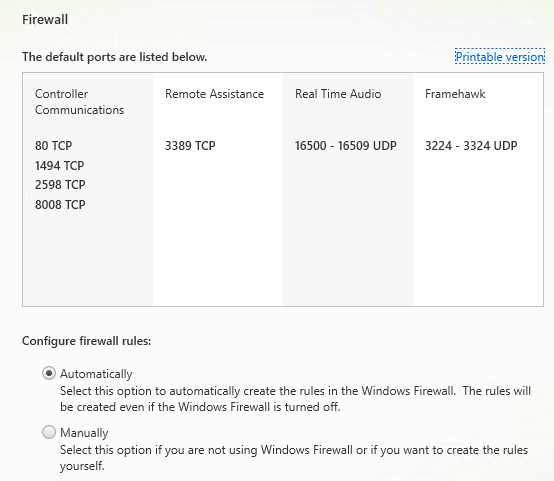
Step 33: Configure the Firewall rules automatically, click next
Step 34: A summary of the setup will follow, if all looks Ok then click Install
Note: A reboot will be required, so if you ‘’software’’ mounted the ISO, you need to remount it after the reboot.

Step 34: The setup will ask if you want to use the Citrix Call Home function, choose your own and click Next

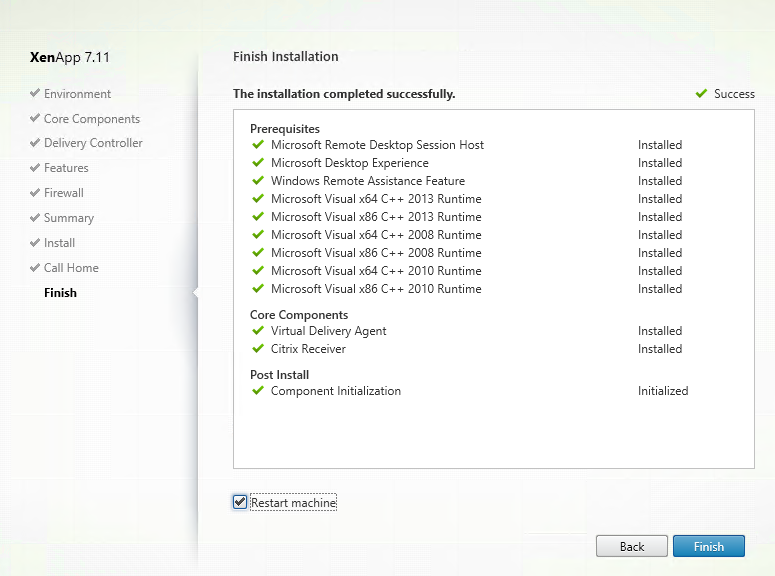
Step 35: The VDA setup is completed, one final reboot is needed to activate al components successful
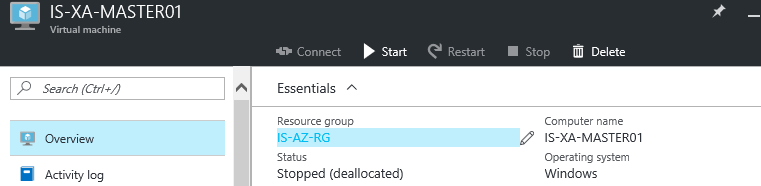
Step 36: Prepare the image to make it personal, install all your Company apps. Afterwards they will be usable in the Citrix Studio to a Published Application. You need to Stop the VM and wait till the status de-allocated will be presented in the Portal
Note: If the status de-allocated is not be presented quickly, you can force these PowerShell commands to enforce the procedure

Step 37: Next step is to switch back to the Citrix Studio and configure the MCS Machine Catalog based on this (Master) Machine
Create a Machine Catalog based on Azure Virtual Machine (MCS)
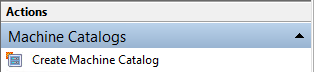
Step 37: Go to Machine Catalogs in the Citrix Studio and choose for Create Machine Catalog
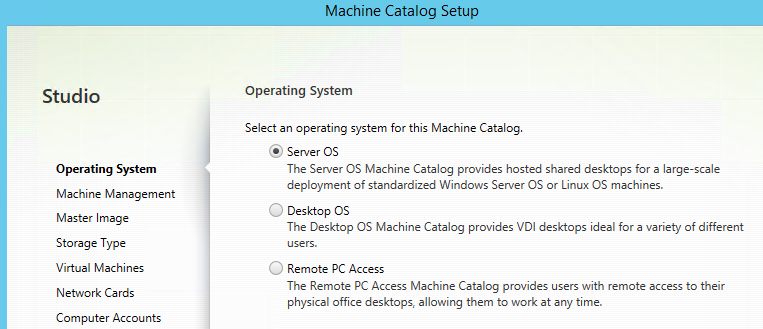
Step 38: Choose Server OS for XenApp or Desktop OS for XenDesktop, for this tutorial I choose Server OS, click Next
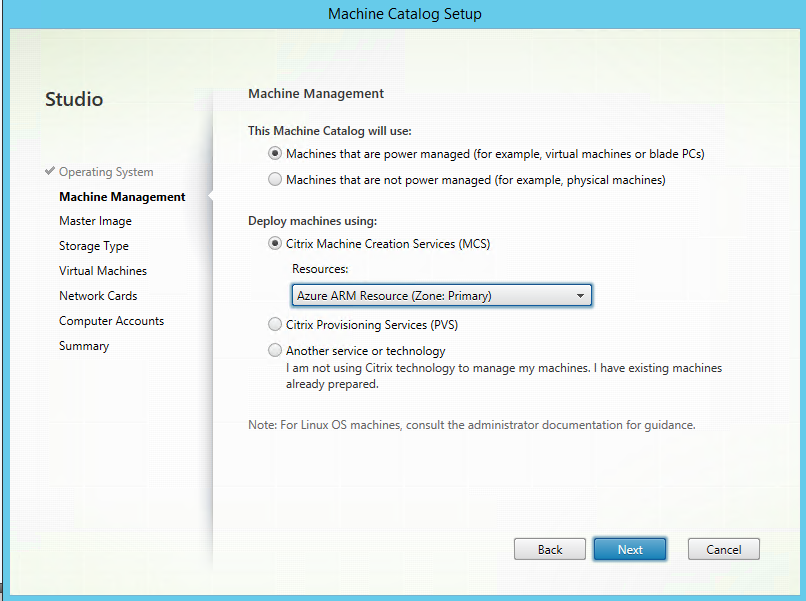
Step 39: Select the Azure Resource that you configured before, click on Next
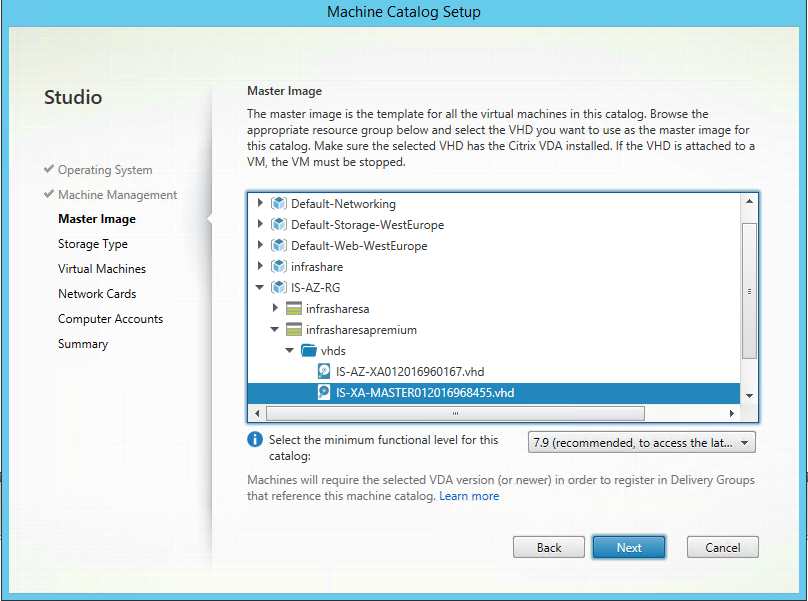
Step 40: Open up the Resource Group of the Machine, open the Storage account and select the Machine VHD. Select the latest available VDA version, in this case I select 7.9 and click Next
Step 41: Select if you want to use normal or SSD (premium) storage for deployment, click next

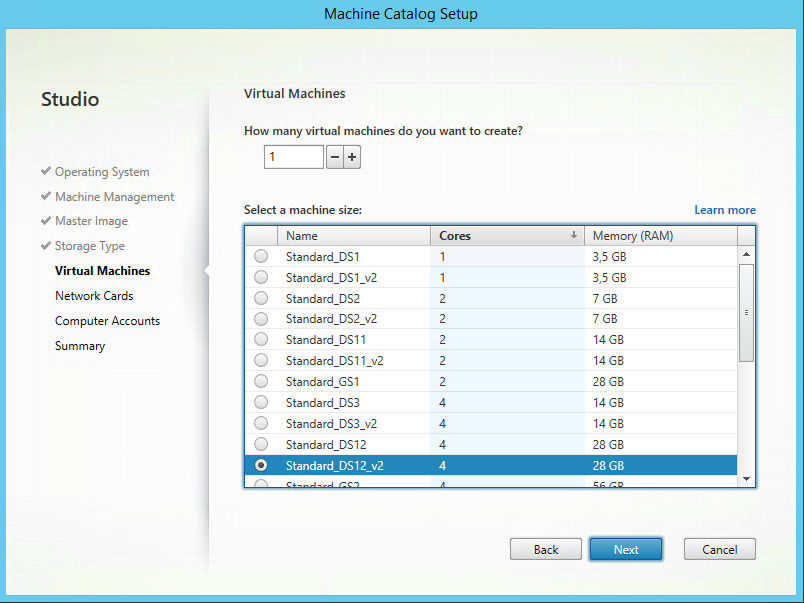
Step 42: Select the default (from step 24) Machine size (SKU) for enrollment, if you want to add more XenApp servers just increase the value of “how many virtual..’’. Click Next
Step 43:Select the subnet where the must be in, click Next
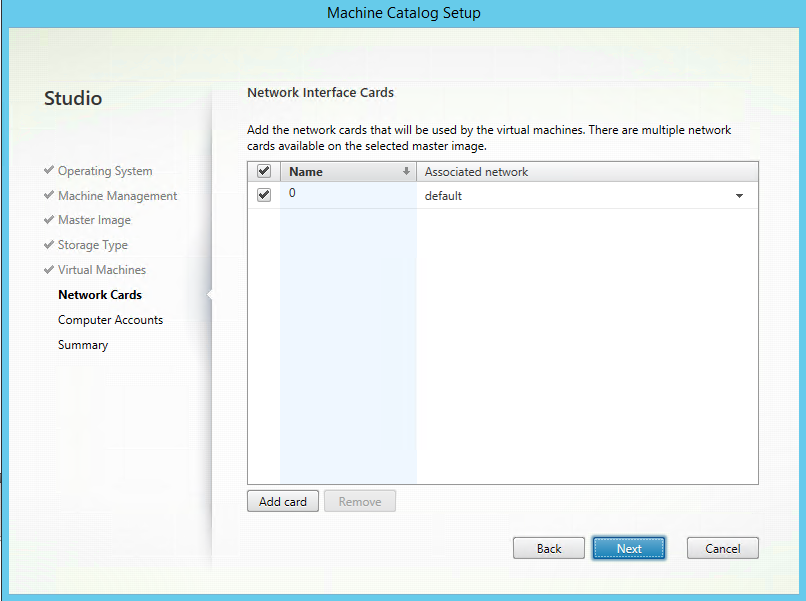
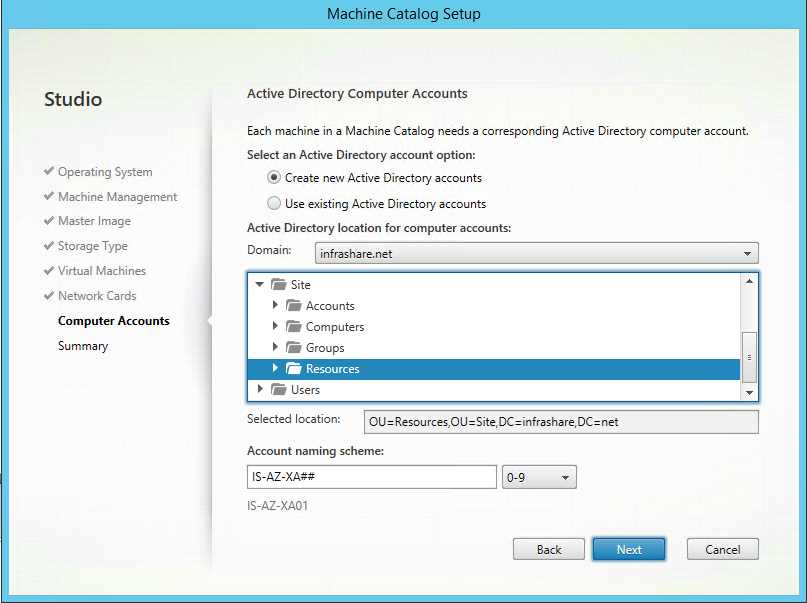
Step 44: Choose your own naming convention for the computer names, and select the OU location, click Next
Step 45: Create the Machine Catalog, click Finish
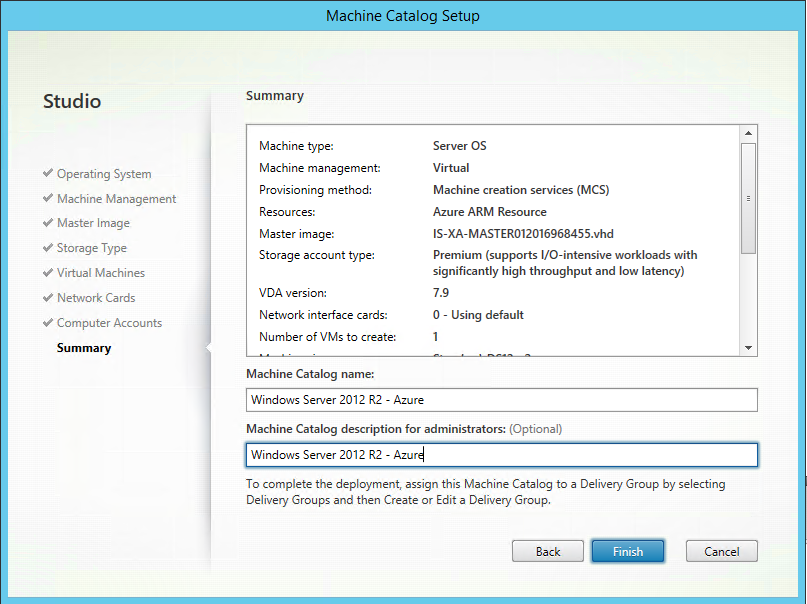
Step 46: The deployment process will start; this can take a while (like 10-20 minutes)

Note: The machines that are created in Azure will be prepared, a custom resource group will be created cannot be customized
![]()
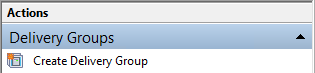
Step 47: All the core preparation steps are done; the final step is to create a Delivery Group based on the Azure MCS deployment. So the next step is to create a Delivery Group in the Citrix Studio
Note: The Machine Catalog process needs to be finished before going to step 47
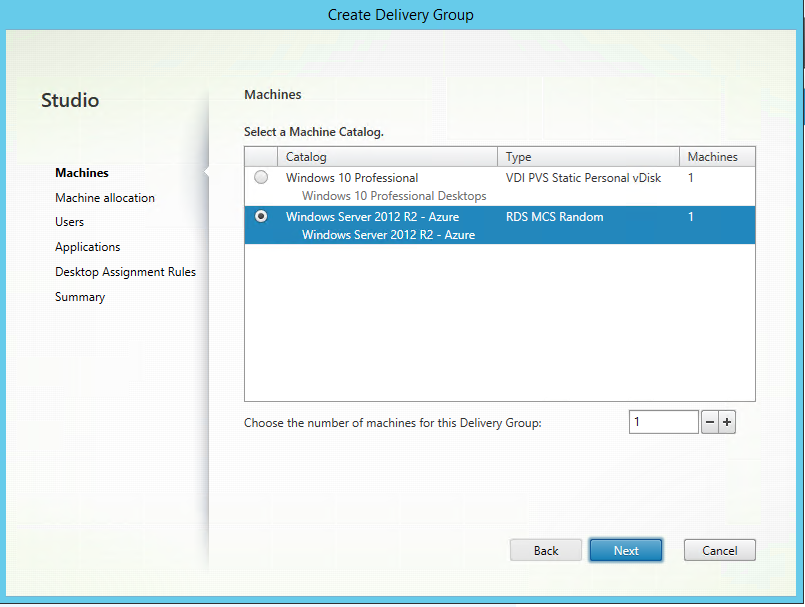
Step 48: Choose the just created Machine Catalog, and select the number of machines that you created before and add these to the new Delivery Group
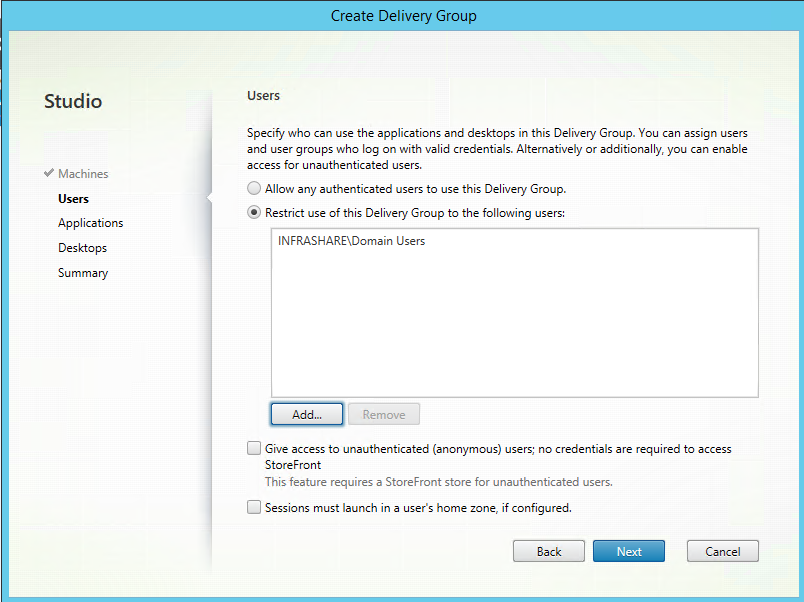
Step 49: Choose the group of users that need to have access to this XenApp Desktop and Published Applications, for the example take Domain Users and click next
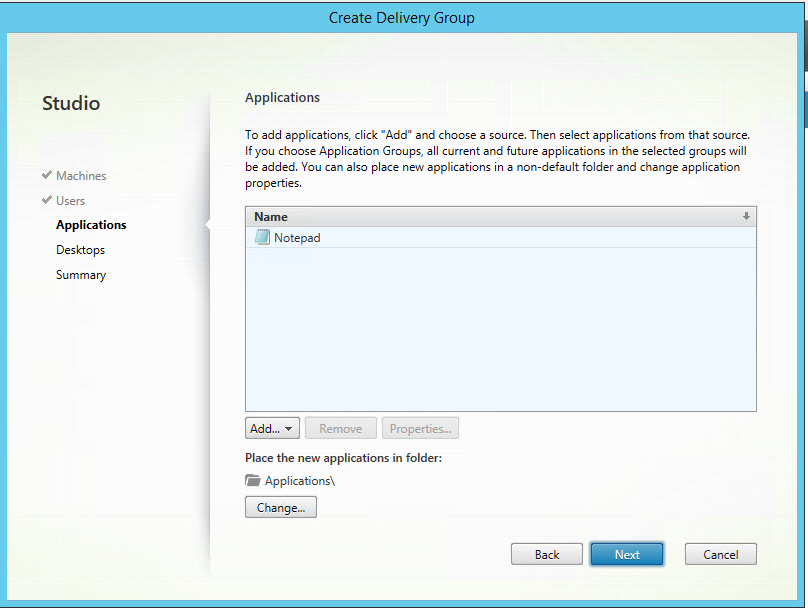
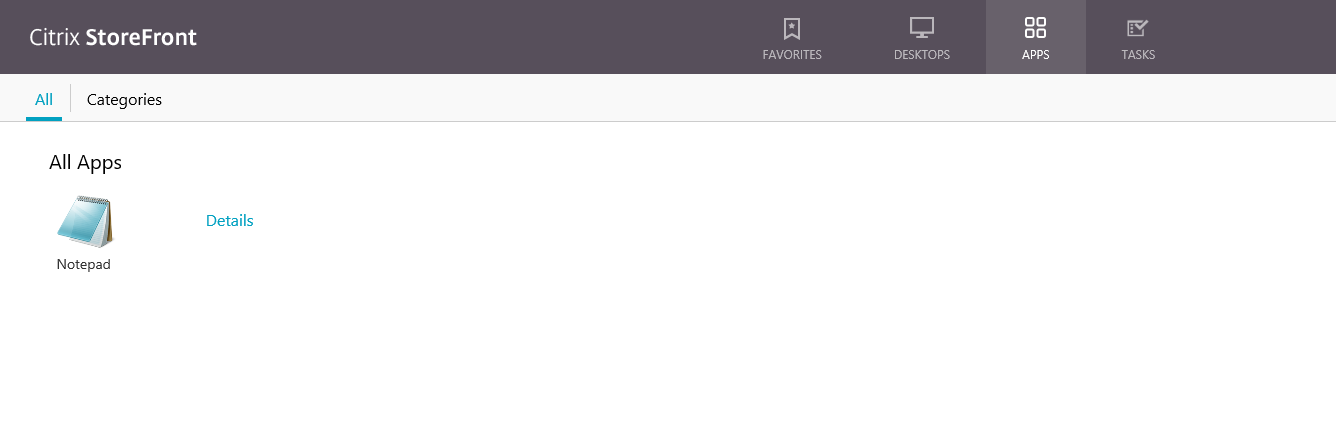
Step 50: If you want to use this XenApp environment for Published Application you need click on the add button, choose your option to search in the Start Menu for programs, or search to it manually. I choose for the Start Menu option

Note: One of the advances of XenApp is that it is a Multi Session environment, you can use this to configure Published Application and Desktops as well
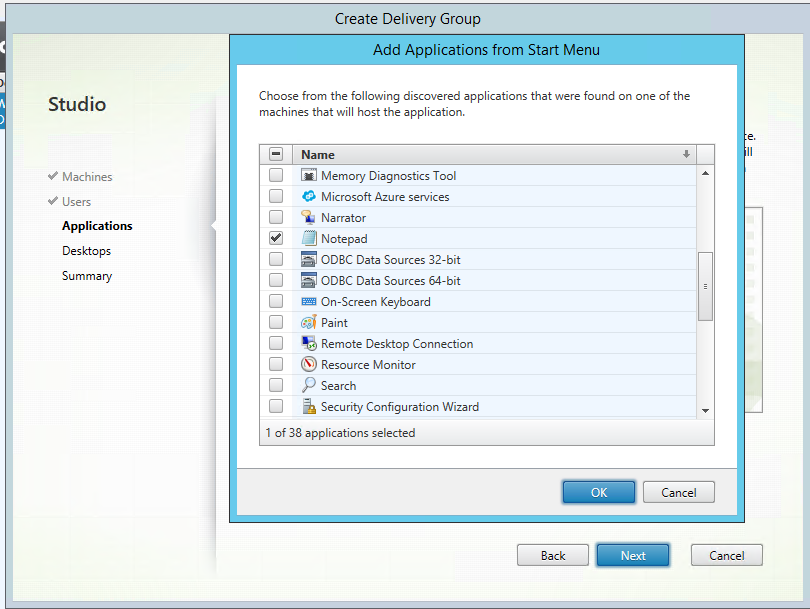
Step 51: An inventory will get all the installed programs that have an entry in the Start Menu section, the machine must be turned on to get results back. For this article I choose Notepad to Publish, and click Ok
Note: If no Apps are presented, reboot your Azure VM to get registered again
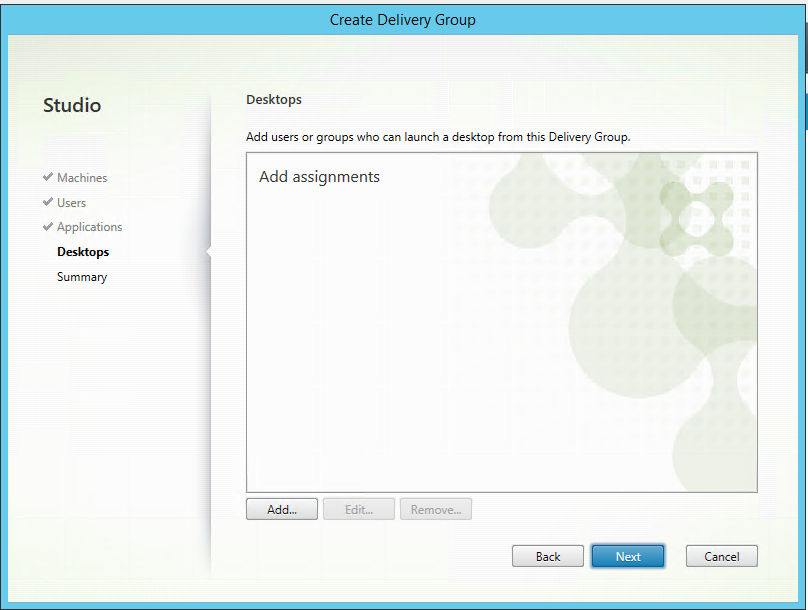
Step 52: Click on the next button to go to the Desktops option
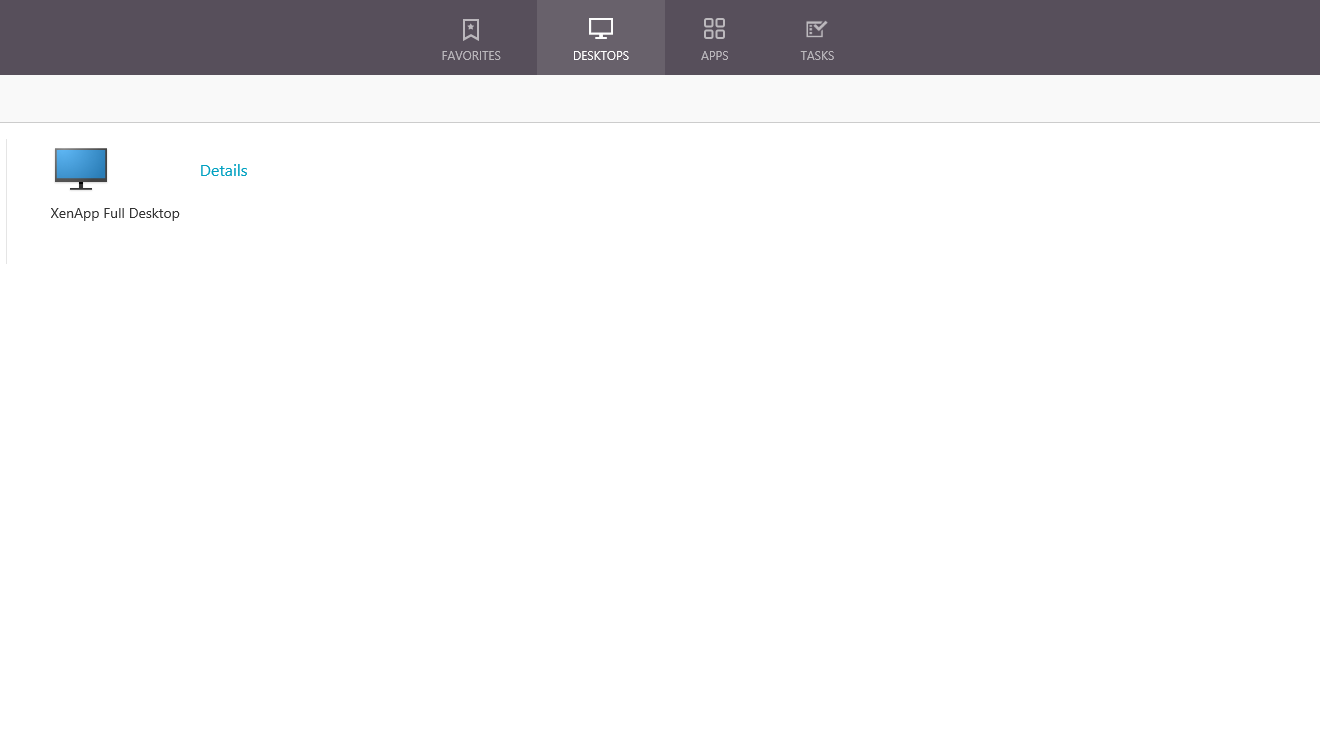
Step 53: This is the XenApp Desktops part, if you activate this option, users will be able to perform a fully RDSH session to this server in Azure, for this article I activate this option, to do so, I click on the Add button
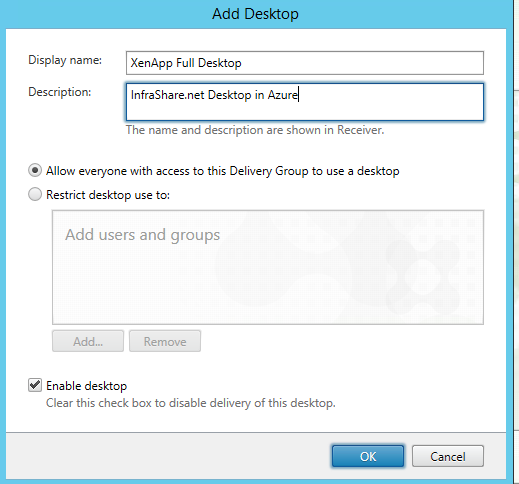
Step 54: Now we need to setup a Display name for the Desktop, this name will be presented to your user’s StoreFront page (on the Desktop part). The description will be visible as mouse over test field. The next other option is to choose you want to relay on the earlier configured access group, or do you want to create a separated group for Accessing the Desktop environment, I choose Allow Everyone with Access to this Delivery Group.. and click on the Ok button
Step 55: Verify the settings, Click on Next

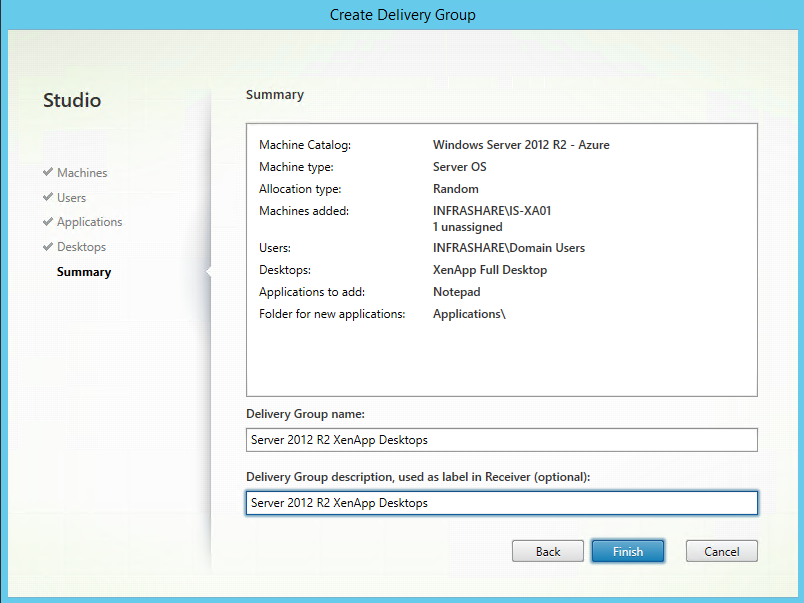
Step 56: A summery of all the steps is presented.The last configuration step is to fill in the Delivery Group Name, if you are using the receiver as presentation method to your users they will be seeing the Description name in their Receiver list to add the Application and Desktops. Click on Finish
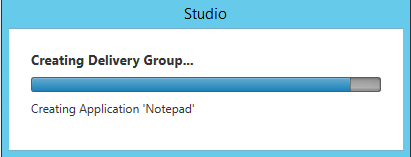
Step 55: The configuration process is proceeded…
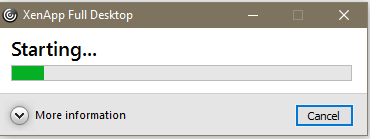
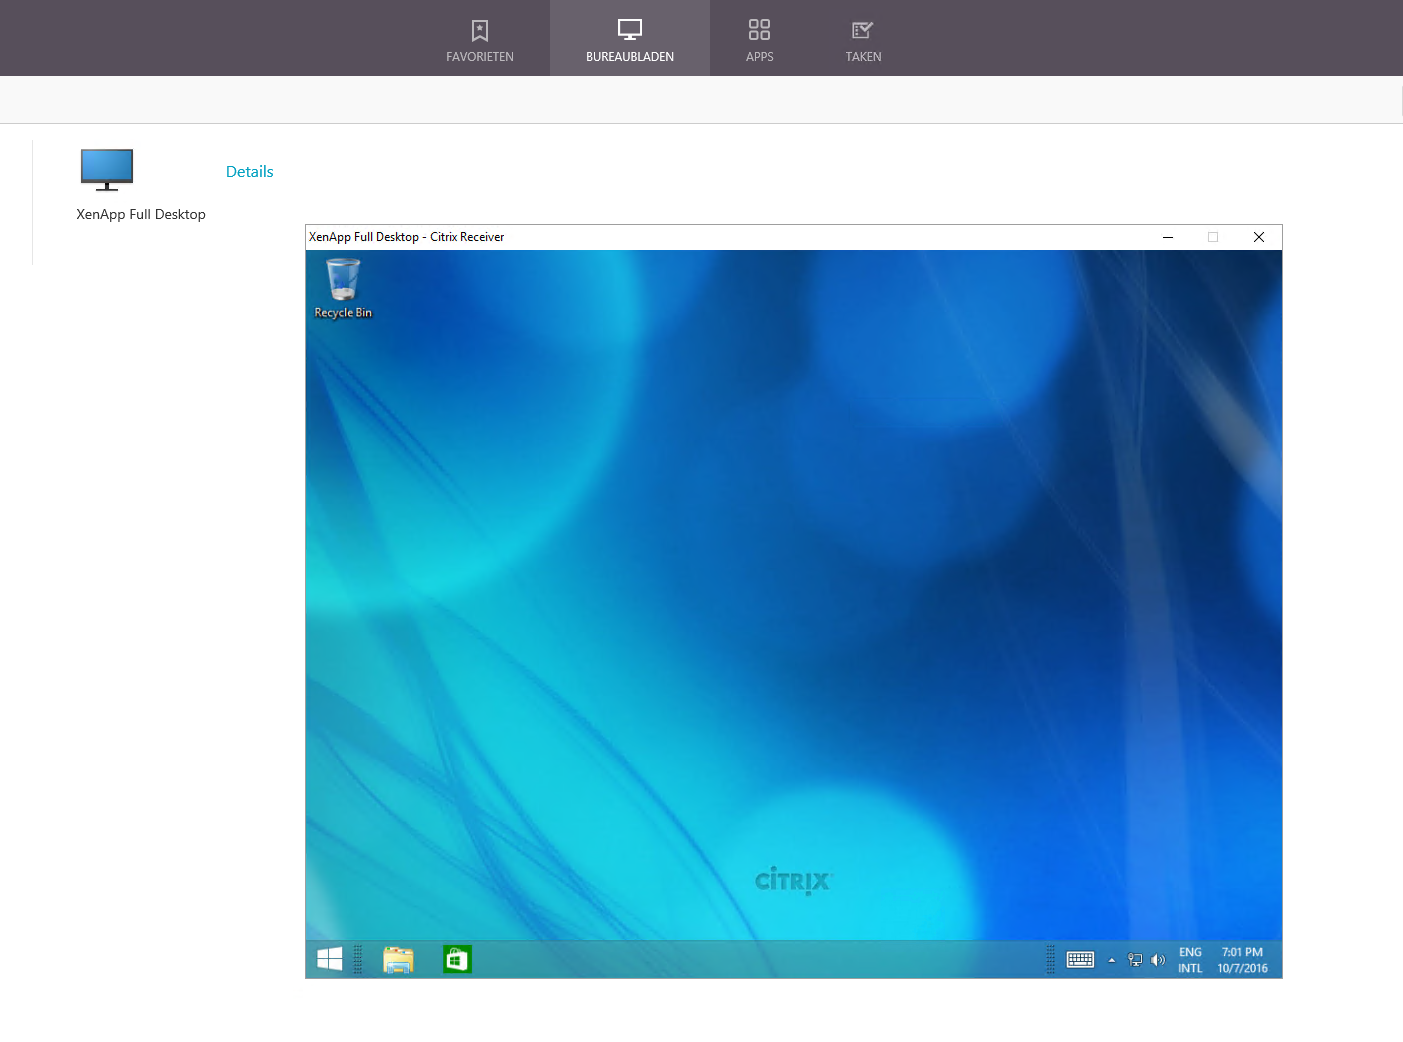
Step 56: Browse to your StoreFront page, and log on as one user that is a member of one of the Application or Desktops groups. Your XenApp Desktop and Published Application will be presented to you
Step 57: Click on these newly options and check if everything is starting well and your good to go!