
Back-up your Citrix NetScaler VPX with NetScaler Management & Analytics System (MAS)


Back in the days, the only official method to backup your Citrix NetScaler devices was to use Citrix Command Center. Since Citrix released their NetScaler MAS (Management & Analytics System) in June 30, 2016, there was a new kid in town that can do the same, and even more… It combines the NetScaler Insight, Control Center and Citrix Command Center into 1 NetScaler product.
NetScaler MAS is a centralized management, orchestration and network analytics software appliance. It provides a simple way to manage all of your NetScaler Appliances through a central simplified dashboard. The dashboard also analyzes the existing configuration of your NetScaler and advice you if it’s the recommended setting or if it’s not.
In this article I will describe in a step-by-step installation how you can do the initial setup of a NetScaler MAS, based on a VMware hypervisor infrastructure and the setup of an automatic ‘’scheduled’’ backup of your NetScaler VPX.
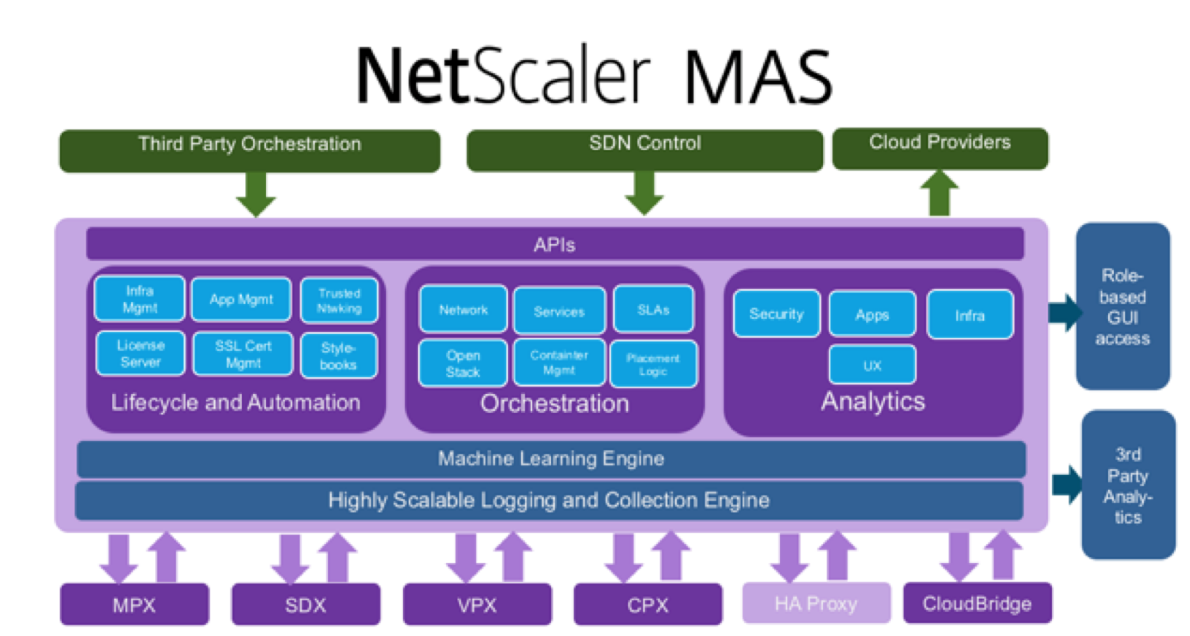
Some other advanced features of MAS are:
- SSL certificate management to minimize access disruptions
- Automated provisioning of NetScaler services
- Support High Availability (2 or more nodes)
- Application-centric configuration templates to simplify application deployment
- Integrates with third party orchestration platforms (VMware, Docker, Cisco etc.)
- Scheduling of firmware upgrades with no downtime (HA required)
- Support for multi-cloud and hybrid environments
- Comprehensive role-based access to different groups and users
- Logging and analytics to provide actionable insights
- Citrix Director Insight integration (XenApp/Desktop 7.11 or higher)
For more detailed information, please read the official data sheet by Citrix
Supported hypervisors
- XenServer 5.6 or later
- ESXi 4.1 or later
- Hyper-V
- KVM
Licensing
NetScaler MAS is free for 30 vServers. Above 30 VIPs will require a subscription license. Instance packs of VIPs of 100 must be purchased if you exceed this value. You can request a trial license here.
More license information, please check this page
Technical requirements
- NetScaler version 10.1 or higher
- MAS server need to have access to the NetScaler management network
System requirements
- 8 GB RAM
- 4 vCPU (8 recommended)
- 120 GB storage (500 GB recommended)
- 1 Network interface (minimal of 100 Mbps troughput)
Deploy the NetScaler MAS template in VMware
Pre-step: First we need to download the MAS template file, in my case it will be the .ovf VMware ESX template file, from the Citrix website.
Note: At the moment of writing the latest release of NetScaler MAS Release is (Feature Phase) 11.1 Build 50.10

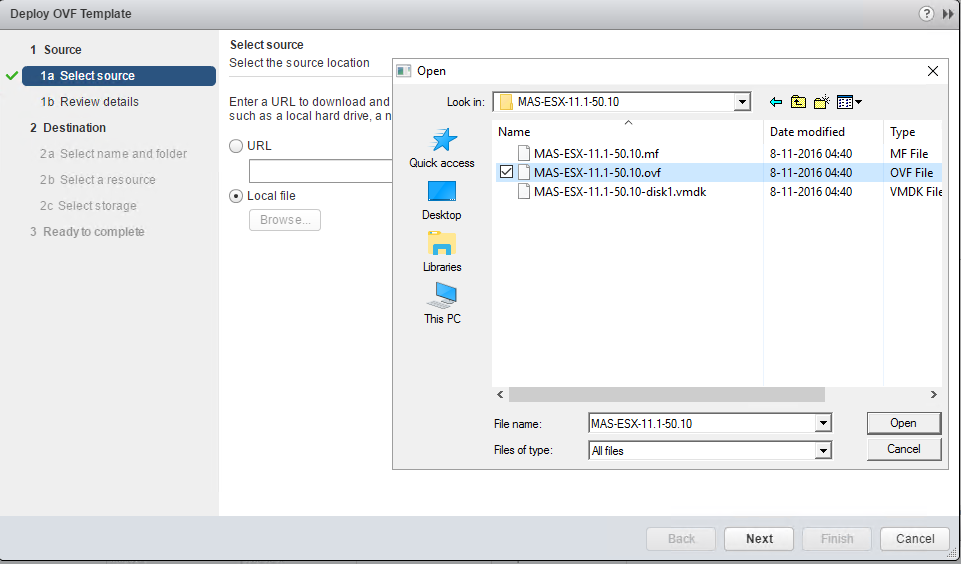
Step 1: Add the template file to your VMware environment by logging in to your vCenter Web Client and choose for Deploy OVF Template

Step 2: Search for the .OVF file and click on Open and Next
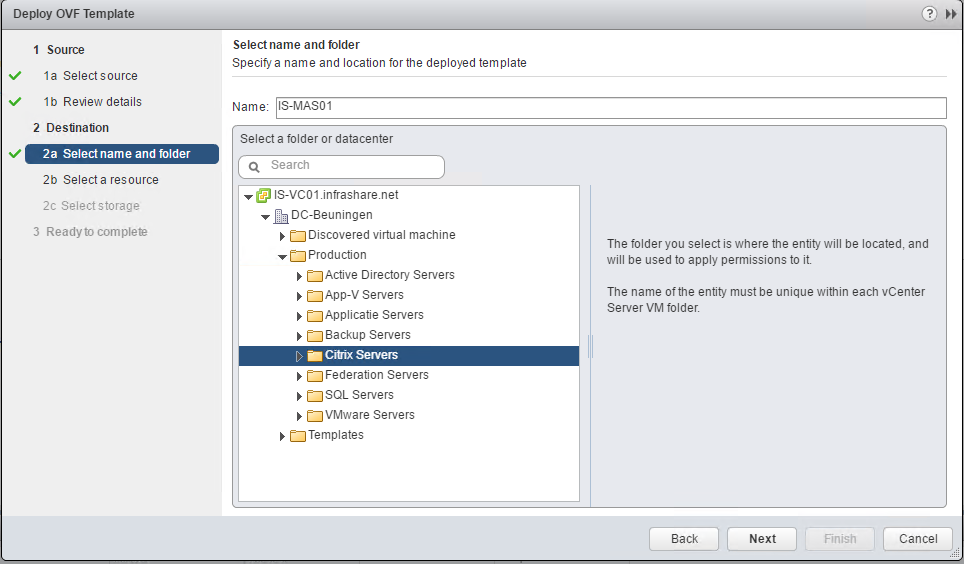
Step 3: Give in a Virtual Machine Name and select a folder, click next
Step 4: Select a host, click Next

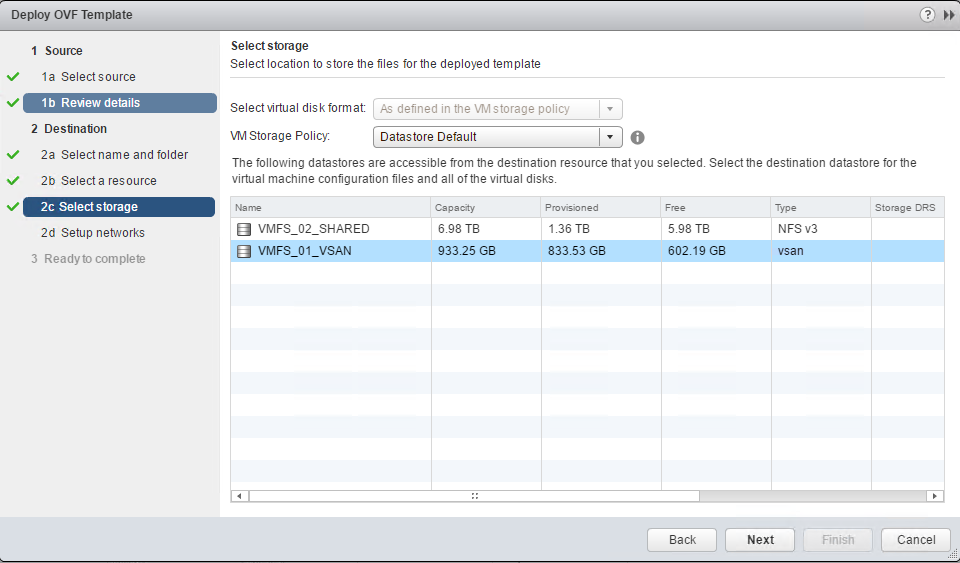
Step 5: Select a Datastore, click Next
Step 6: Select a vSwitch Network, click Finish to start the deployment
Note: Your MAS server needs to have access to the NetScaler management network

Step 7: Start the virtual machine and open the console
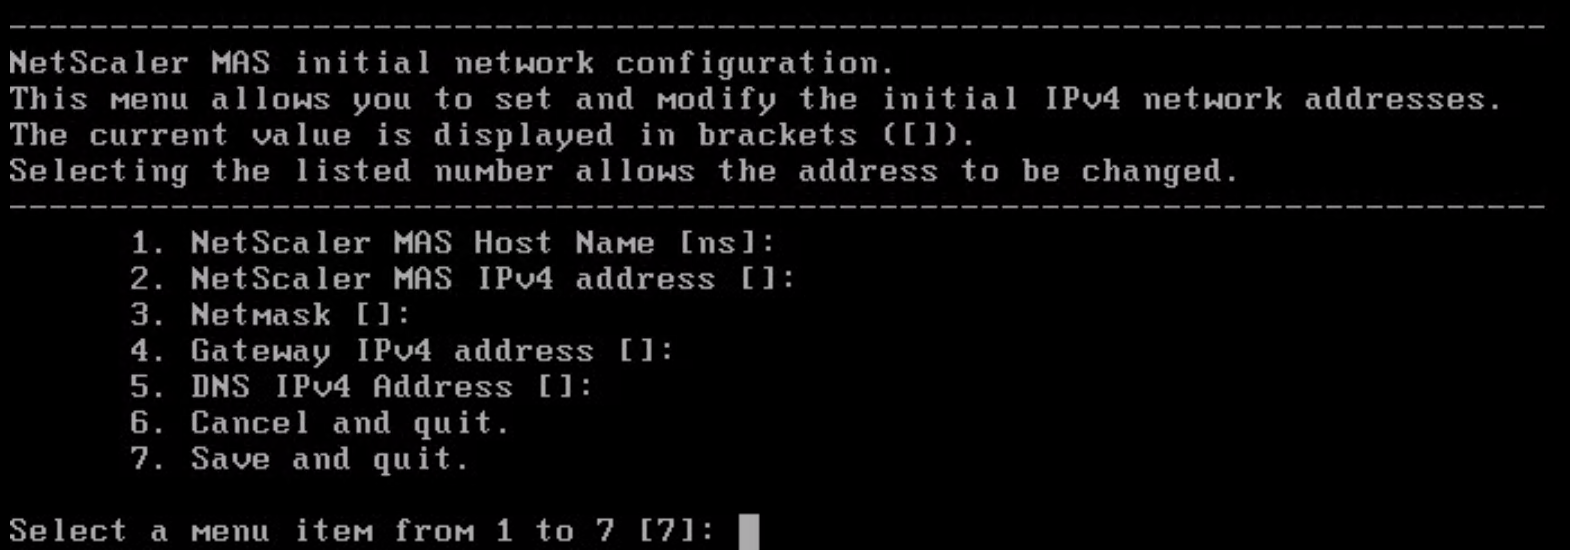
Step 8: Give in the proper information, by pressing the numbers 1 to 5
NetScaler MAS Host Name: Your MAS Hostname
NetScaler MAS IPv4 address: The IP of the MAS server
Netmask: Your subnet mask of the management network
Gateway IPv4 addres: Your management network gateway address
DNS IPv4 Address: Your internal DNS address

Step 9: Press 7 to Save the configuration
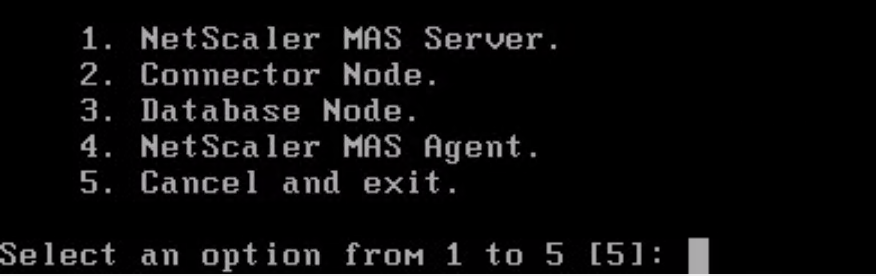
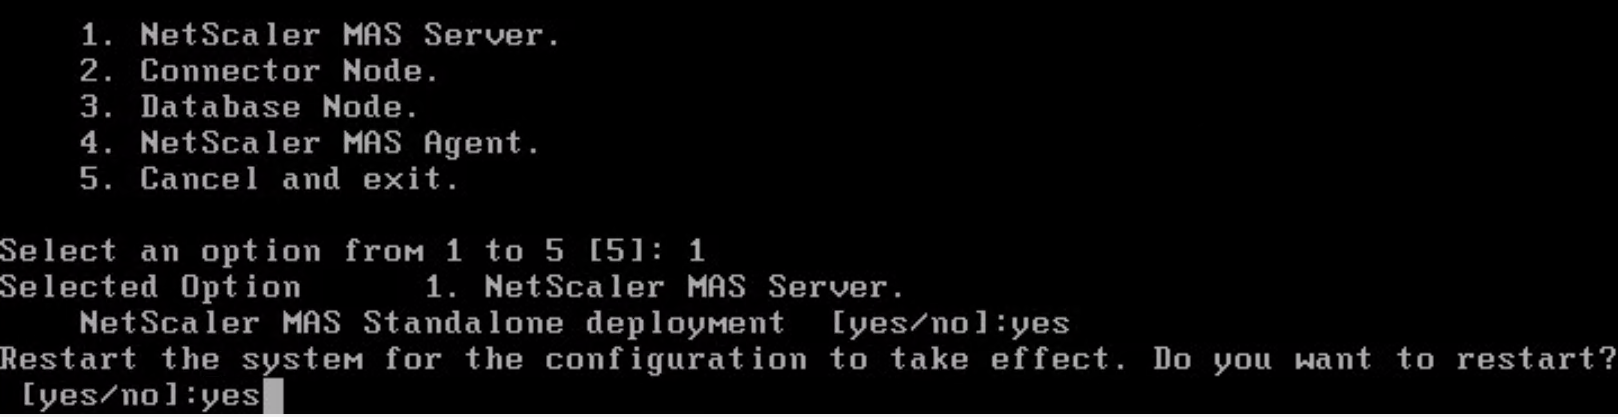
Step 10: Choose for Option 1, and press enter
Step 11: I choose for a standalone version, so type in yes, press enter

Step 12: Type in yes to restart the System
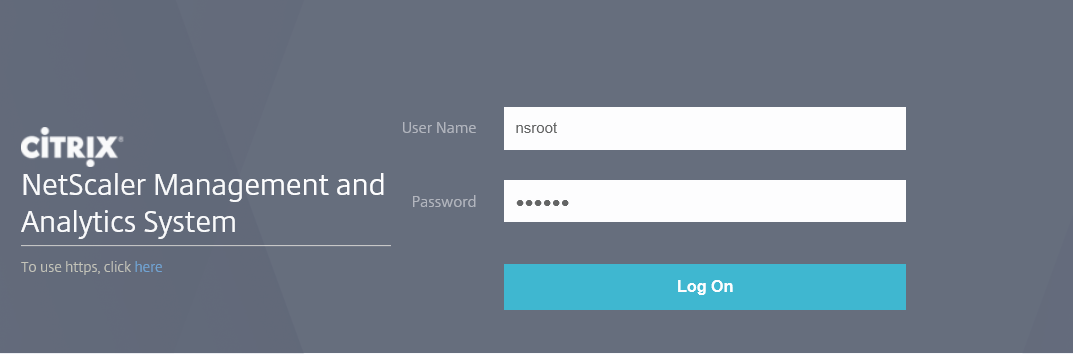
Step 13: Open a web browser and go to your MAS servers IP address and Log in with the default username: nsroot / password: nsroot
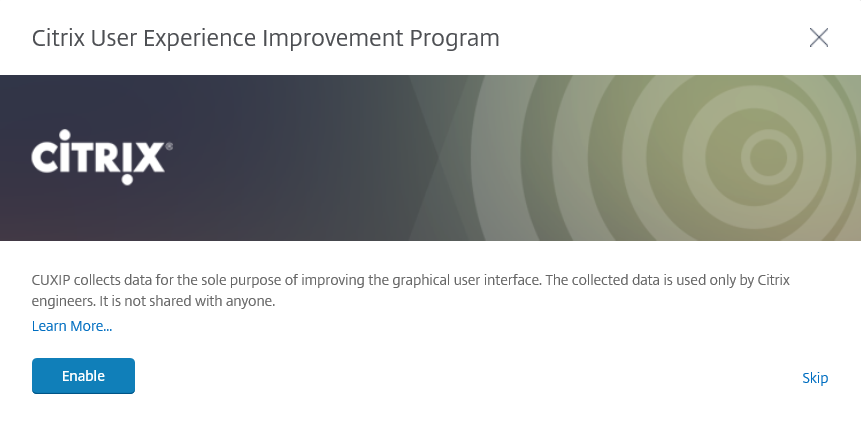
Step 14: Skip the User Experience Improvement Program, by clicking on Skip
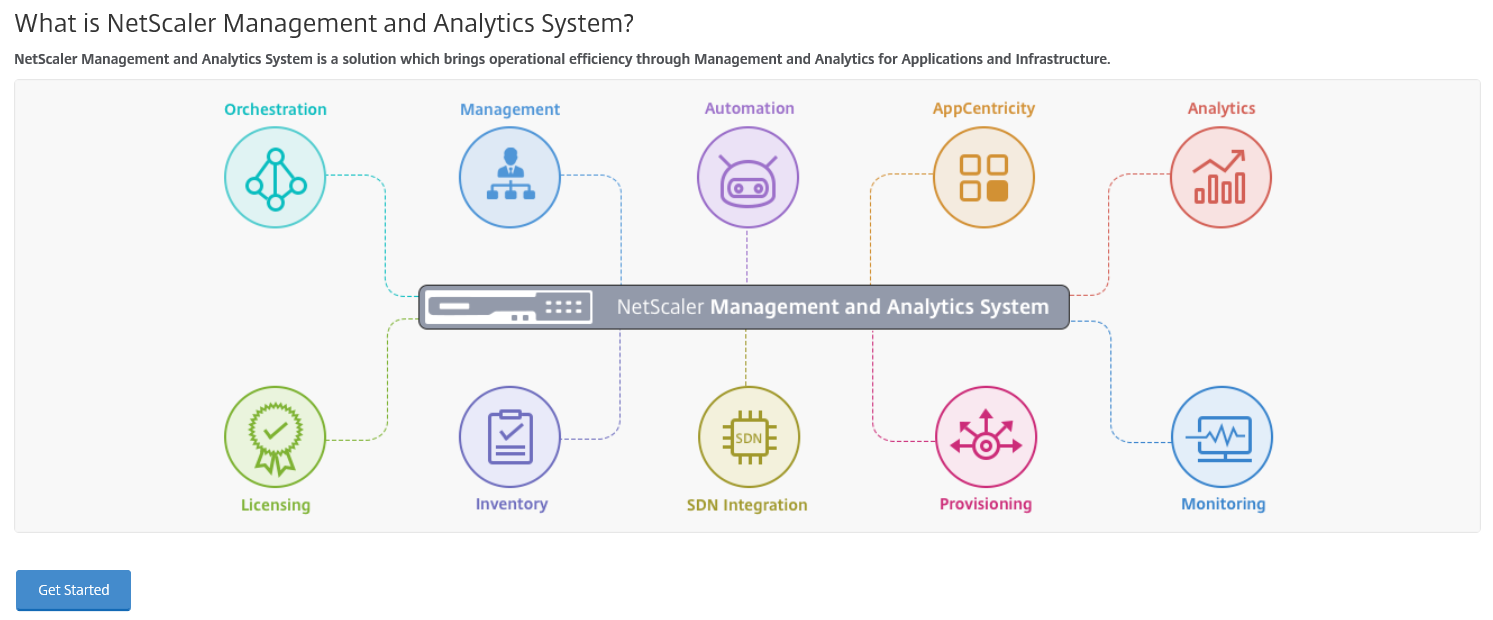
Step 15: Click on the Get Started button
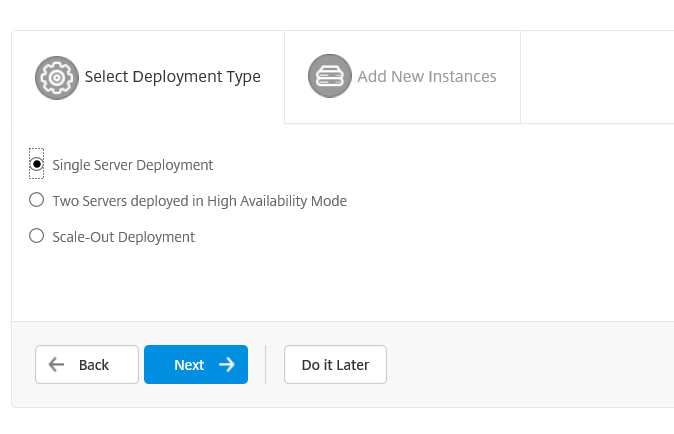
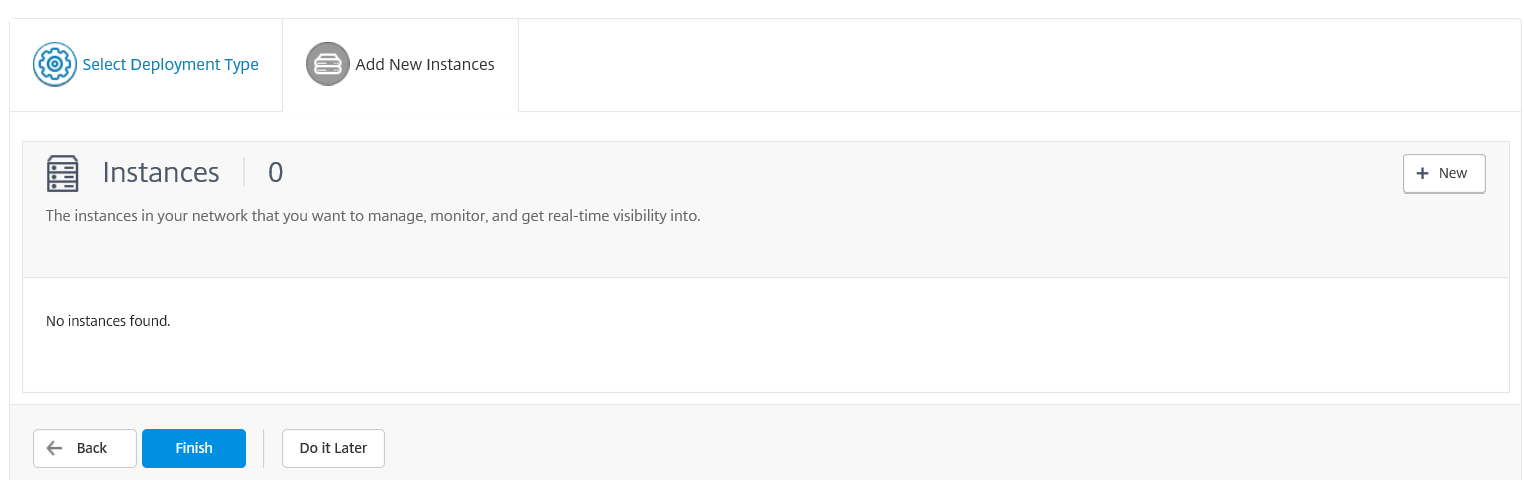
Step 16: Choose for Single Server Deployment, click on Next
Note: If you want to install the MAS in a HA setup, then you must choose for Add New Instances
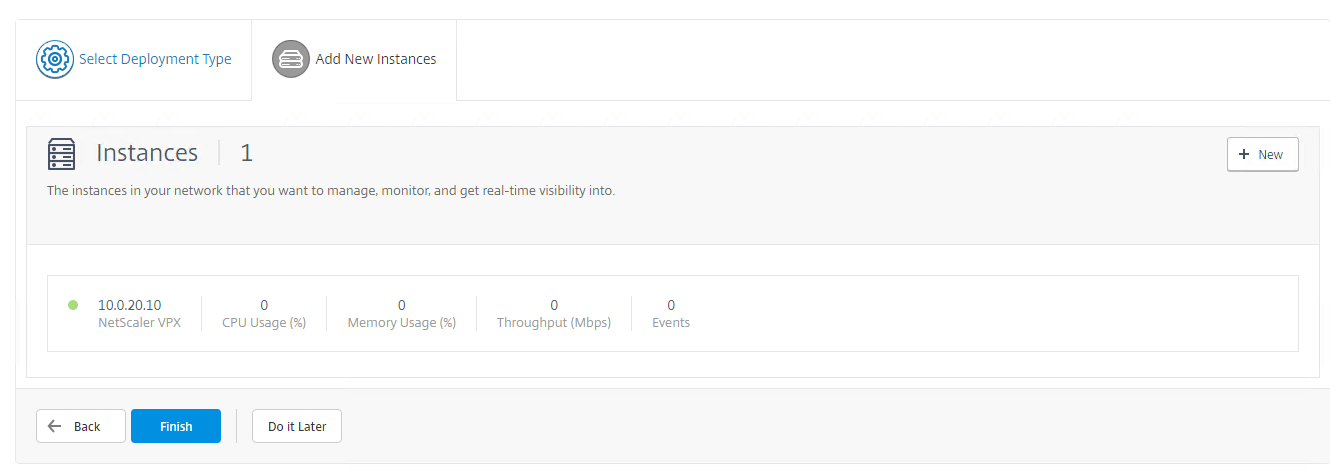
Step 17: Add your NetScaler device, by clicking the + New button
Step 18: Add the IP Address of your NetScaler to the IP Address section, and after click on the Prencil button ![]() for providing the account password
for providing the account password
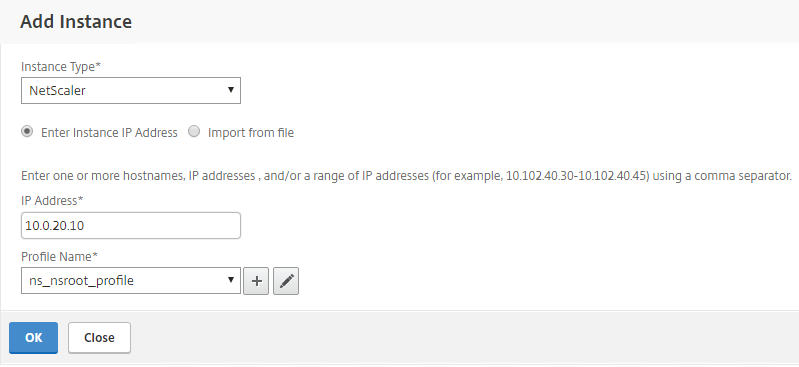
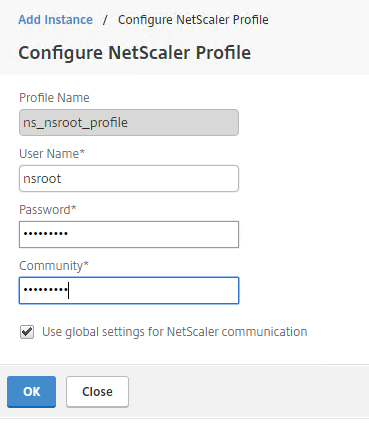
Step 19: Add the username (default nsroot) and password to connect to your NetScaler device, that you want to monitor and add your SNMP Community Password, when finished, click Ok
Note: If your NetScaler device is only responsive on HTTP instead of HTTPS, then change this setting by un-check the Use Global settings for NetScaler communication setting
Step 20: Click the Ok Button
The device is being added…
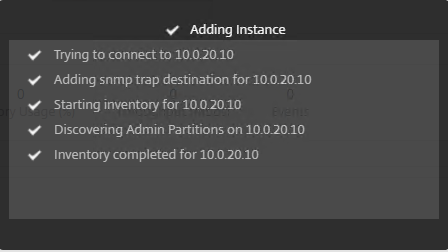
Step 21: After the discovery process, all the instances must be visible, if so, Click on the Finish button
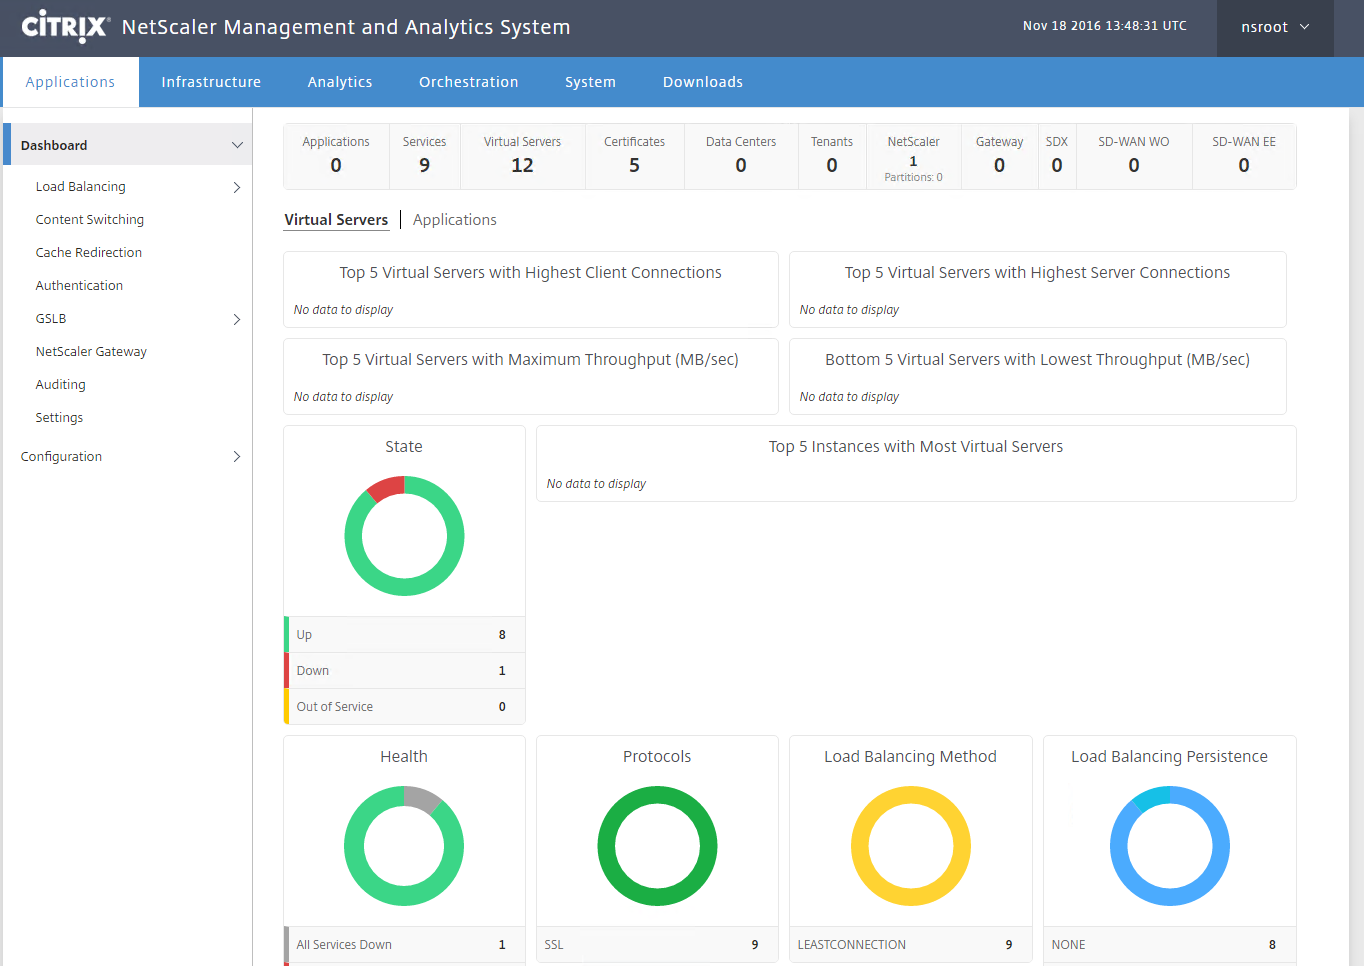
Step 22: The Dashboard page of NetScaler MAS
Change nsroot password
Step 23: First change the default nsroot password by going to System->User Administration->Users, tick on the checkbox next to nsroot, click on edit and give in a secure password, click on Ok

Upload your license file
Step 24: If you have a MAS license / or received a trial license, you need to upload this first to extend the default (free) 30 Virtual server limit. Go in the menu to Infrastructure and choose for Licenses
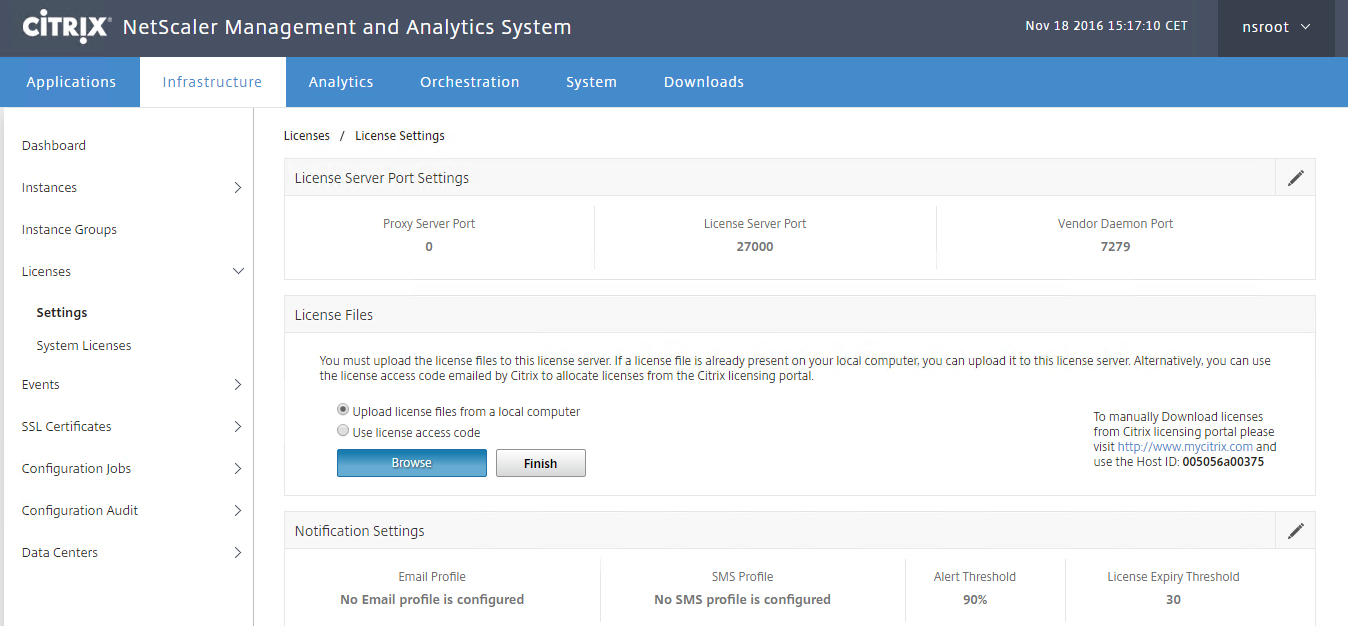
Step 25: Click on Browse and search for the license file, click on Finish
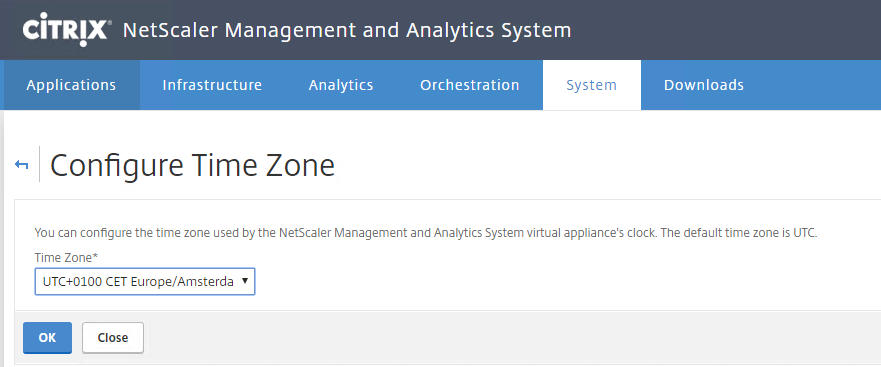
Change time zone
Step 26: Change the time zone by going to System->NTP Servers and enter your own
Setup the Backup
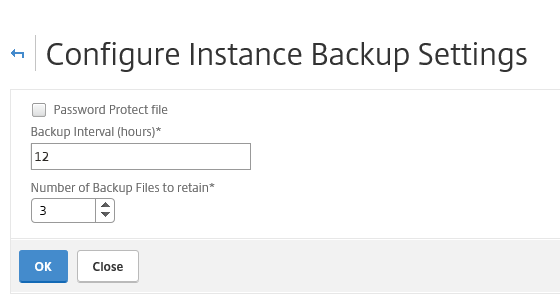
Step 27: Now we can start with the setup of the NetScaler VPC Backup, to do so, please go back to System and click on the Instances Backup Settings option

Step 28: Fill in your personal backup needs, I choose to backup after a 12 hours interval, with the file retain of a maximum of 3 days
Note: If you want to protect your backup files with a password, please check the Password Protect file option, to provide a password
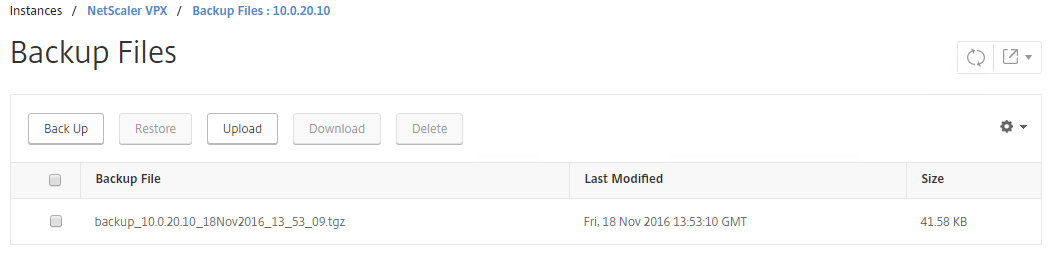
Step 29: To check your backups of the NetScaler, you need to go to the Infrastructure Menu option, followed by Instances, open your sort of device (NetScaler VPX in my case), mark the checkbox next to the IP Address and choose for View Backup

Step 30: A list of all the backups files will be available here and your setup is done!
Note: If you want to restore your NetScaler configuration, the NetScaler is now automatically restarted after a restore, also big plus between a MAS and Command Center, that needs to be done manually…