

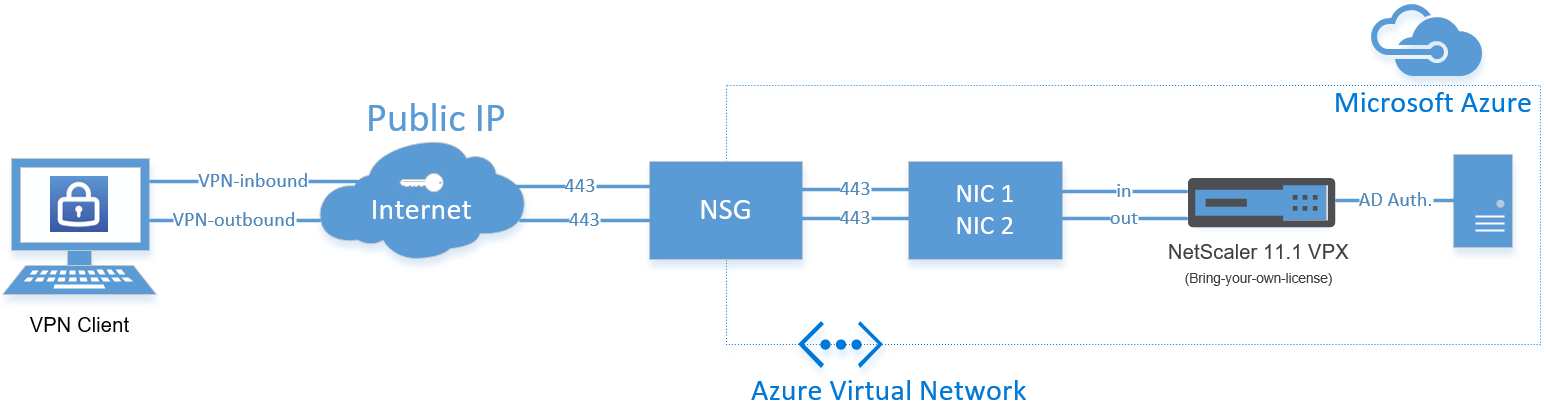
Configure Citrix ADC – NetScaler Gateway SSL VPN in Azure as Point-to-Site VPN replacement, using multiple network interfaces


Citrix just upgraded their NetScaler VPX in Microsoft Azure (official article). There were some limitations before the upgrade that I mentioned in one of my previous blogs. Most of them are now gone, what makes it possible to take NetScaler deployments in Azure to a new level!
You can now add extra network interfaces, what means that we now can use multiple external IP addresses, that are not limited on port usage, like before on 443 and port 80. It now supports multiple IP addresses (internal/external) on a single network interface or multiple interfaces with single or multiple IP addresses. For example; when you need to separate network access, by configuring multiple network security groups (NSG), you can now choose for the multiple interface option (described in this article). You are able to separate your management network usage by configuring the CIDR filtering option and can open the extra interface (NIC2) for public usage, like SSL VPN.
From the official Citrix website “NetScaler VPX on Azure now supports up to 3 Gbps — almost three times the capacity of previously supported models. We’ve increased the number of vCPUs (up to 12) that are supported in Azure to enable higher L7 performance and throughput.
Multi-region support: global server load balancing (GSLB) is now supported on Azure. This will allow you to enable active failover or load sharing across multiple Azure regions, and even your on-premise data center. This capability becomes especially critical as the enterprise begins capitalizing on its hybrid cloud strategy to account for unplanned outages.”
Now this is reality – this definitely open a lot of new doors – and will take out many barriers to migrate even more services to the Microsoft Azure Cloud! In one of my previous Azure Site Recovery projects, I always wanted to use GLSB to provide as failover. That was not supported at that moment, now it does. So, expect a new blog article coming soon about setting this up!
In this article – I will show you how you can setup a NetScaler Gateway (SSL VPN ) 11.1 VPX in Microsoft Azure that you can use as Point-to-Site replacement, by adding an extra network interface to the NetScaler VM through PowerShell and the Azure portal.
This can be very handful to directly connect to Azure when you haven’t got any IPsec VPN or ExpressRoute active. The Point-to-Site method can be difficult for some users, as they need to upload an management certificate. With this method you can provide your users a simple (webbased) uniform method to connect to the your Company’s Azure vNet (Virtual Network)!
Requirements
- Azure Subscription
- Pre-configured Azure Virtual Network (vNet) and Subnet
- NetScaler Universal, Enterprise or Platinum license (request a trial here)
- Active Directory server in Azure for AD authentication
- Or IPsec VPN tunnel to your on-premises AD server (hybrid)
Note: If you haven’t got any AD servers in Azure, please make use of the internal AAA authentication server and choose for local as primary authentication method
Deploy the NetScaler VPN in Azure
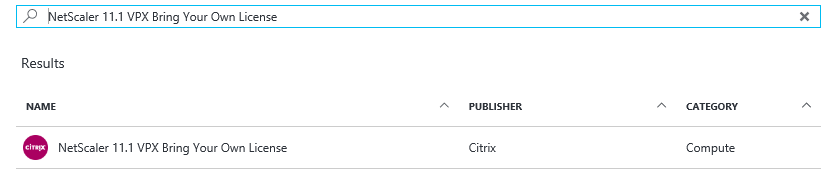
Step 1: First of all, we need to deploy the NetScaler VPX Virtual Machine in Microsoft Azure. So logon to your Azure environment (https://portal.azure.com) and open the marketplace
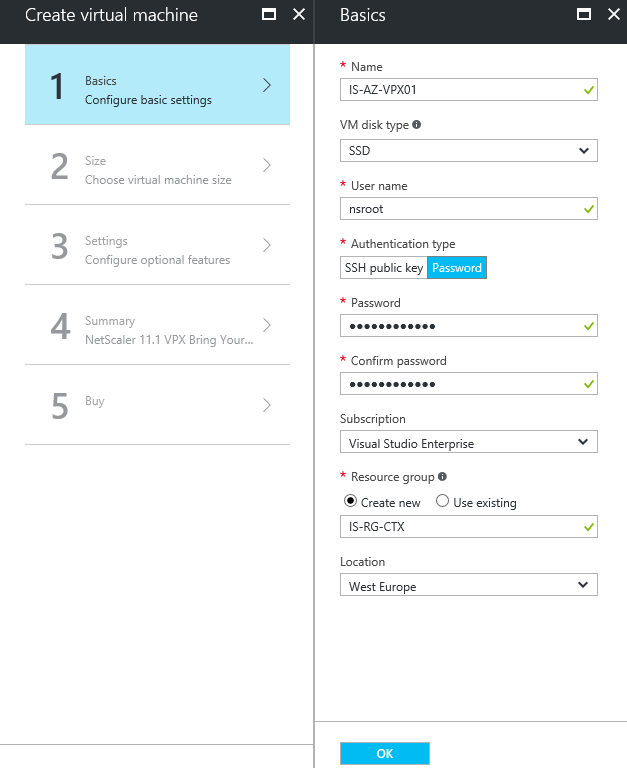
Step 2: Enter all the requested information, like the Virtual Machine name, root username and password, subscription, resource group and the datacenter location. When all checkmarks are green, click on Ok
Note: For active production environments, I definitely advice you to make use of Azure Premium (SSD) storage, for better performance!
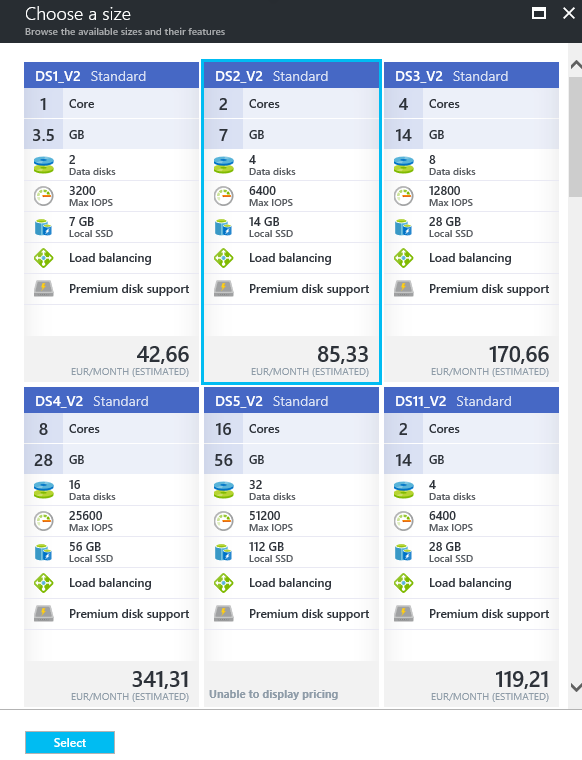
Step 3: Choose the size of your Virtual Machine, for this article the DS2_V2 Standard will be enough. Click on Select
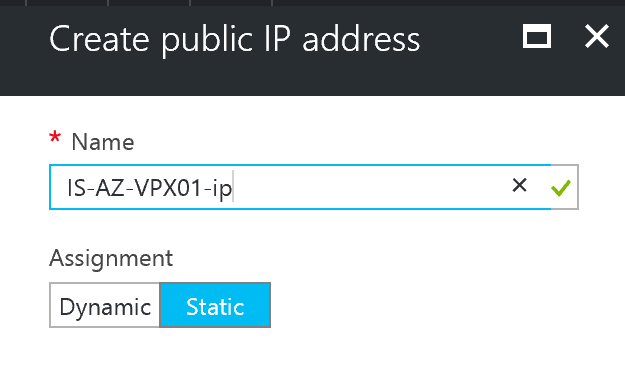
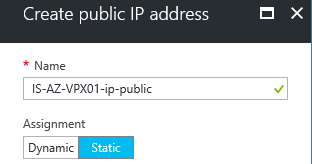
Step 4: Create or select your existing (premium) storage account, Virtual Network, Subnet, Public IP (select assignment; static) and default Network Security Group (NSG). Monitoring can be left disabled – Click on Ok
Note: We will change the NSG settings a few steps later. When u make use of a IPsec VPN tunnel to Microsoft Azure, the creation of the Public IP is not required. You can access the NetScaler Management Portal by using the internal/private address then.
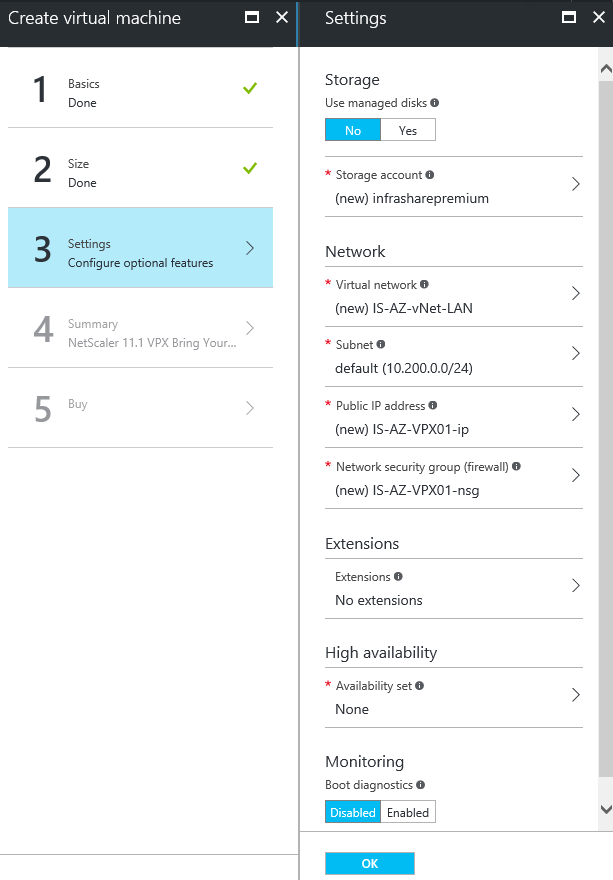
Change the Public IP address to static, if you forget this option, you will get an different Public IP after a reboot or shutdown!
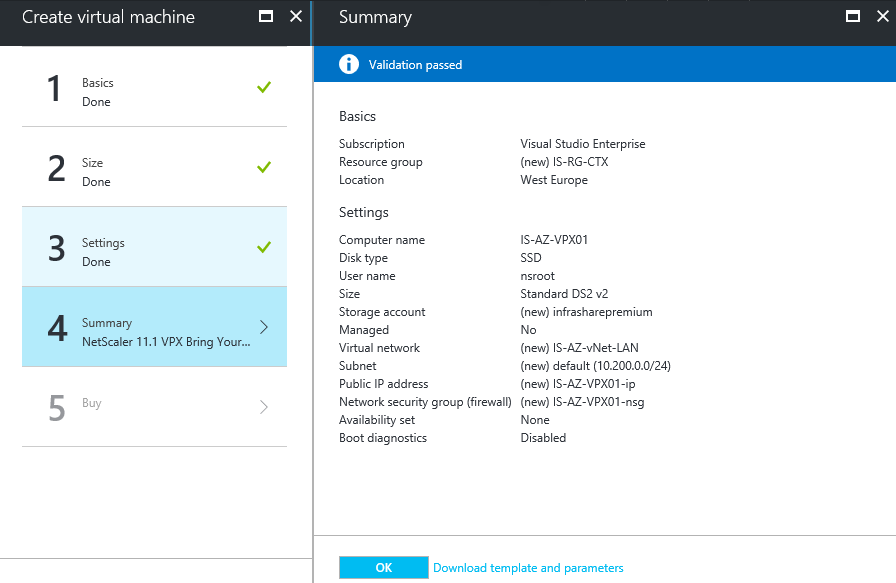
Step 5: Check all the settings in the summary screen – when accepted click on Ok
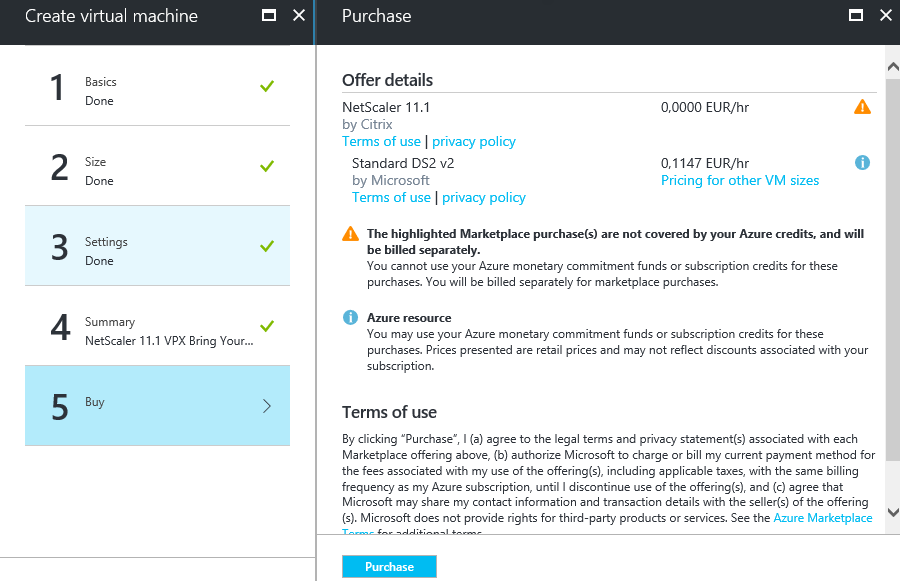
Step 6: Click on purchase to start the deployment
Configure the Network Security Group for management access (NIC01)
To get access to the management portal of the NetScaler, we must open the default port 443 from the outside by creating an inbound NSG rule in the primary Network Security Group
Step 7: Open the just created Network Security Group
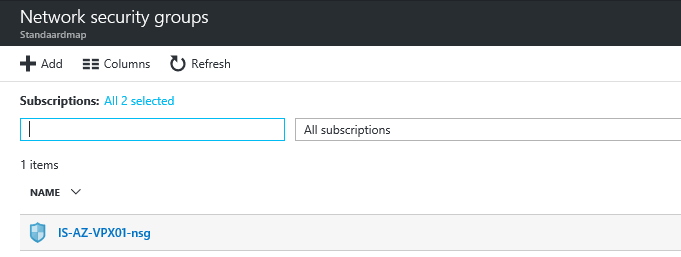
Step 8: Click on the – Inbound Security rules – option and on the + Add button afterwards

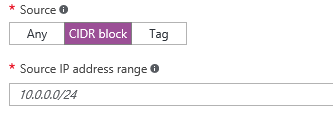
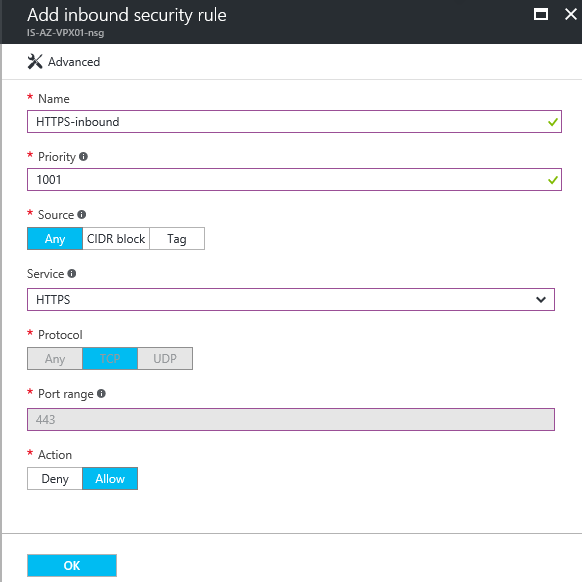
Step 9: Create an new inbound rule named like – HTTPS-inbound – give in the priority number 1001 – and select the protocol/service. When you need to filter the remote management access, for security reasons. You can select the CIDR option as source an enter your external WAN subnet or IP Address – Otherwise the whole internet will have access to your management portal. Click on create when finished
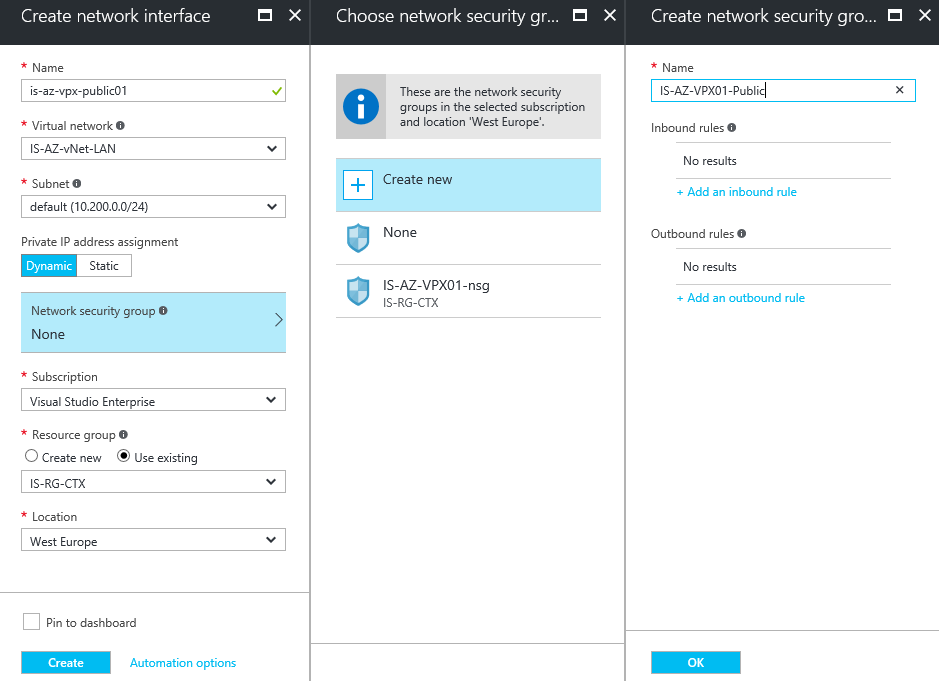
Add the extra Network Interface (NIC2)
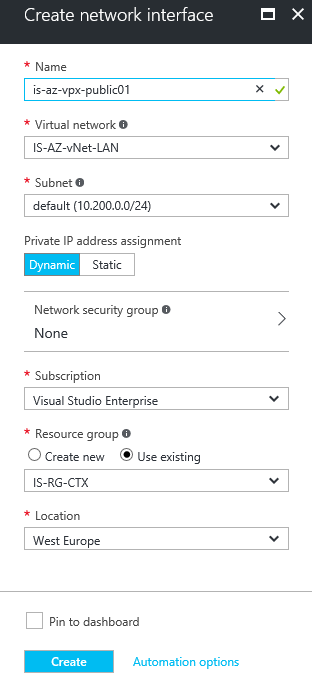
We need to create a Network Interface manually through the Azure portal, afterwards we need to attach it to the NetScaler virtual machine through PowerShell
Step 10: Open the Network Interface menu option – click on the + Add button

Step 11: Give in a logical name for the interface – select the Virtual Network and subnet. Click on the Network Security Group option to create an extra (Public) NSG for external usage
Step 12: Select the – create new – option. Enter an name for the public NSG, click on the + Add an inbound rule option afterwards
Step 13: Take over the settings from the picture below – create the same (other name +outbound) policy for outbound traffic afterwards
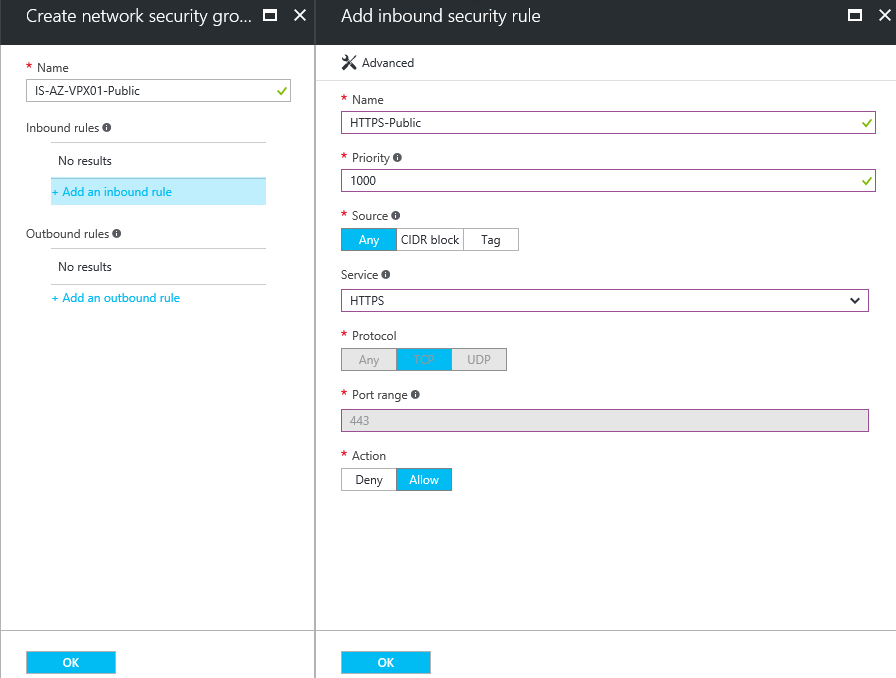
Step 14: Do the same for HTTP traffic – create the same (other name +outbound) for outbound traffic afterwards

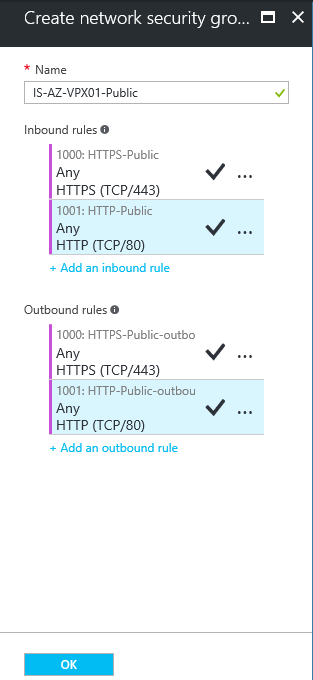
Check the NSG summary, click on Ok
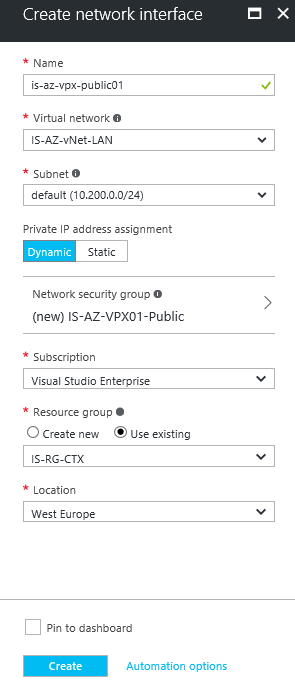
Step 15: Verify all the settings – click on the Create button
Step 16: Now we need to collect the resource ID – Open the new Network Interface
Step 17: Go to the properties option and copy the Resource ID to the clipboard for the following PowerShell steps

Attach the extra Network Interface to the Virtual Machine
The following steps must be done through PowerShell. To perform the following cmdlets, you first need to install/import the AzureRM module to your client – reboot afterwards.
Install-Module AzureRm- Scope CurrentUser
Step 18: First logon to the Azure subscription by entering the following cmdlet
Login-AzureRmAccount
Enter your Azure Administrator credentials and click on Sign in
Note: When you use multiple Azure subscriptions, you need to select the right one before you proceed to step 11. You can use the following command for doing this:
Select-AzurermSubscription -SubscriptionName "SubscriptionName"
Step 19: Now we need to allow Multiple IP configuration on our Azure Subscription by entering the following cmdlet
Register-AzureRmProviderFeature -FeatureName AllowMultipleIpConfigurationsPerNic -ProviderNamespace Microsoft.Network

Step 20: Now we need to allow the Load Balancing feature on our Azure Subscription by entering the following cmdlet
Register-AzureRmProviderFeature –FeatureName AllowLoadBalancingonSecondaryIpConfigs –ProviderNameSpace Microsoft.Network

Step 21: Register the Provider to our Azure subscription
Register-AzureRmResourceProvider -ProviderNamespace Microsoft.Network

Step 22: Check if all the feature are successfully registered
Get-AzureRmProviderFeature

Step 23: The NetScaler Virtual machine must be shutdown (deallocated), you can do this through the Portal or by entering the following cmdlet
Stop-AzureRmVM -Name VMNAME -ResourceGroupName "RESOURCEGROUPNAME"

Step 24: Collect the NetScaler Virtual Machine under the following variable
$netscalervm=Get-AzureRmVM -Name "VMNAME" -ResourceGroup "RESOURCEGROUPNAME"
![]()
Step 25: Now we can add the manually created Network Interface by entering the following cmdlet, paste the earlier copied Id from step 17
Add-AzureRmVMNetworkInterface -VM $netscalervm -Id "PASTE FROM CLIPBOARD STEP 17"

Step 26: We need to order the Network Interfaces, so we are sure first interface will always be the primary (management). Enter the following cmdlets for doing this
$netscalervm.NetworkProfile.NetworkInterfaces[0].Primary =$true

$netscalervm.NetworkProfile.NetworkInterfaces

Step 27: Update all the configuration parts to the Virtual Machine by entering the following cmdlet
Update-AzureRmVM -VM $netscalervm -ResourceGroupName "RESOURCEGROUPNAME"

Step 28: We now finished with the PowerShell part – We can start the Virtual Machine again
Start-AzureRmVM -Name "VMNAME" -ResourceGroupName "RESOURCEGROUPNAME"

Add the Public IP address to Network Interface 2
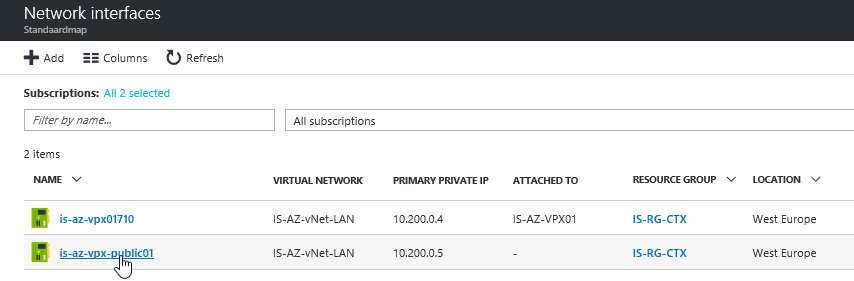
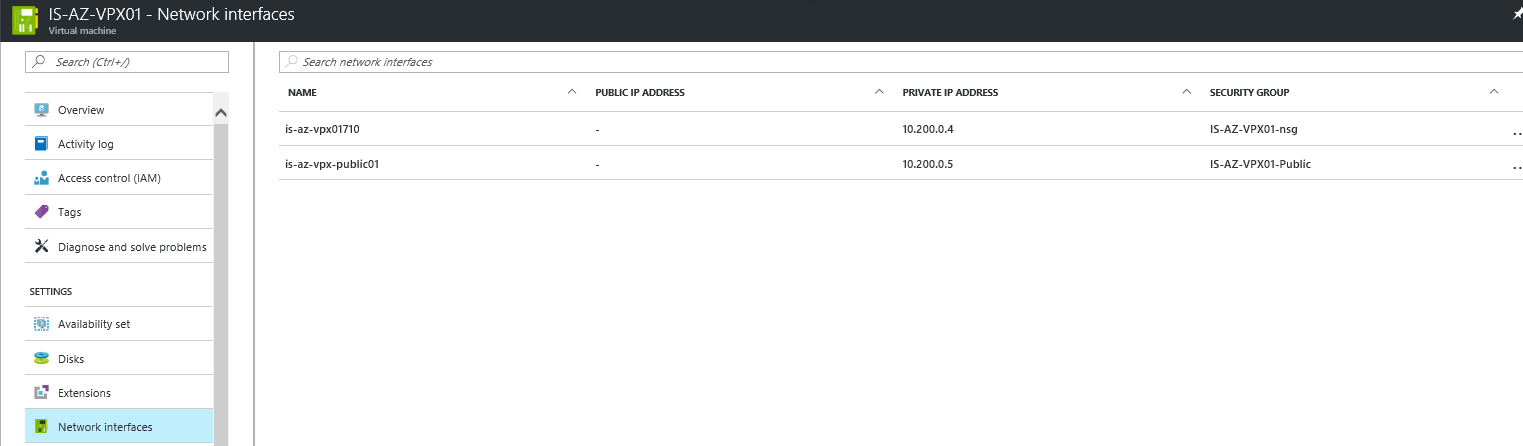
Step 29: Go back to the Azure Portal and open the Network Interfaces of the NetScaler Virtual Machine – If all the steps are successfully completed there must be 2 interfaces attached. Click on the second Network Interface, for me the will be the – is-az-vpx-public01
Step 30: Select the – IP Configurations – option and click on ipconfig1
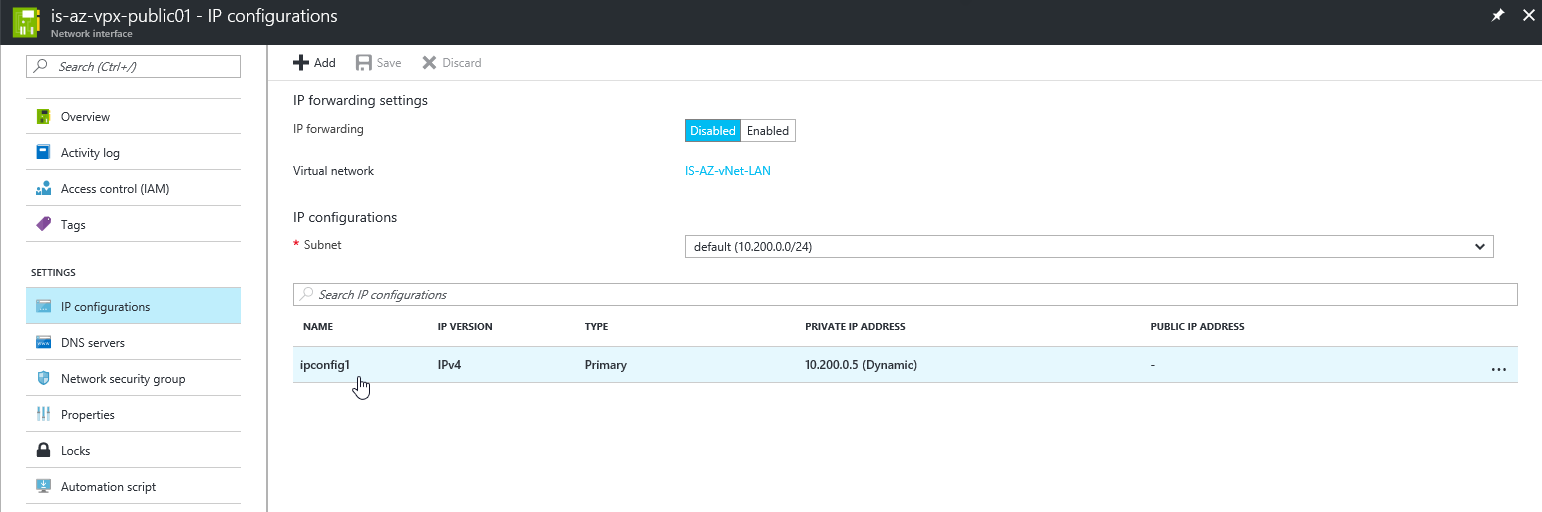
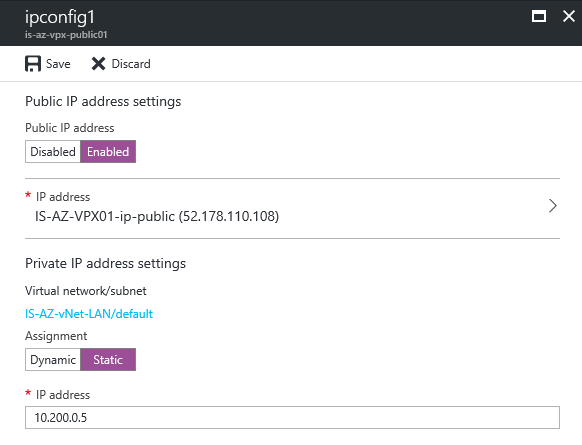
Step 31: Click on the enable option under Public IP Address and create an new IP Address for the second interface. Make sure you select the Static optionotherwise your WAN IP will be dynamic. Click on the save button afterwards
Step 32: When finished, change also the private/internal address of the NetScaler to static by pressing the Static button under the Private IP address settings option. Choose an address that fits your own
Save the Public IP Address, we need this a few steps later to create the external DNS record for the SSL VPN portal
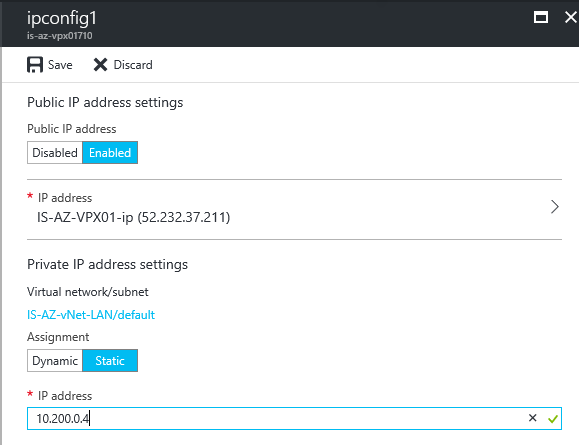
Step 33: Repeat the same steps for the internal Private address for the primary network interface (NIC01), like picture below
Note: I already mentioned at the beginning; when u use a IPsec VPN tunnel or ExpressRoute to Microsoft Azure, you can get access to the Management Portal of the NetScaler through the internal/private IP of interface 1 (NIC1) – you can disable the Public IP address option then (for NIC01)
Create a DNS A record at your ISP
Step 34: Log in to your DNS hosting portal and add an external DNS A record and point it at the NIC2 Public IP Address record – for me that will be 52.178.110.108 – the address we copied from step 32
Note: When your domain/local DNS is the same as external, don’t forget to create the record also in the internal DNS zone!

Connect to the NetScaler Management Portal
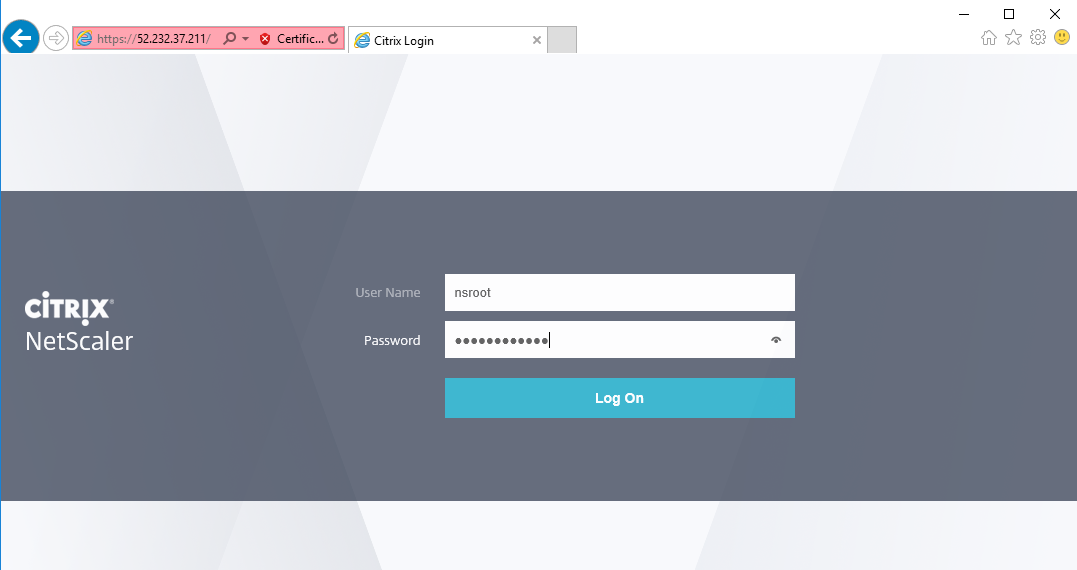
We now can start with the initial configuration part of the NetScaler, to get access to the management portal we can use the NIC01 public IP Address or the internal/private address when u use a IPsec VPN tunnel or ExpressRoute. For me this will be the following (red line) address:

Step 35: The connection works fine! Enter the earlier created credentials (username: nsroot) to get access to the NetScaler
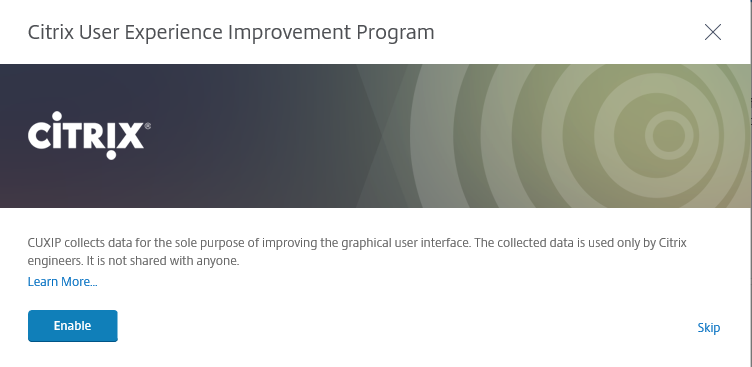
Skip the CUXIP screen
Step 36: You’re now at the welcome screen – click on the Subnet IP Address option
Step 37: Enter a free internal network address to route your network traffic over, click on Done

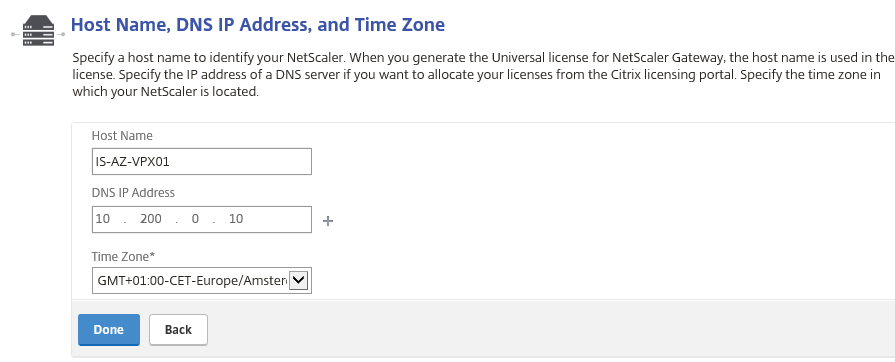
Step 38: Click on the – Host Name, DNS IP Address, and Time Zone – option, setup the DNS IP of your internal DNS server or external. For me this will be the 10.200.0.10. Click on done
The setup is asking for a reboot, click No
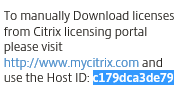
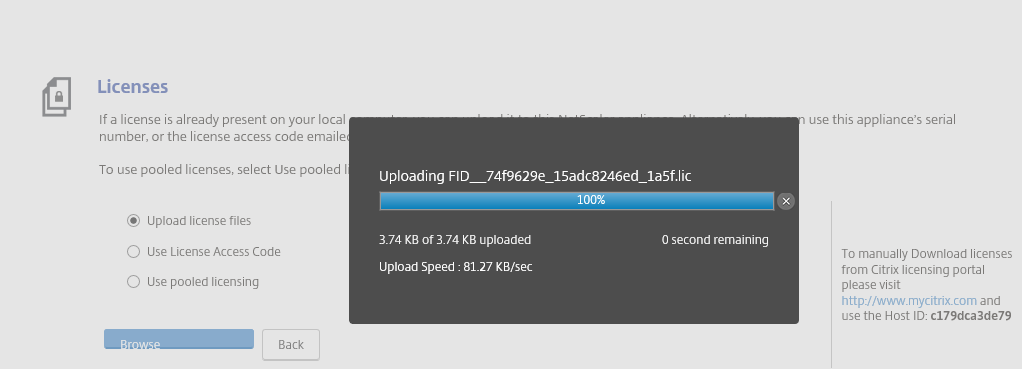
Step 39: Now we need to upload our NetScaler License file, so browse to your FID_.lic file an upload it to your NetScaler
Note: When you requested a trial, please check the correct host ID when activating
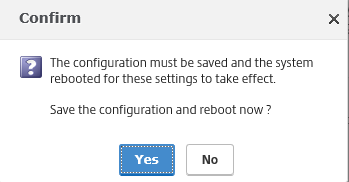
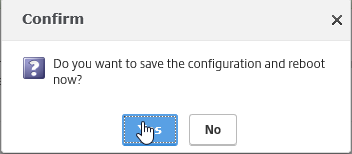
Click on Reboot to save the NetScaler configuration

Choose for yes
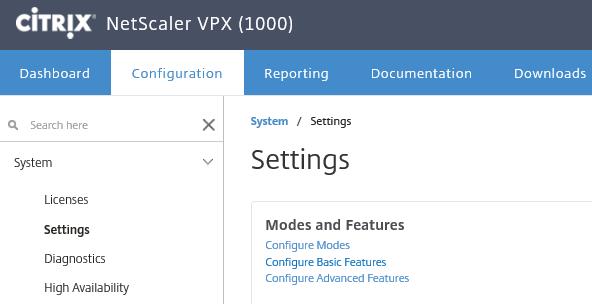
Activate the required Basic features
Step 40: To use the SSL VPN functionality – we need to activate the SSL Offloading Basic feature first. Do this through the System -> Settings -> Modes and Features menu
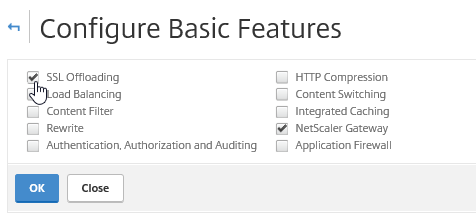
Select the SSL Offloading option and click on Ok
Upload your (existing) SSL certificate
Step 41: Go in the NetScaler menu to Traffic Management -> SSL -> Certificates -> Server Certificates and click on the Install button
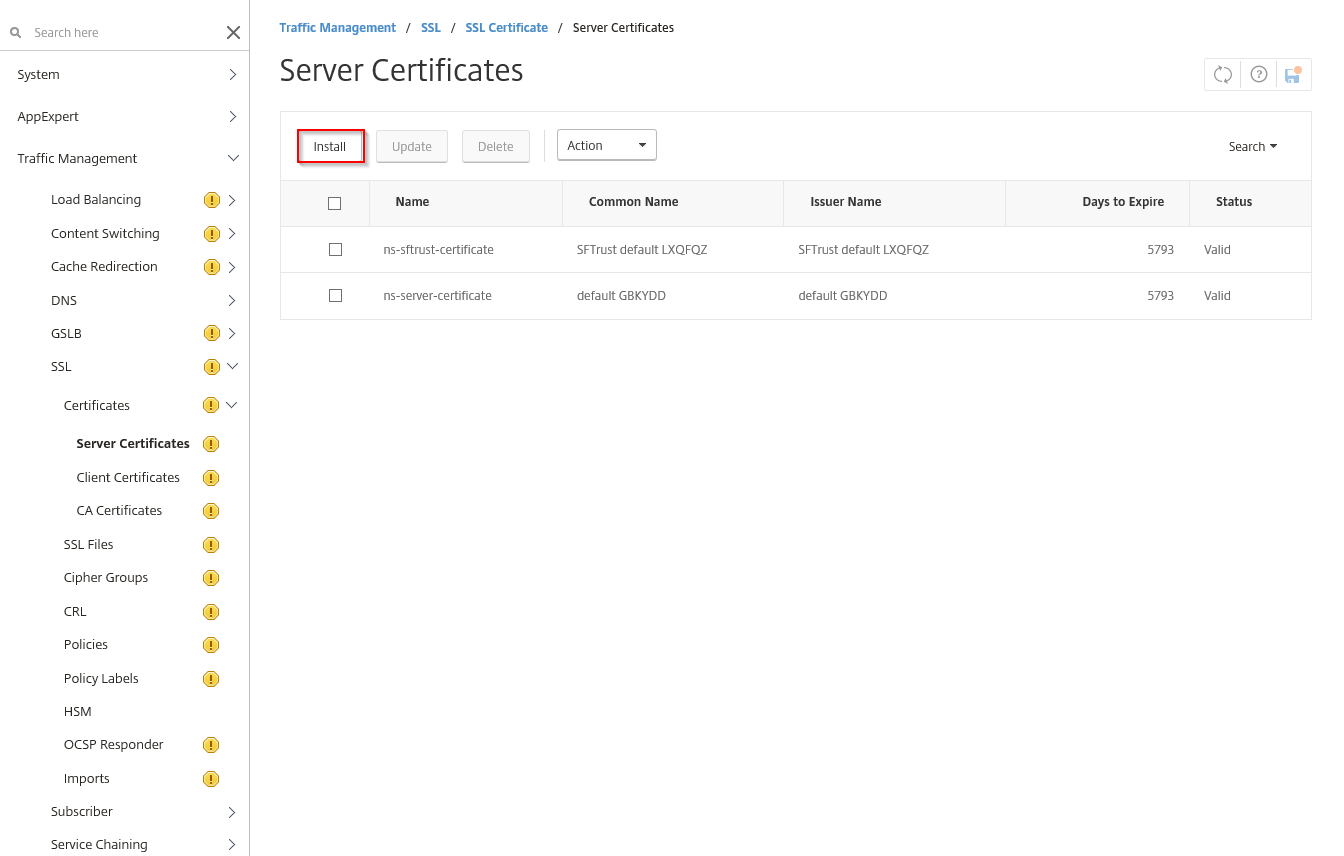
Step 42: Enter in a certificate-Key Pair Name and click on Choose file – local – and select the certificate file. Enter the Password and click on Install

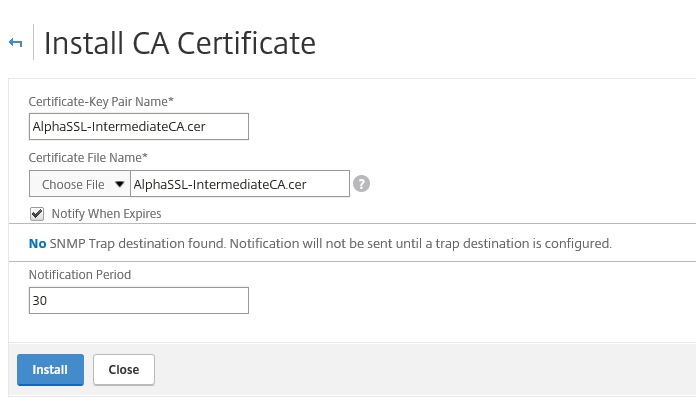
Step 43: Add the RootCA and/or intermediate certificate through the RootCA option and link them afterwards to avoid Key chain mismatches/errors.
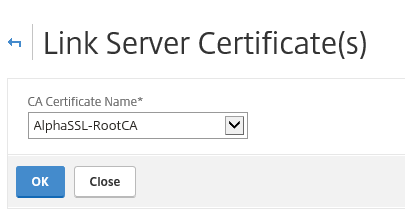
You can link the certificates by pressing the right mouse button upon the Intermediate or RootCA, choose for link and click ok
Create and configure the VPN vServer (VIP)
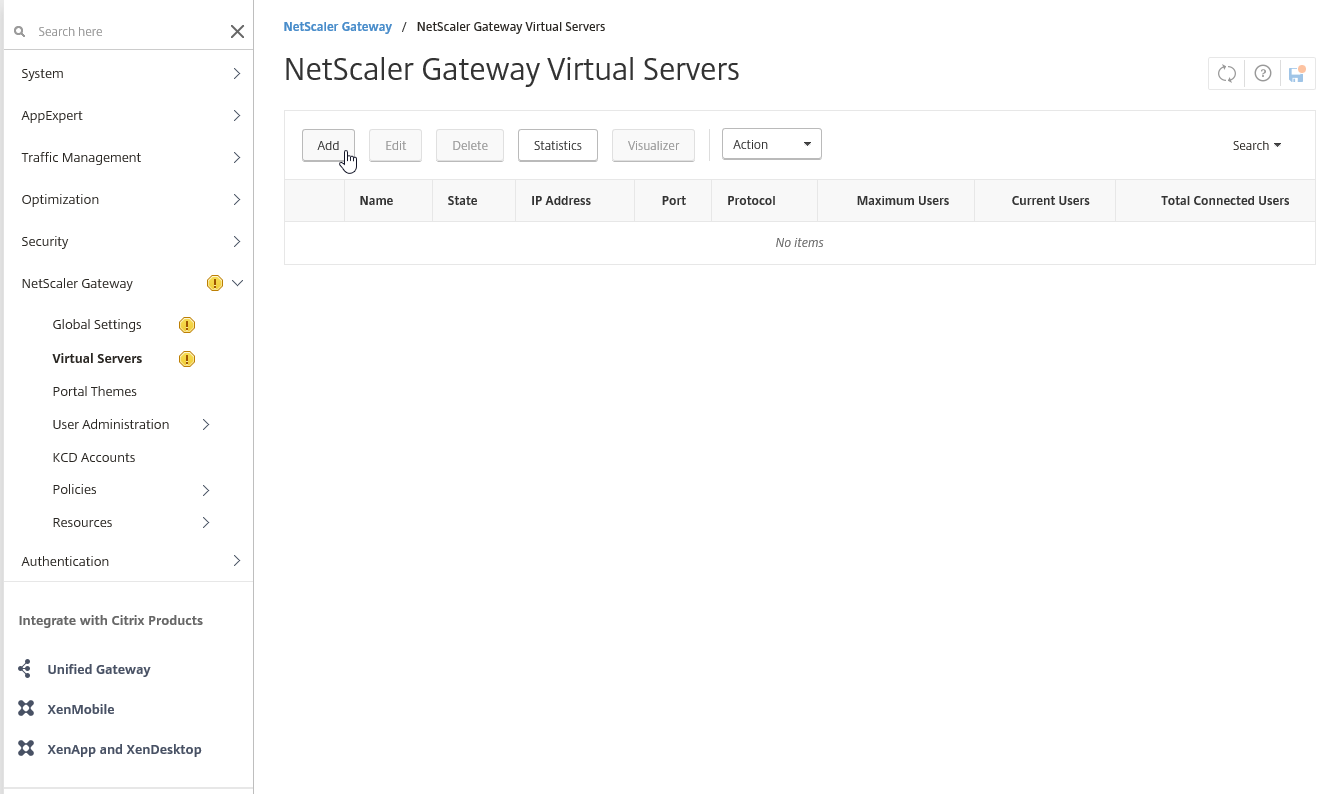
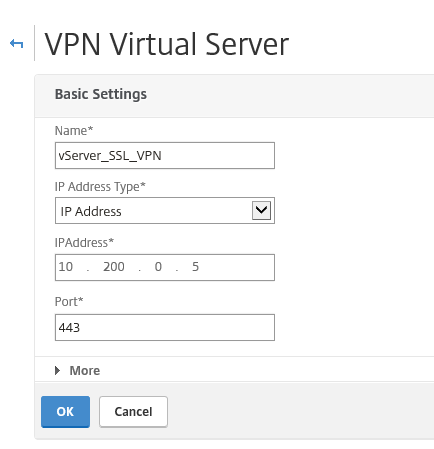
Step 44: To create the VPN vServer – open the NetScaler Gateway -> Virtual Servers – menu option Click on Add
Step 45: Enter the name and internal network address from the secondary public network interface (NIC2) to the vServer and click on Ok

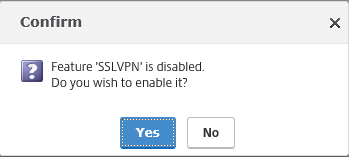
Choose for Yes
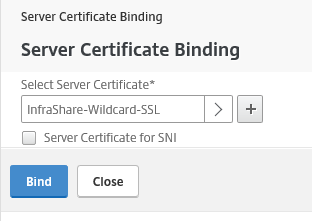
Step 46: Now we need to attach the Server (for me wildcard) certificate to the vServer – Click on the No server Certificate option and select the just added certificate

Choose for bind
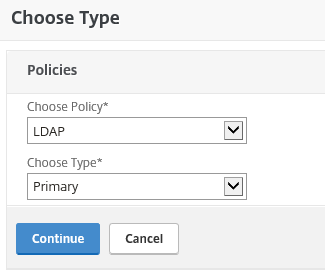
Step 47: Click on the Continue button and click on the + button next to Basic Authentication

Extra: I wrote an earlier article over NetScaler RADIUS (sec. authentication) through the new Azure MFA NPS extension. So If you’re interested, please check this article to secure your SSL VPN web portal even more!
Step 48: Choose for LDAP and Primary as type
Step 49: Click on the + button to add the new LDAP policy
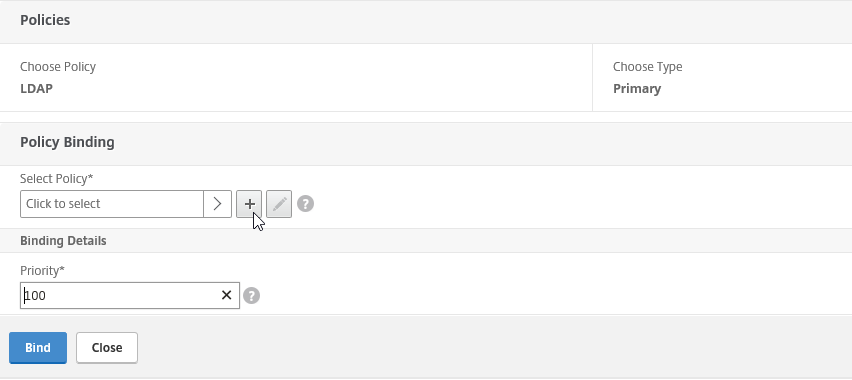
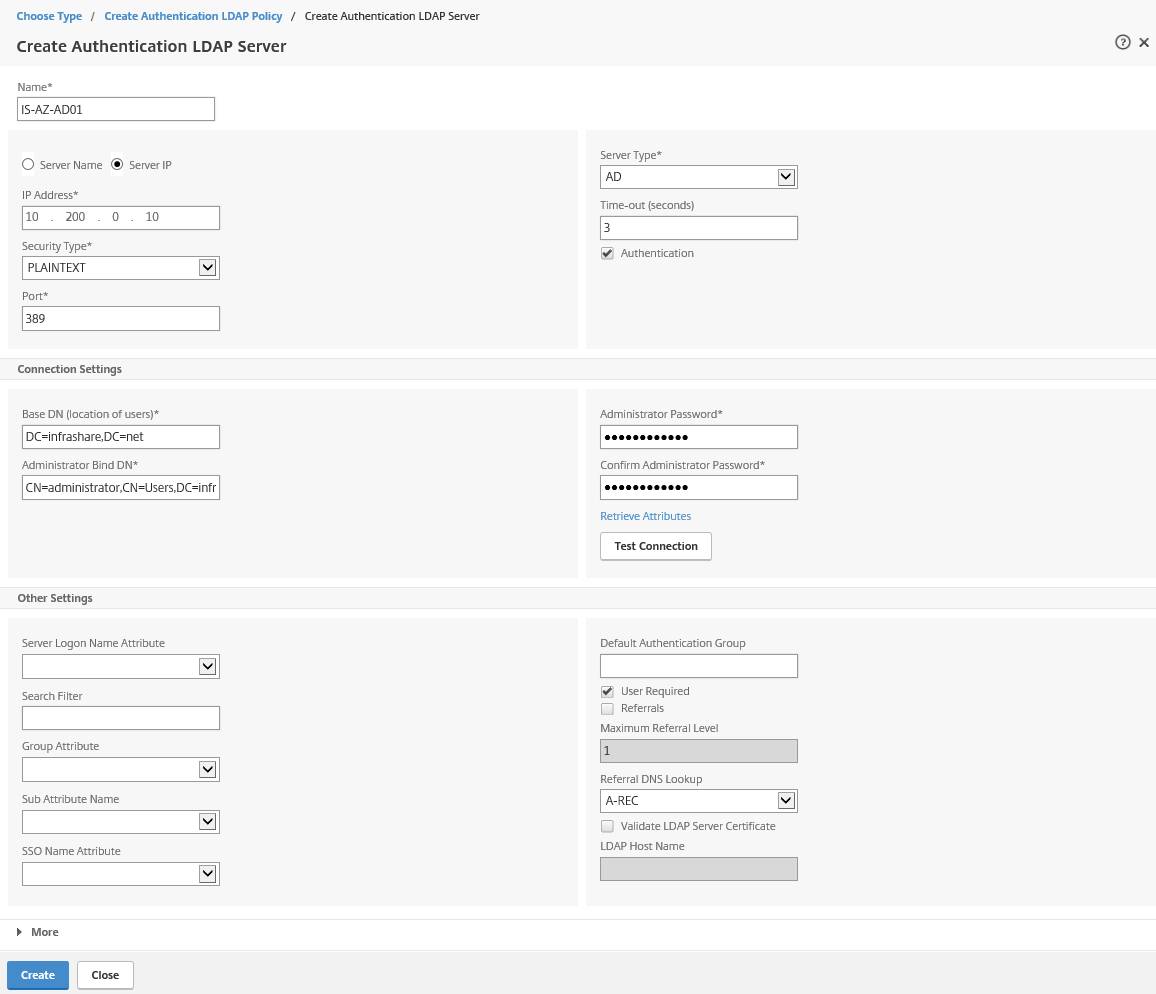
Step 50: Take over the properties from the picture below and click on the + button afterward to setup the LDAP connection properties

Step 50: Fill in all the requested information – you can test the connection by pressing the Test Connection button – click on Create an Bind in the earlier screens to save the authentication policy
Name: The name of the domaincontroller
Server IP: The Network address of your domaincontroller
Base DN: The distinguish name (source) to search in for user authentication (you can limit access by selecting a separate OU for SSL VPN access
Add the SSL VPN Session Policy / Profile
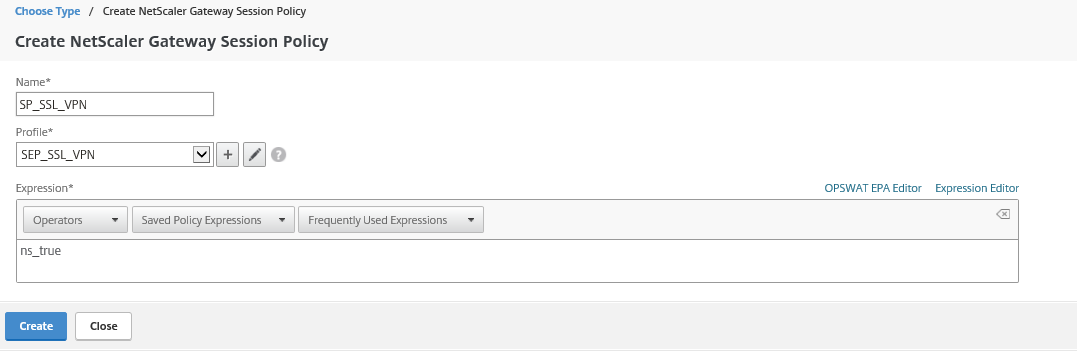
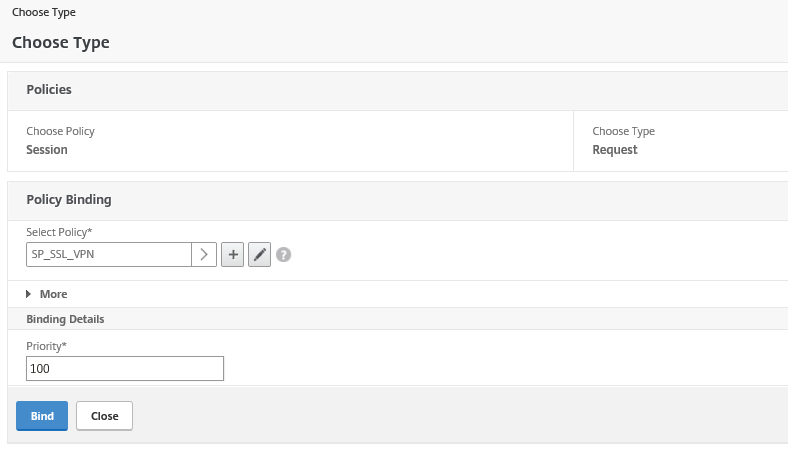
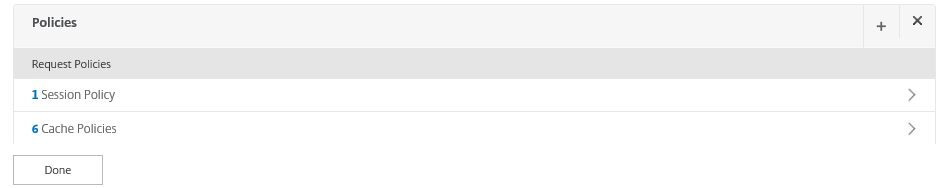
Step 51: Back in the VPN vServer setup screen, click twice on the continue button to get to the Policies option – click on the + button to start the SSL VPN Profile configuration

Step 52: Choose for session as policy and request as type

Step 53: Click on the + button
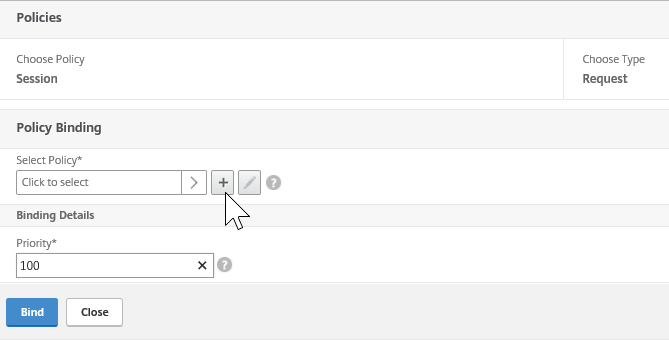
Step 54: Take over the name and settings from the picture below, click on the + button afterwards

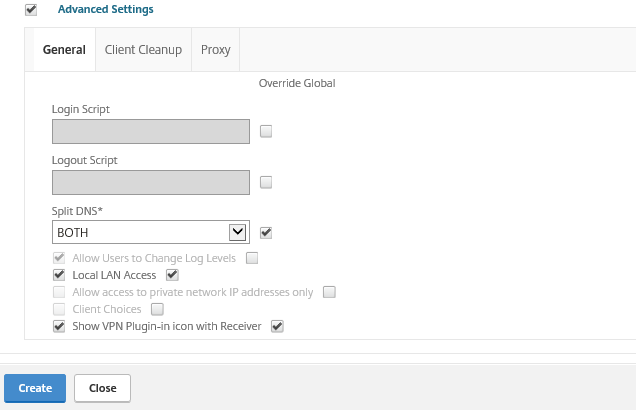
Step 55: Give in a name for the Session Profile and change the settings in the picture below – the homepage is the website that is redirected to, when the VPN connection succeeds. The plug-in settings will accept be accepting Windows and Mac after the setting change.
Note: When activating Split-Tunneling, you will force your VPN to route the traffic over your local gateway instead of the remote (VPN) gateway.
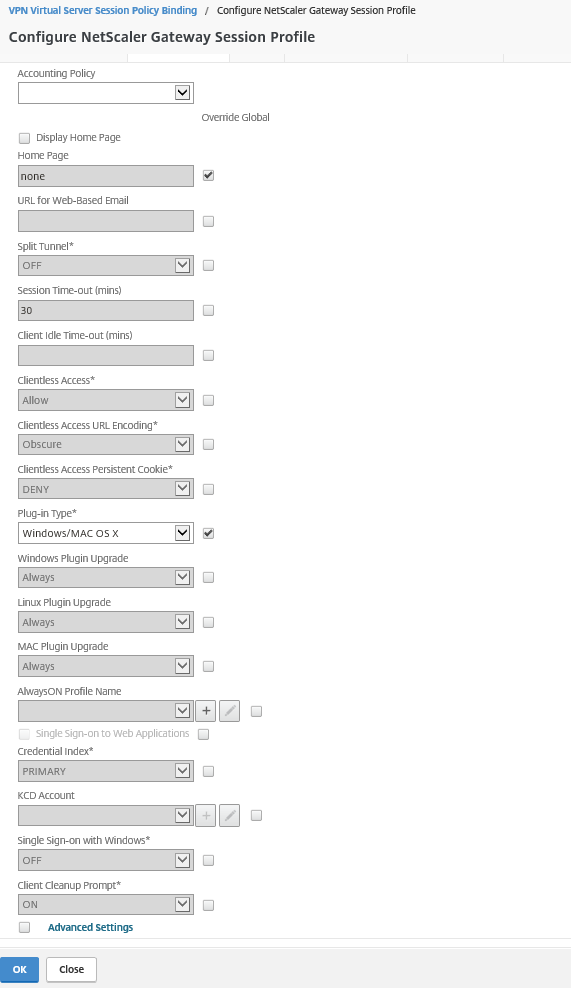
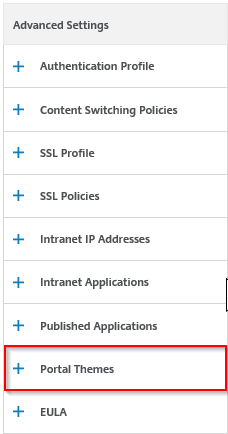
Step 56: Check the Advanced Settings option to define even more settings. Activate Split-DNS to interact with the local and VPN DNS server – Activate Local LAN Access to make sure you still can interact with your local LAN when the SSL VPN is still active and the last one – Show VPN Plugin-in icon with Receiver
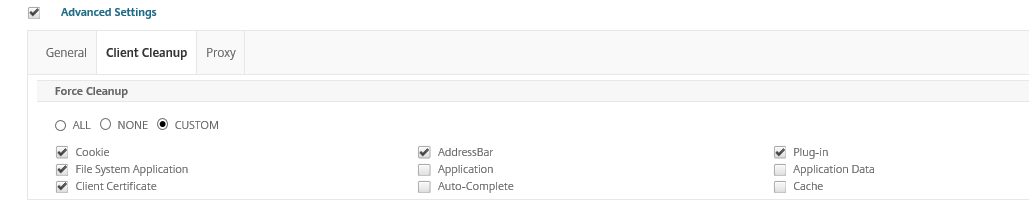
Extra settings: When you switch to the – Client Cleaup – tab, you can select the behavior of the client when you disconnect.
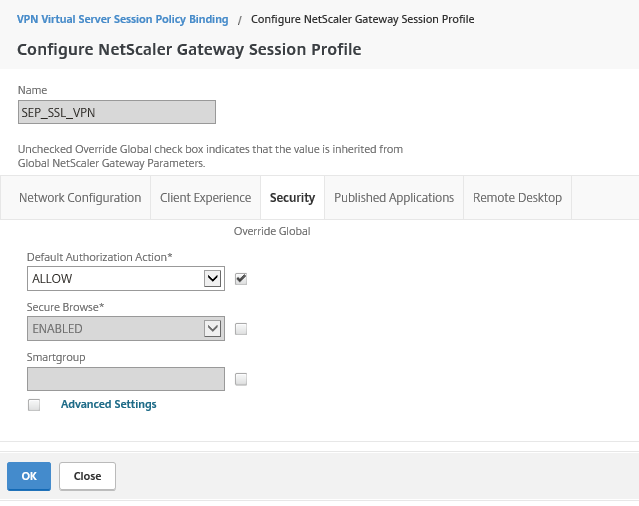
Step 57: Open the Security tab, change the Default Authorization Action to ALLOW
Note: The default setting for authorization is to deny access to all network resources
Step 58: Click on the Create button and the Profile is now attached to the Session Policy, click on Create
Step 59: Click on bind to save the Session Policy
Change the default theme
Step 60: Click on the Portal theme option
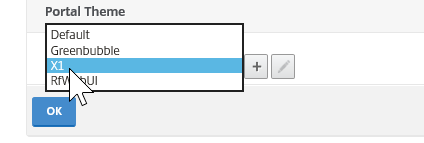
Step 61: Change the theme to one that fits your personal needs, I choose for the X1 version. Click on Ok
Click on Done to save the VPN vServer settings
Testing the VPN Connection
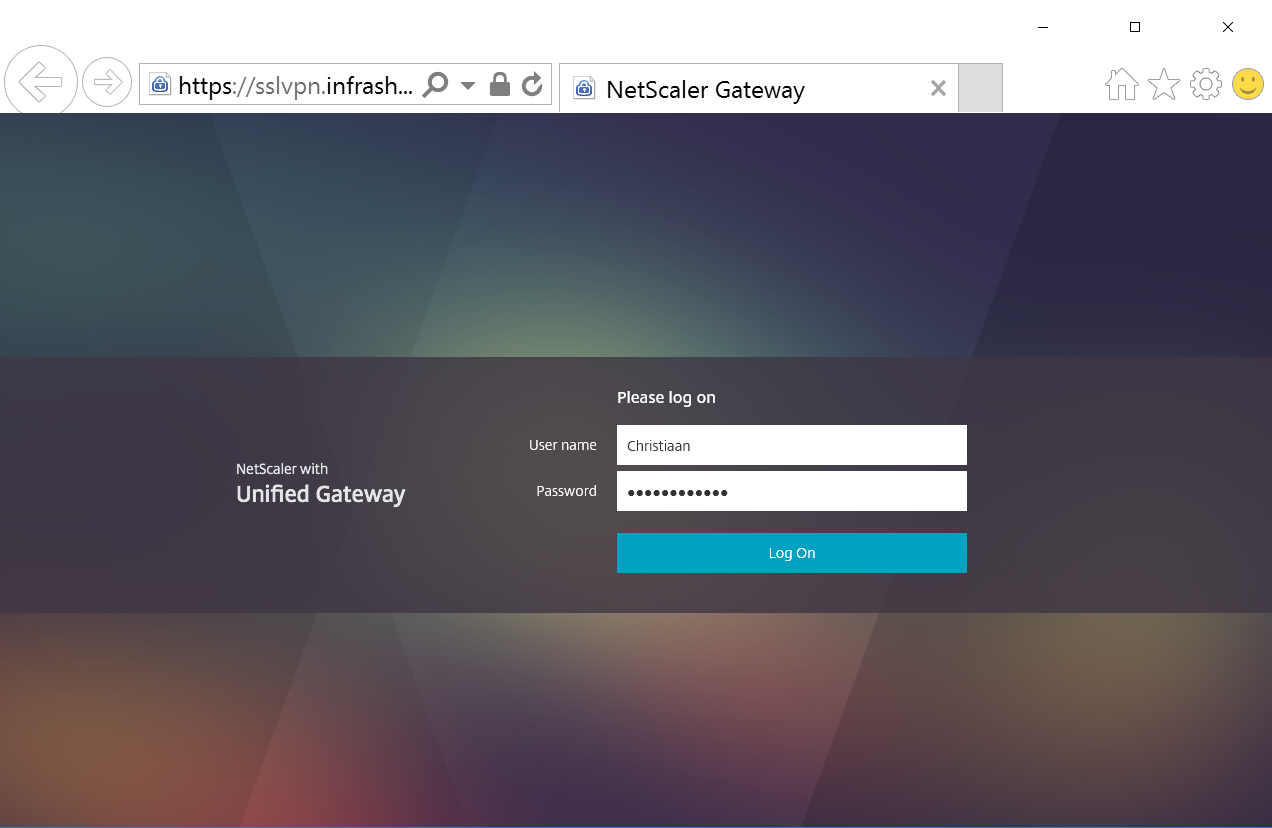
Step 62: Open an Internet Browser – enter the earlier created DNS, for me that will be – https://sslvpn.infrashare.net – logon with domain credentials
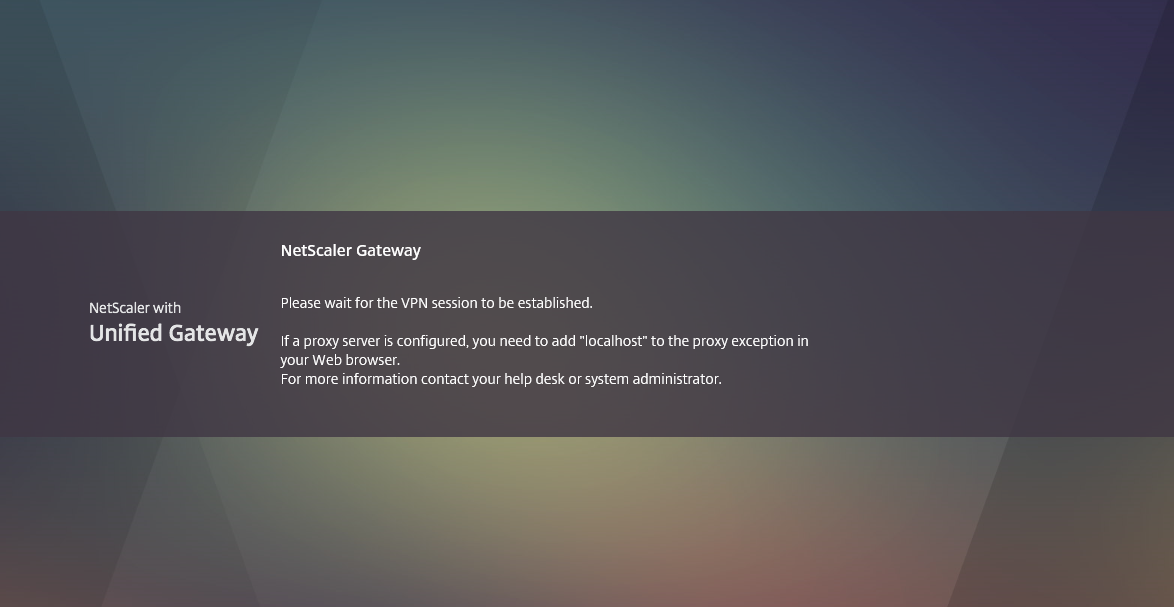
The connection is initializing…
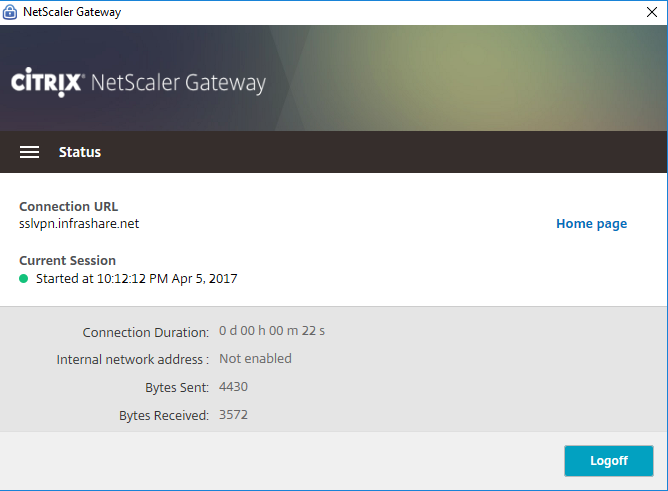
And the connection is started successfully!
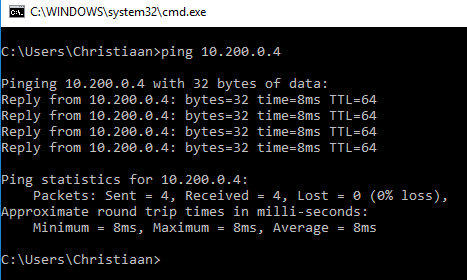
Let’s ping to the internal management address of the NetScaler, it works – just awesome right?
Check the management Portal by using the internal IP address
The Tunneled Applications page (Can be find through the Citrix Receiver -> Advanced Preferences -> NetScaler Gateway Settings)
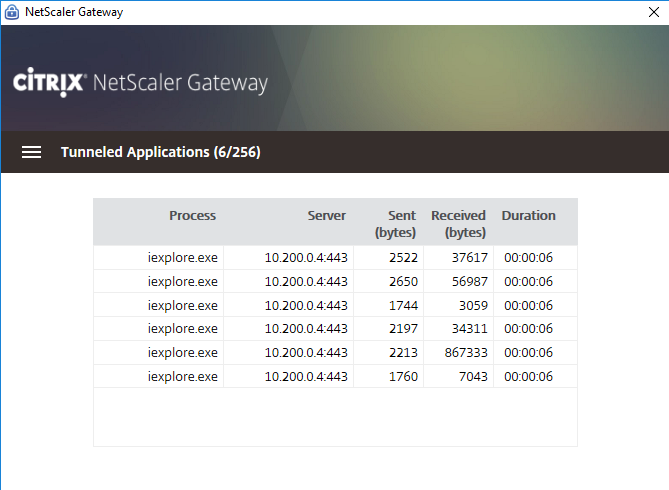
You now are able to connect to all your Azure devices that are running in the same vNet as the NetScaler Gateway VPN Device as Point to Site replacement!
Extra: Add Secondary authentication
Please check one of my other blog articles to configure secondary authentication for the NetScaler based on Azure Multi-factor-authentication to secure your NetScaler Gateway even more!
Configure HTTP to HTTPS redirection
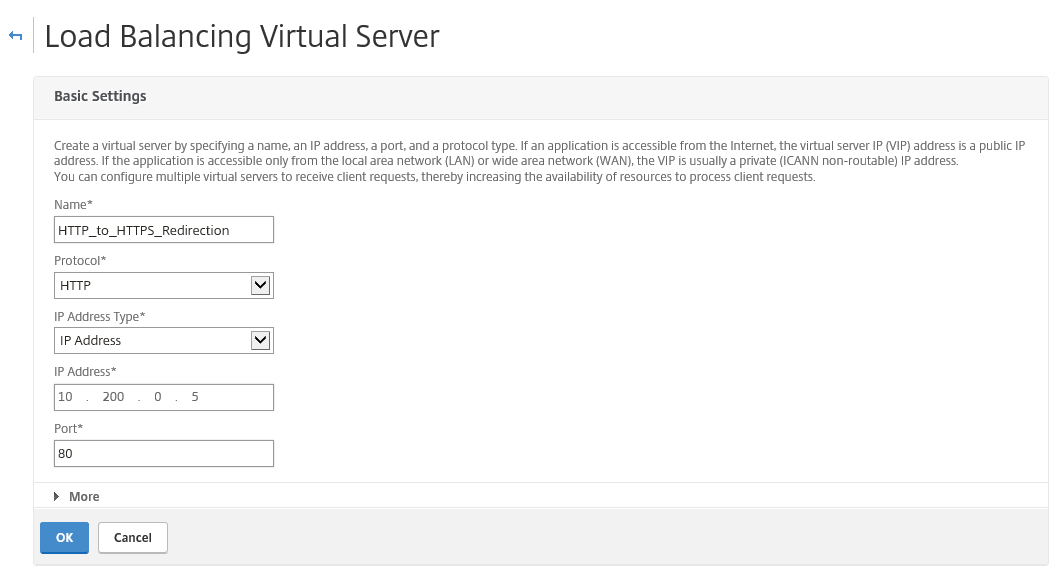
To make your SSL VPN portal also responsive to HTTP request you need to create a Load Balancer vServer that redirects port 80 to https://sslvpn.infrashare.net – please proceed the following steps to configure this
Go in the Configuration menu to Traffic Management -> Load Balancing -> Virtual Servers and click on Add
Enter a name – protocol HTTP – and give in the same internal IP Address that we defined for our VPN vServer – for me this will be 10.200.0.5
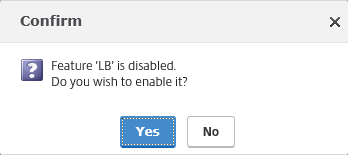
Activate the LB Feature
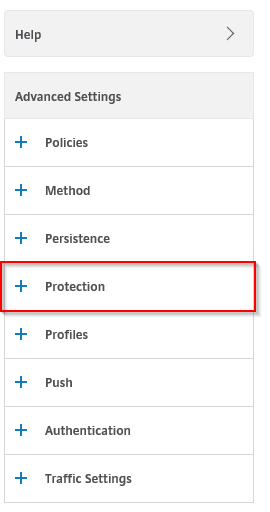
Click on Continue
Click on the Protection option
Enter the SSLVPN HTTPS url that must be used for the redirection, click on Ok and your good to go!

Thanks for reading!