Migrate from XenApp 6.5 to XenApp 7.x in just a few steps, using the Citrix Cloud Smart Tools


As you probably know, on 22nd December 2016, Citrix renamed their Lifecycle Management Services to Citrix Smart Tools. In short: The tool that provides service delivery management – Cloud-based control – to optimize, build, scale, check, and migrate existing or new Citrix XenApp or XenDesktop environments – all taking place from the Citrix Cloud.
As of today, there are still many customers running XenApp 6.5 in their production environments, with the need to upgrade in short notice, because the software will be out of support on 31 December 2017 and be end of life on 30 June 2018.
So with that in mind I thought to myself that it can be relevant to highlight this simple method to migrate from XenApp 6.5 – IMA (Independent Management Architecture) to the latest XenApp 7.13 – FMA (Flexcast Management Architecture).
In this article I will use the Smart Migrate functionality of Smart Tools to migrate published applications and user/computer policies from a (simulated) XenApp 6.5 environment to the latest Citrix XenApp 7.13 current release. During the migration process, Smart Tools creates a Delivery Group in the XenApp 7.13 site and imports the selected application and policy settings from XenApp 6.5.
It’s just as simple as 1-2-3 and it can save you a lot of time, curious? Just read the whole article – enjoy reading!
Table of Contents
Click on the title to get forwarded in the article:
What are Smart Tools?
Citrix Smart Tools is a set of cloud-based tools to help you speed up and create the design, deployment, and management of Citrix solutions across any on-premises or cloud environment. As already said in the above section, all delivered straight from the Citrix Cloud.
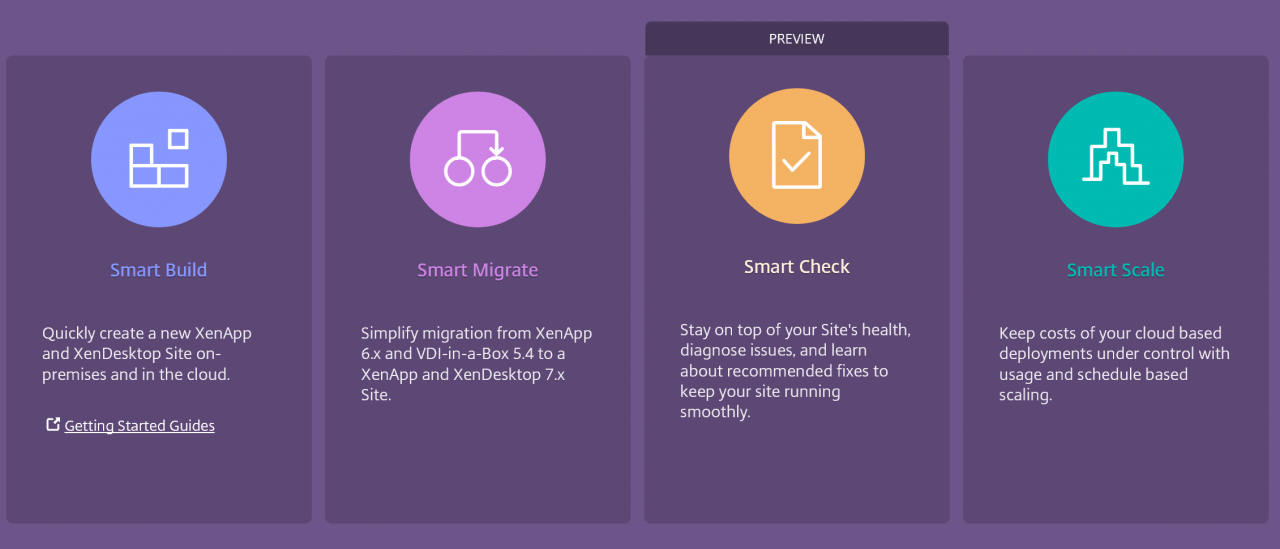
With the introduction of the new name, Smart Tools, Citrix also added the Smart Scale and Smart Check services that weren’t available before. That makes the following 4 services available in total:
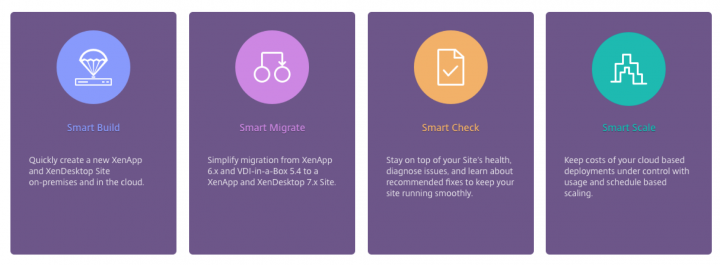
Smart Build: In Smart Build, you are able to design, and easily create new Citrix XenApp/XenDesktop sites both on-premises and for the public cloud, based on best practices/blueprints;
*Smart Migrate: Smart Migrate makes it possible to migrate, quickly and easily, Published Applications and Citrix policies of an existing XenApp 6.5 or VMware Horizon View environment to the current version of XenApp/XenDesktop (7.13 now);
Smart Scale: Smart Scale provides insight into the use of the area(s), displays costs transparent and can be scaled up or scaled down in any time;
Smart Check: Smart Check provides all the information from your Citrix (Cloud or on-premises) environment–the ‘health’ of the site, diagnosis of problems and recommended fixes that allow you to keep the area up-to-date
What about Licensing?
Citrix Smart Tools is free available to all Citrix customers with an active Citrix Cloud subscription – or when you have a valid Subscription Advantage contract.
For the full license feature page, please take a look at this official Citrix page: https://www.citrix.com/products/smart-tools/feature-matrix.html
Citrix is changing their support contracts in July 2017, so there can be some changes. For more information:
https://www.citrix.com/support/citrix-customer-success-services.html
How does it work?
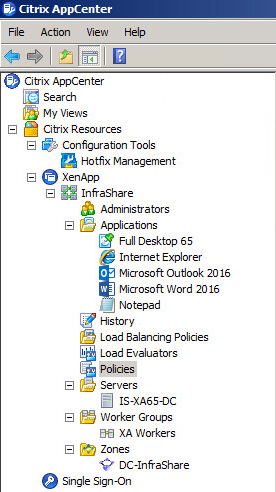
Before we start, we need to (of course) have a source environment. To simulate this, I installed a XenApp 6.5 environment, including a DataCollector and Session-host server in one. That will be enough for this article.
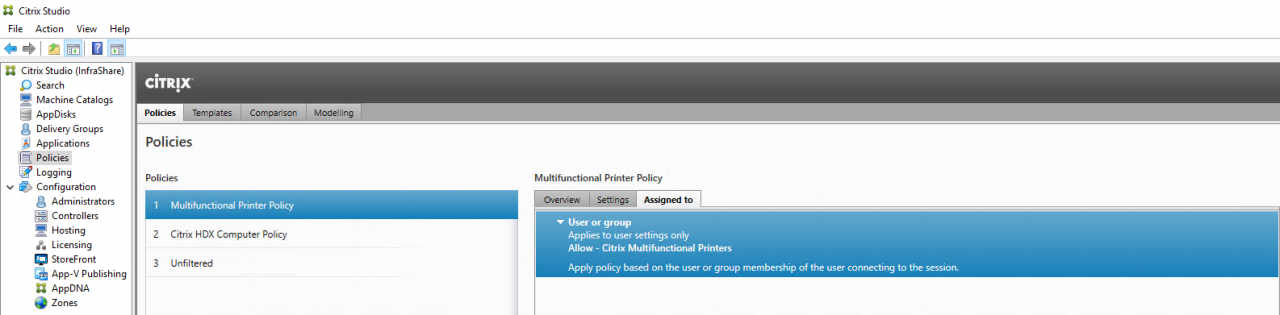
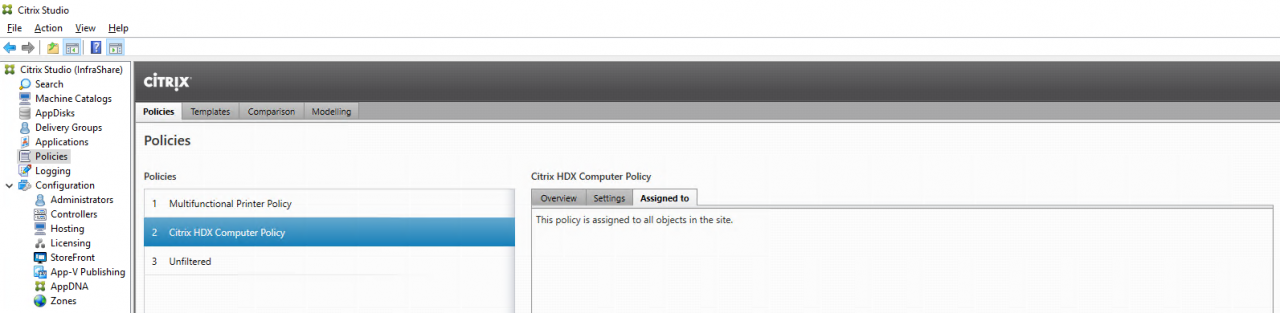
I created some example published applications with Security Group Filtering – a Citrix HDX Computer Policy and a Printer User Policy with security group filtering.
To read out the configuration parts with Smart Tools, you first need to arrange the connection to the old environment – so the Citrix Cloud will know where to get the information.
To provide this, you must install the Cloud Connector agent software on all your Citrix machines. The communication between the servers and Smart Tools occurs over outbound port 443 encrypted connection.
Through some simple steps, the Smart Tools wizard intelligently exports your existing farm policies and settings and seamlessly imports them into your new XenApp and XenDesktop 7.13 Site.
Supported Resource location
All the Citrix Smart tools can provide migration between the following platform and/or services:
- Public Cloud
- Microsoft Azure Cloud (ASM)
- Amazon AWS
- Private Cloud
- Citrix XenServer 6.1, 6.5 and 7.0
- VMware vSphere 5.1, 5.5 and 6.0
- Hyper-V
Register for the Citrix Cloud
Before we can use Smart Tools, we need to create an Citrix Cloud account – If you already have one, you can enter the direct namespace to the Smart Tools -> https://smart.cloud.com and log on with your Company MyCitrix account.
Note: For trial purposes, Citrix first needs to approve the service before you can use it. So expect some waiting time before you can start.

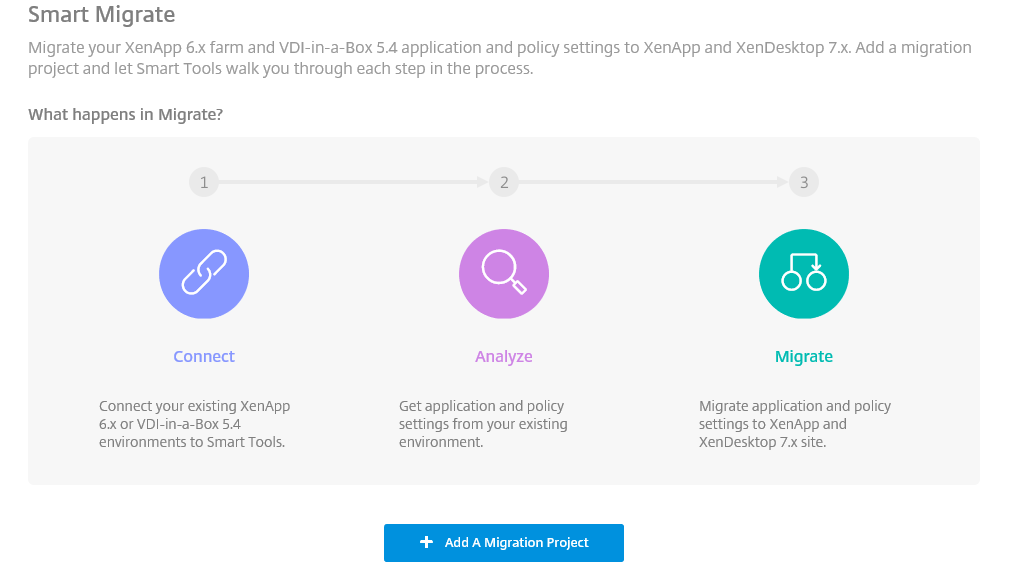
Configuring Smart Migration
Once you are in the Smart Migration portal – choose the Smart Migrate option:
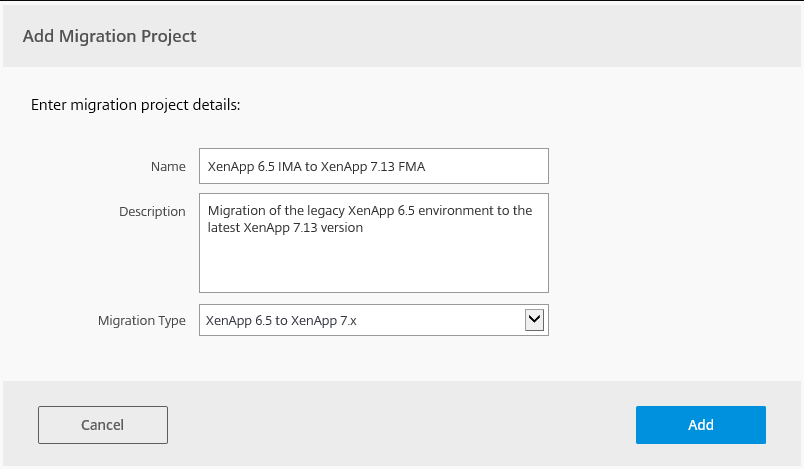
Choose Add A Migration Project
 Choose Add Project
Open the Project and choose the method of migration – for this article, we go for Fully Automated
Note: For the manual method, the Connection agent installation is not required.
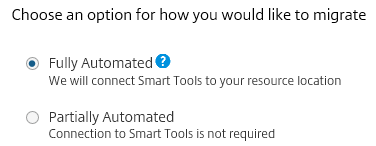
The Fully Automated process will proceed in 3 separate segments:
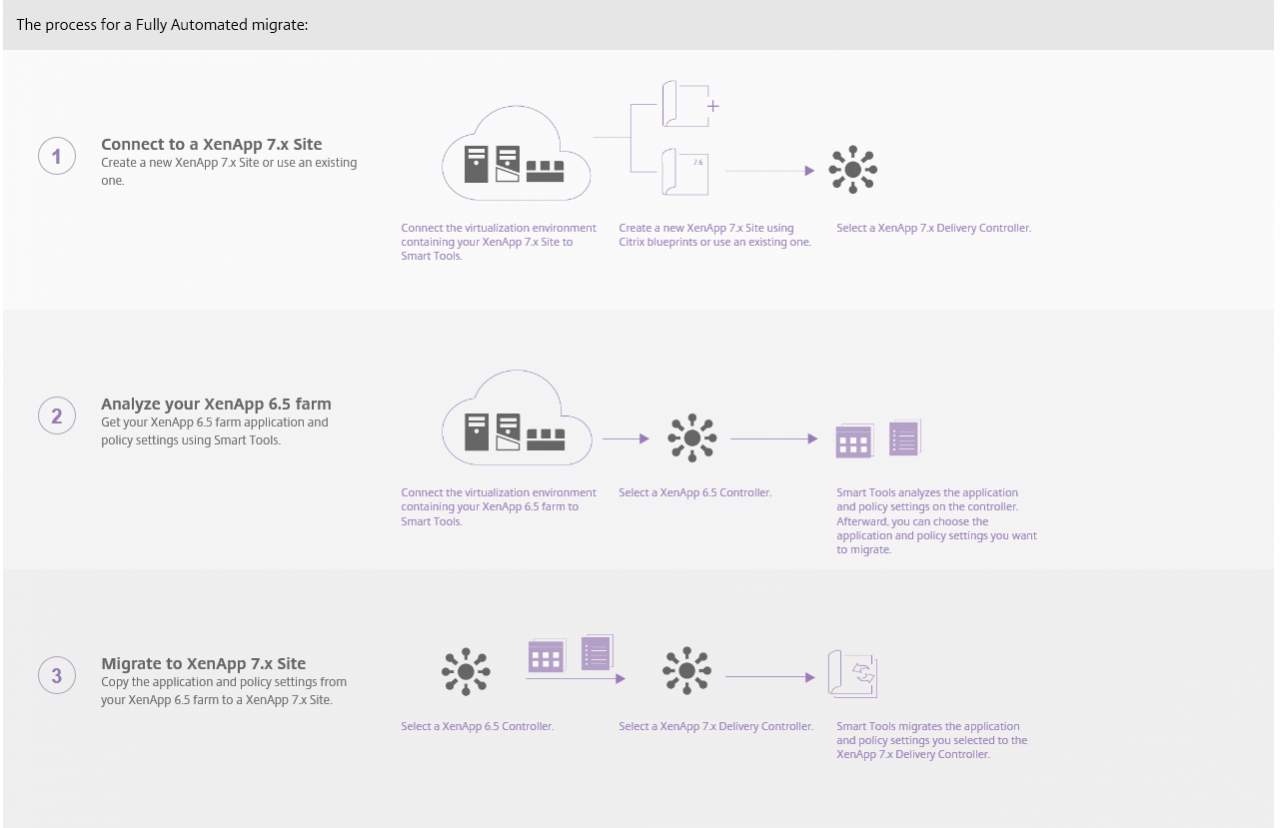
Select the Resource location
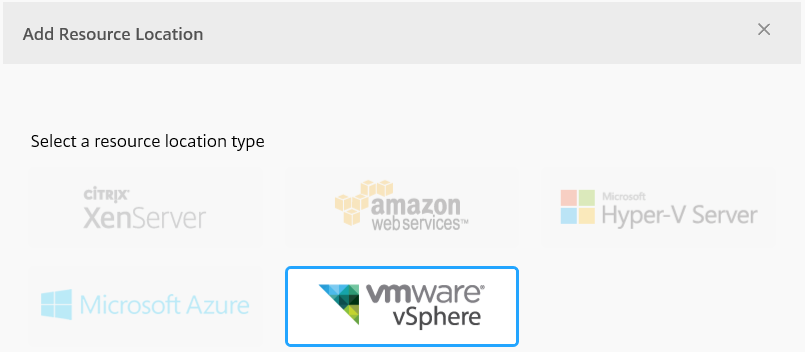
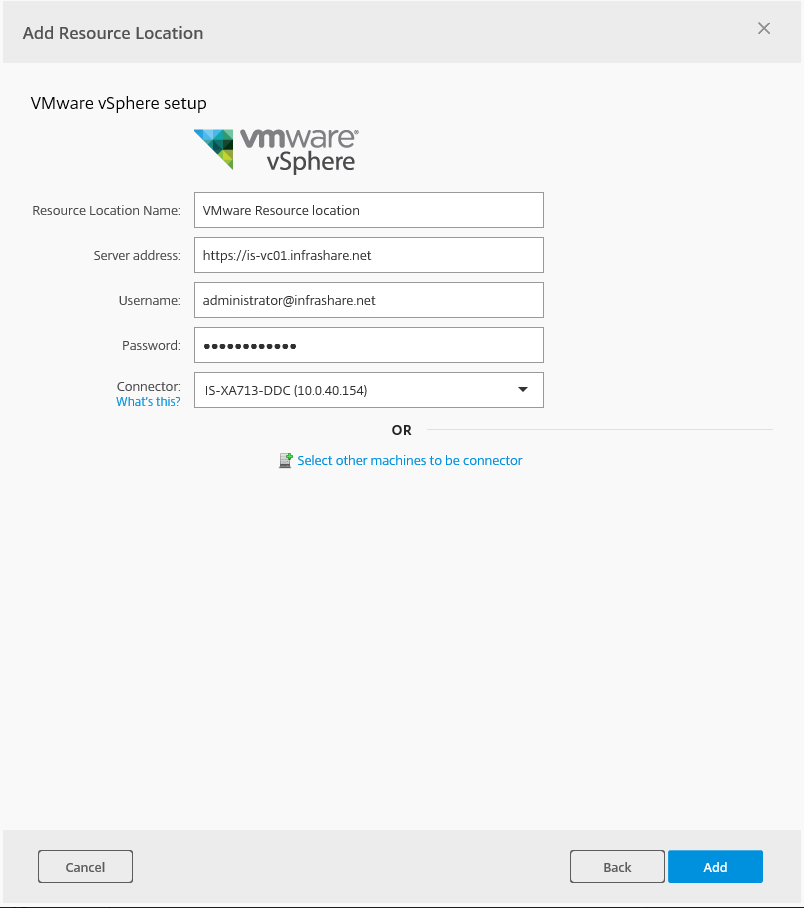
At the next screen we need to add our environment servers – for this article I will use VMware for both the XenApp 6.5 and 7.13 environment.
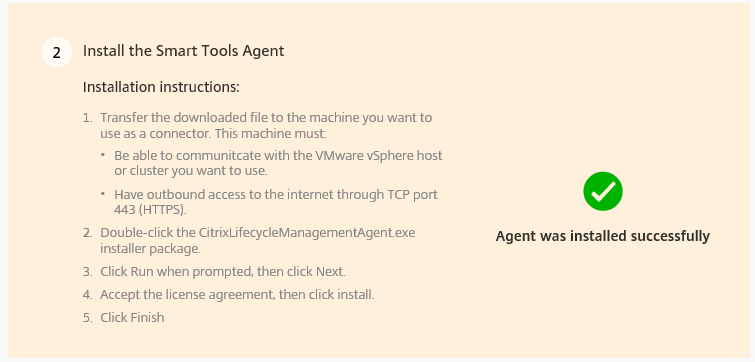
Install the Connection Agent
You must install the agent on all your source and destination servers – you then will be able to find and connect to your server afterwards. I’ll have done this already for the Datacollector and the new Desktop Delivery Controller.
Select the machine and fill in the requested VMware vSphere information, I will connect to VMware from the new Desktop Controller server.
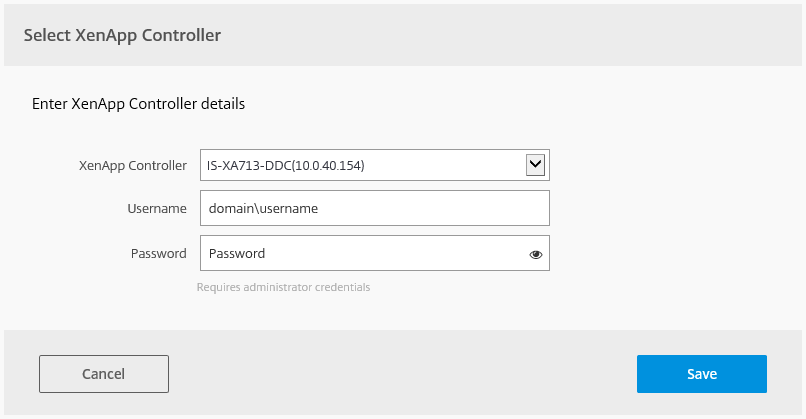
Now we need to select the XenApp controller

The required user must have Delegated – Full Administrator permissions for the entire Citrix Farm/Site
Before we can add the Desktop Delivery controller, we must run the Set-ExecutionPolicy RemoteSigned, otherwise we cannot perform any PowerShell commands through the agent.
This command must also be performed on the XenApp 6.5 environment server(s).

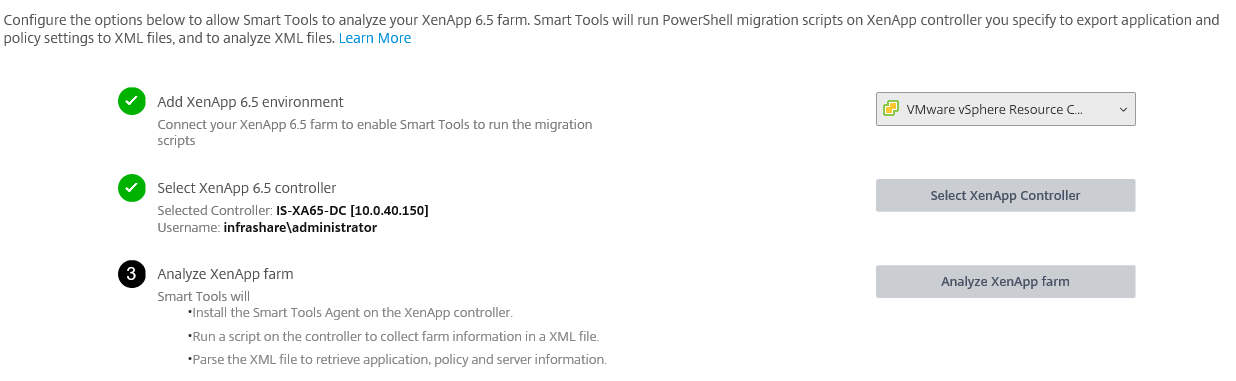
When the environment selection is performed successfully, the green checkmarks must come around.

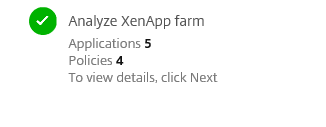
Perform the same steps for the 6.5 environment – Add the XenApp 6.5 environment and click on the analyse XenApp farm button
The configuration is being analyzed…
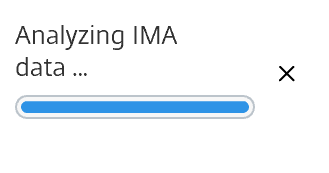
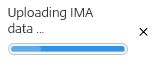
IMA Data is uploading…
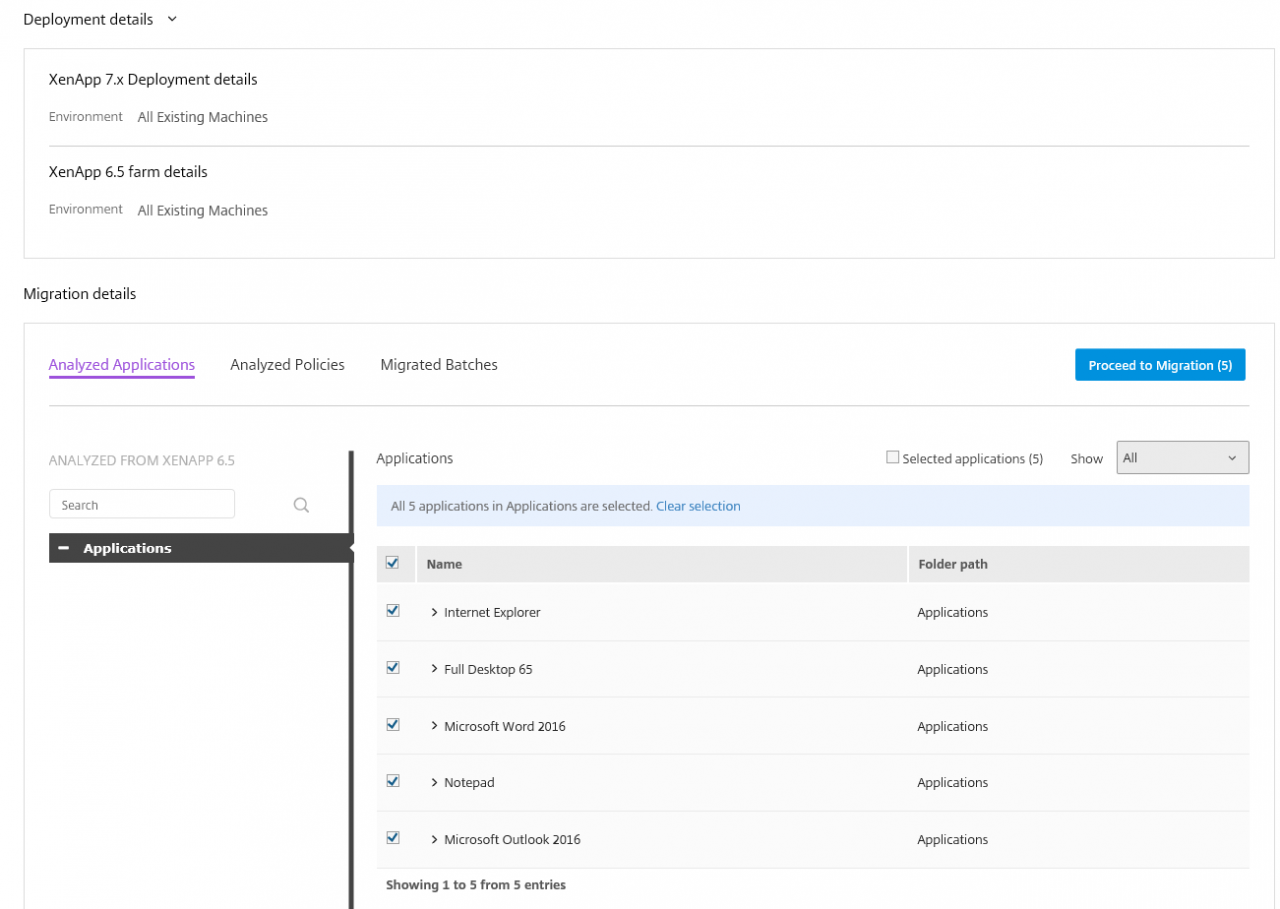
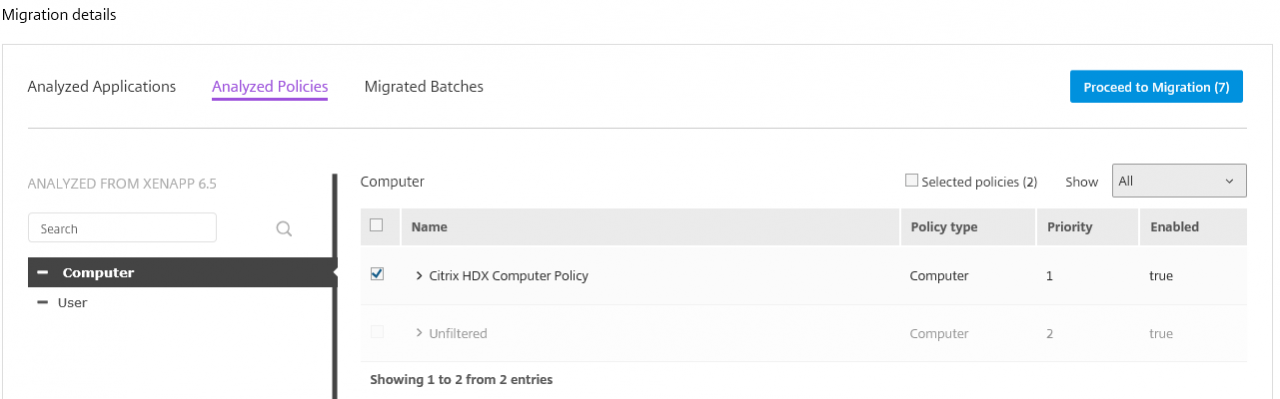
If all the steps did run successfully, your XenApp 6.5 Published Apps and Policy’s are found
You now can select all the Published Apps and User/Computer Policies that you want to migrate to the new 7.13 FMA environment
Computer Policy
User Policy
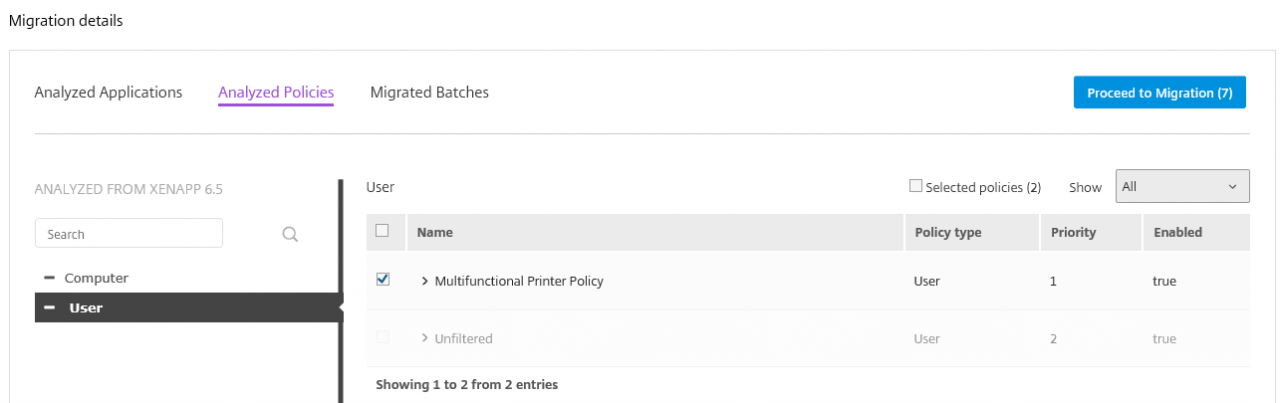
Once you’ve selected all the migration items, we can now start creating the migration batch by pushing the – Proceed to Migration – button.
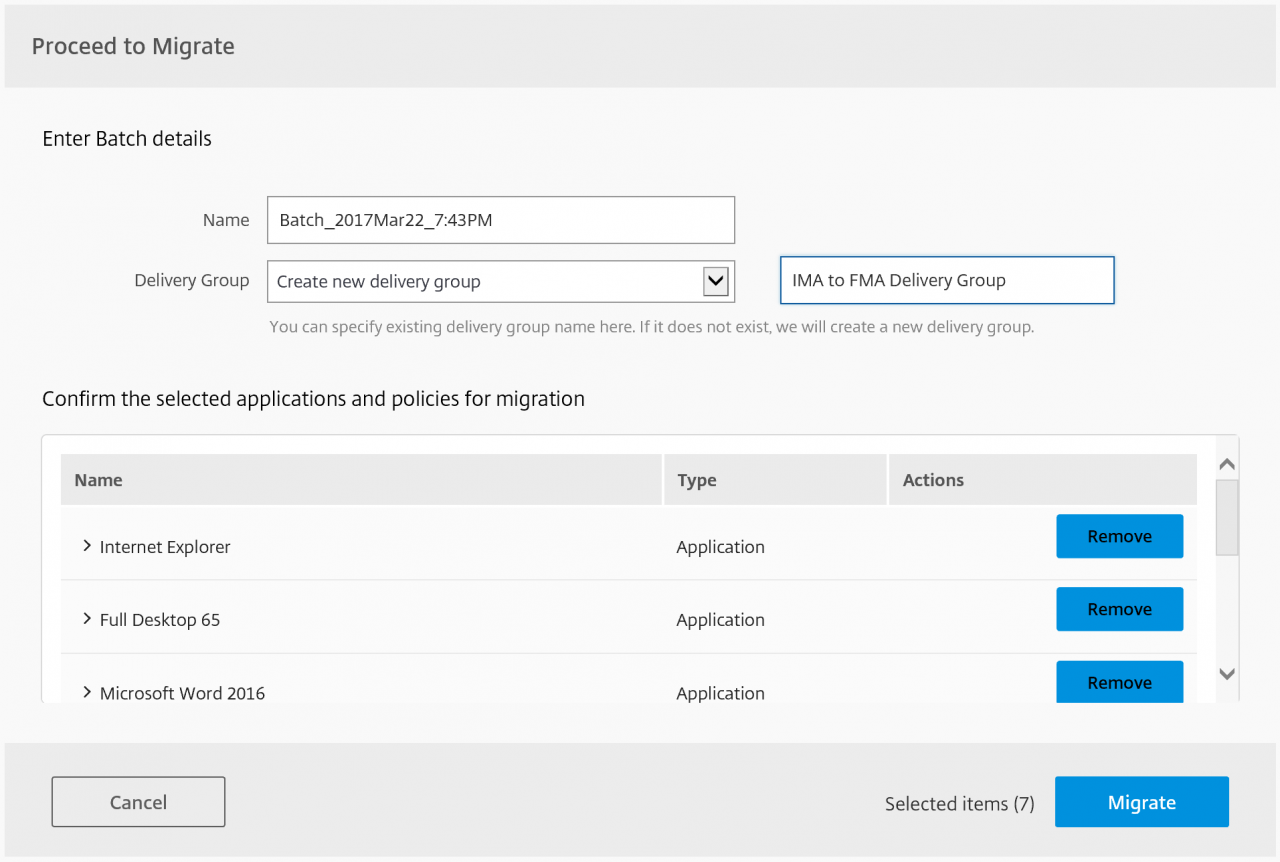
Select the Destination Delivery Group
When you need to place Applications or multiple desktops in separate Delivery Groups, just create another batch to make them separate.
Create the migration batch – I choose to create an new Delivery Group. When done, start the Migration
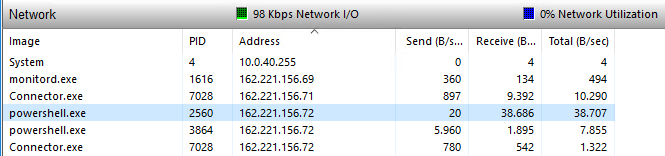
The Migration batch is now running.

On the 7.13 Desktop Controller PowerShell.exe pops up in the taskmanager – the jobs are running now

The PowerShell connection is taking place from the Citrix Cloud (162.221.156.71), just as source of the the Connector.exe (Lifecycle agent).
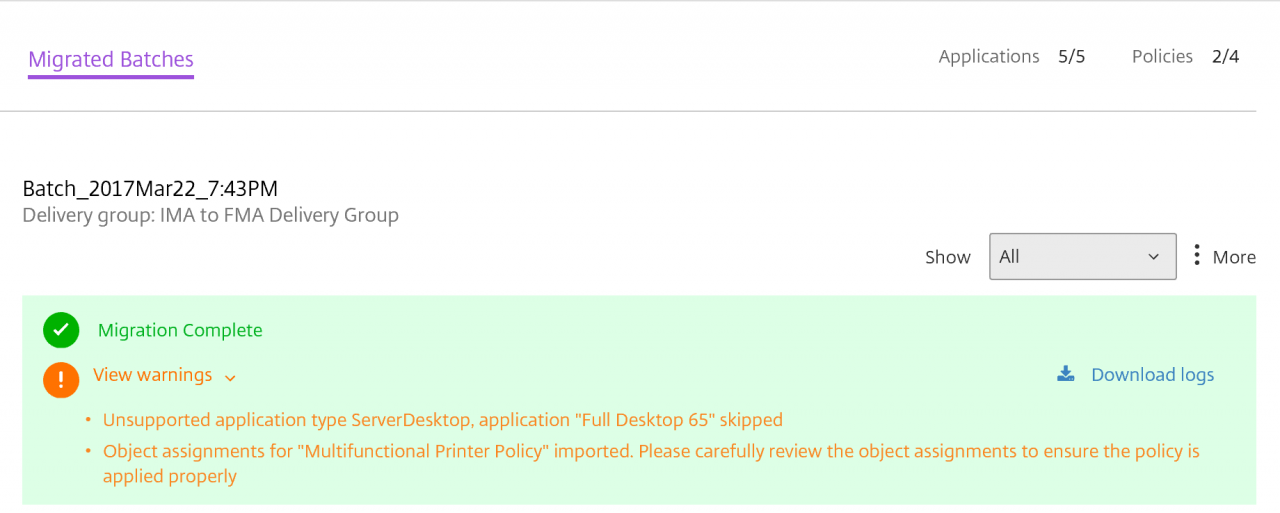
Migration check
And after 1 or 2 minutes – the migration process did work properly – all the published apps are migrated – only the Full Desktop is not supported, you’ll need to create it manually. The other 2 policies are the default Unfiltered, so they are not migrated.
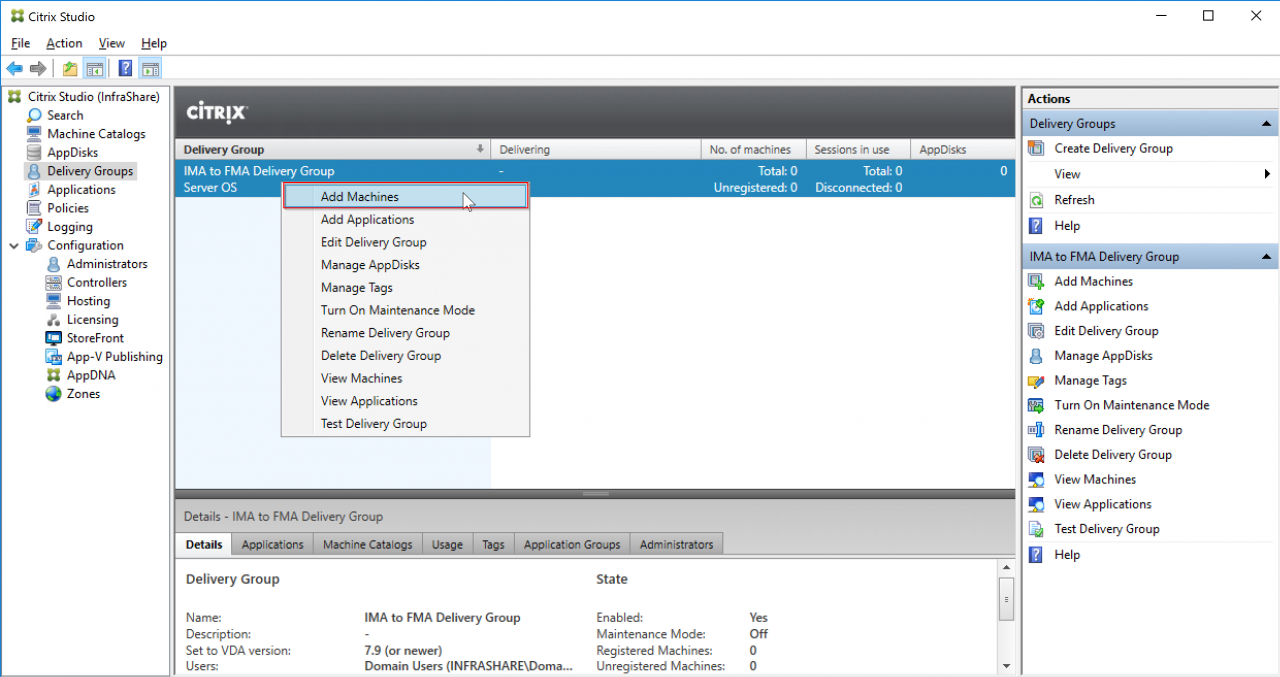
After the migration – open the FMA Citrix Studio to confirm all the selected sources are migrated. The Delivery Group is created/migrated successfully!
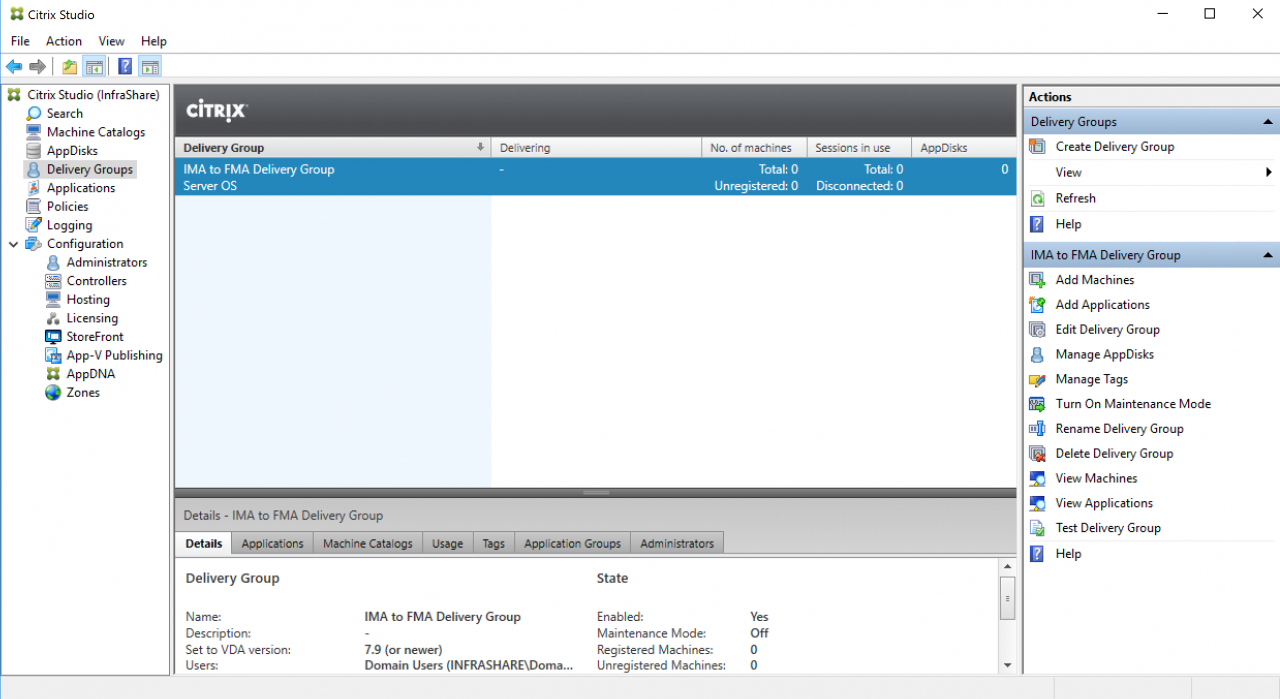
The selected User Citrix policies are migrated, including the Security Group Filtering!
The Computer Policy was filtered on worker group, this is replaced by all objects in the site.
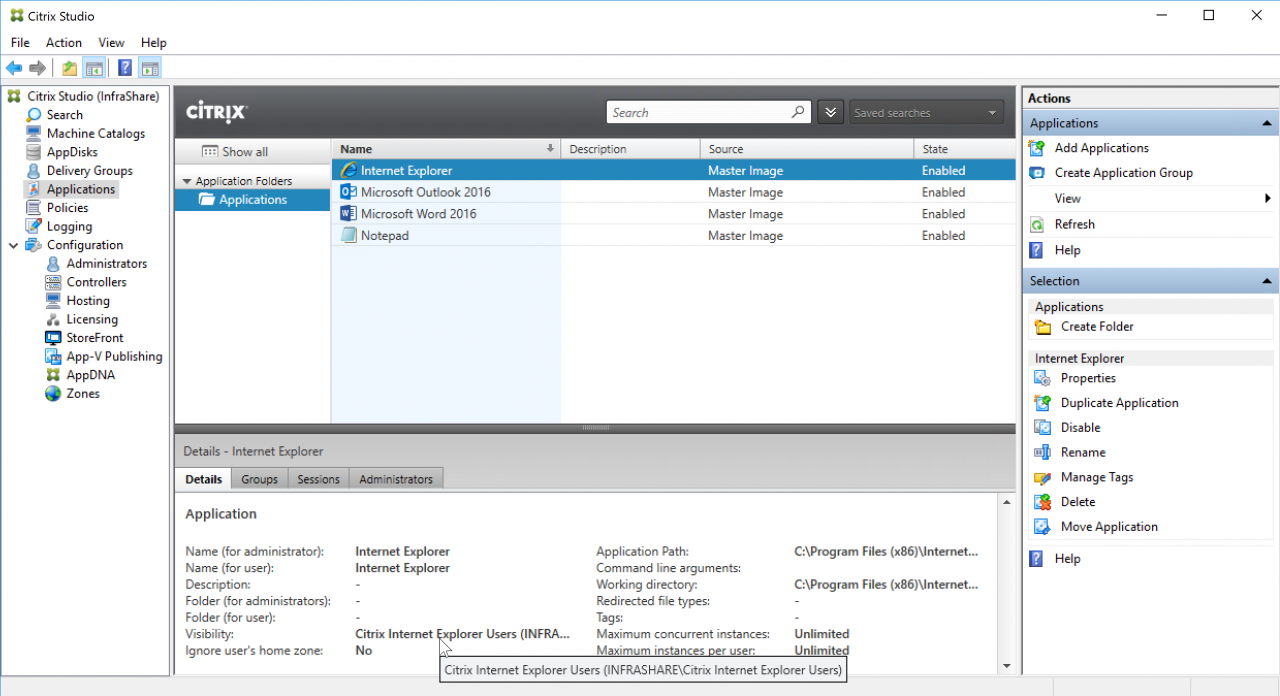
And the final most important migration part – All the Published Applications are successfully added!
You now can start adding a VDA – Machine Catalog to the Delivery Group , for example based on Windows Server 2016 Machine Creation Services for providing as source for the Published Applications. Make sure that you make the Applications available from the new master image.
When setup parts are done, the testing part comes around. So let’s logon to your new internal StoreFront portal to check if the Applications work properly.
And yes they do!