
Configure NetScaler Global Server Load Balancing to Recover your Citrix XenDesktop or XenApp environment in Microsoft Azure


Building the Digital Workspace of the Future can be a interesting road to follow. To prepare your environment for a Public Cloud, such as Microsoft Azure, there are different approaches to follow. Microsoft provides a great method to replicate, failover and/or migrate your on-premises servers to Azure with the service named Azure Recovery Service, what actually 1:1 replicates all your on-premises servers to the Azure IaaS service – Virtual Machines. Unfortunately the service doesn’t support the replication of the NetScaler, but the GSLB feature can fulfill this limitation to be the switching player between both active and passive environments. This was actually an technical Azure limitation before, but since March this year it is possible to activate multiple IPs on the NetScaler VPX in Azure. This definitely opens a lot of doors to implement NetScaler on fully Cloud, but in this case, also hybrid-multi Cloud scenarios! (read the whole previous Citrix announcement article here).
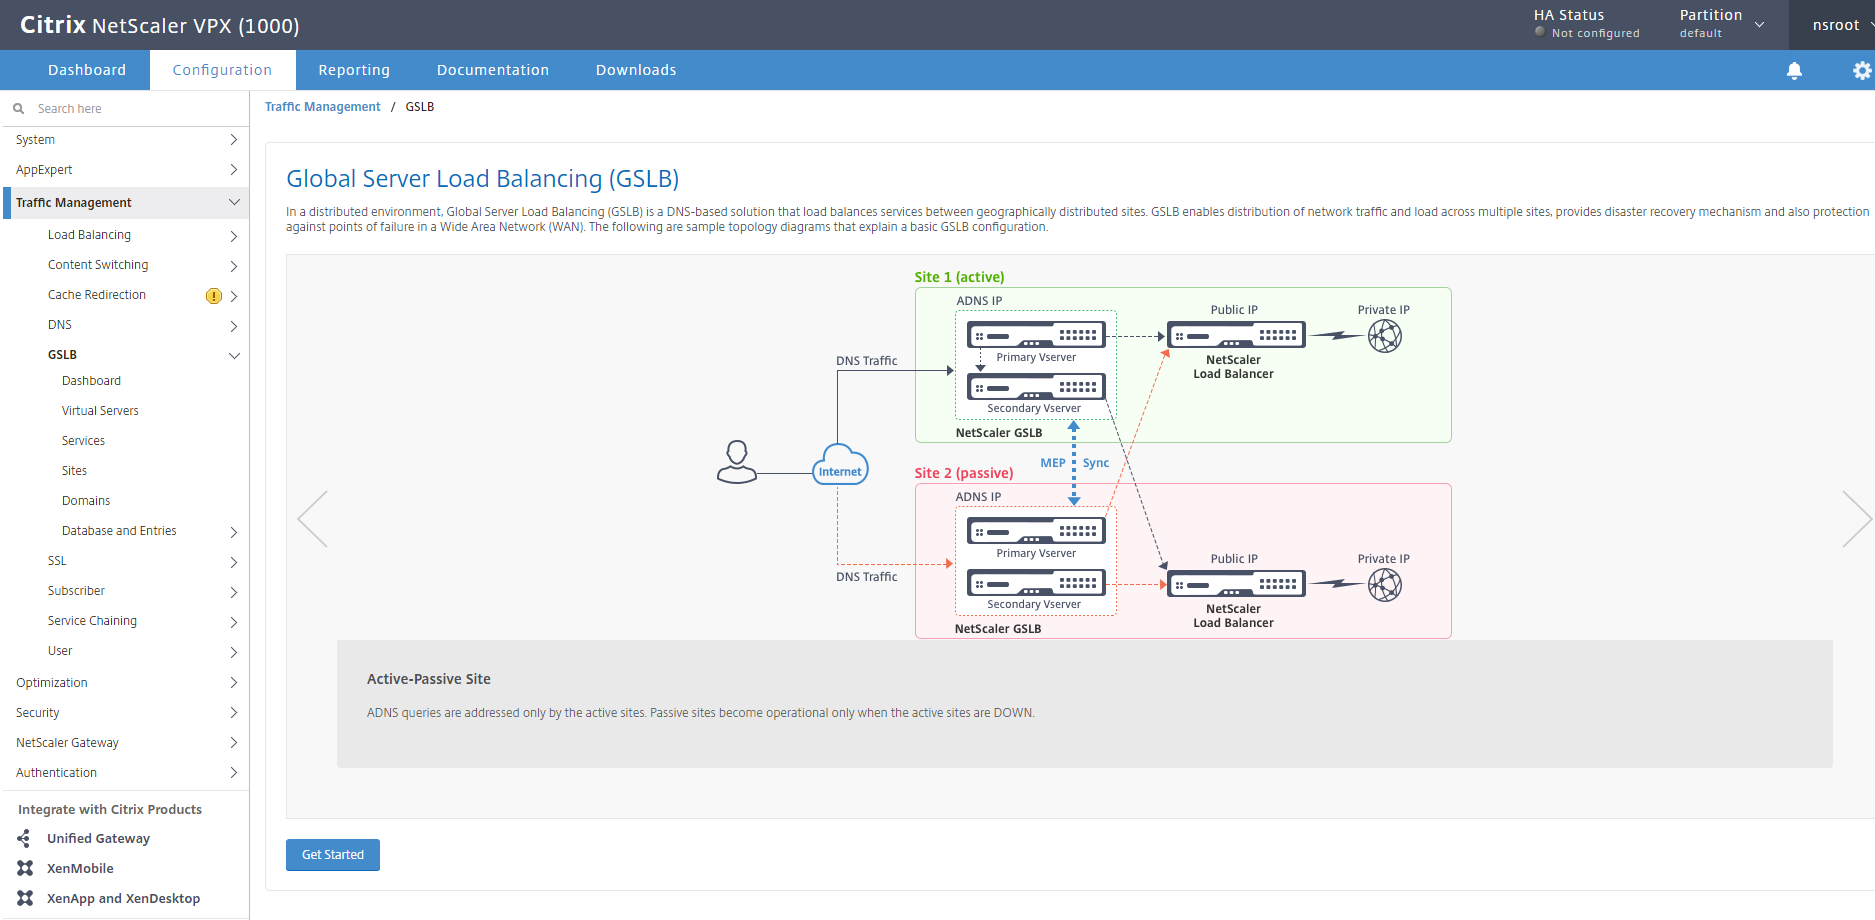
GLSB stands for Global Load Server Balancing and is a DNS-based solution that load balances services between geographically distributed sites. It can be performed in an Active-Passive or Active-Active Mode configuration. For Disaster Recovery scenario’s the Active-Passive will fit best. Depending on the availability of your Citrix XenApp or XenDesktop environment, it also can be used in active-active mode. What makes it also possible to load balancing ICA sessions between different Azure Regions around the globe, with the NetScaler GSLB load balancing proximity DB as method. Just place an extra NetScaler VPX in that specific Azure region, open all the required ports on the NSG (Network Security Group), run the new GSLB wizard and you’re all set!
In this article, I’ll show you how you can configure NetScaler v12 GSLB in Active-Passive mode, just to prepare you’re environment for the Azure Cloud and/or for Disaster Recovery reasons.

Note: Did this all made you more curious, want to dive even deeper on Microsoft Azure Recovery Services and Citrix NetScaler in Azure? Please join Me, Dave Brett and Carsten Bruns on our MyCUGC presentation at the 24th of Augustus in the online Webinar: Building a Citrix XenApp Disaster Recovery environment? Consider NetScaler GSLB & Microsoft Azure Recovery Services. The webinar was recorded, watch it now through this link!
Please share the article with the #MyCUGC hashtag, to share your love for the Citrix User Group Community!
Table of Contents
Click on the title to get forwarded in the article:
- Create the NetScaler in Azure
- Configure Global Server Load Balancing (GSLB) on-premises site A
- Configure Global Server Load Balancing (GSLB) Azure site B
- Create the internal DNS Delegation Zone
- Simulate a failover
Good things to know…
- Both NetScalers need to run the same software version, for this article this will be build NS12.0 41.16.nc. At the moment of writing the one that is delivered from the Azure marketplace.
- ADNS stands for Authoritative DNS Service, what is needed to return the correctIP Addresses for the internal and external DNS name servers!
- The service is all DNS-based and relies on DNS queries, 2 external and internal records eventually are be created. In case of a failover or outage the standby record takes over and becomes active. The public external ICA Proxy record will be pointed to the external IP that is redirected or NAT’d to the ADNS service that will be configured later on in this article.
- ADNS queries are addressed only by the active sites. Passive sites become operational only when the active sites are DOWN.
- The passive sites will be configured as backup GSLB Virtual Server, to act directly in case of an site outage. One great feature to exceed the RTO (Recovery Point Objective – the time your recovery environment will be reachable again) of your Disaster Recovery environment!
- The Metric Exchange Protocol (MEP in short) is the red wire between that determinates the availability between both GSLB sites.
- In an Active-Active NetScaler GSLB setup – You can configure the GSLB feature based on the round trip time (RTT), static proximity, or a combination of the two.A NetScaler appliance directs DNS requests to the GSLB site with the best performance/closest distance. When a client sends a DNS request, the appliance identifies the nearest site location to provide the best performance / lowest latency to the client.
- You need at least a NetScaler Enterprise –VPX, MPX or SDX license to make use of the GSLB feature.
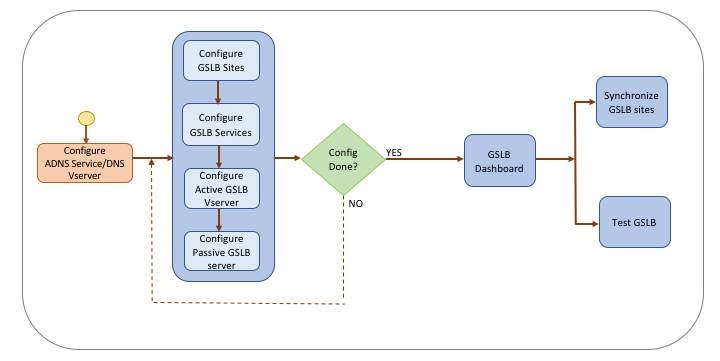
And last but not least… Nowadays it’s also very simple to implement, since the release of NetScaler v12, Citrix has provided a built-in simplified GSLB wizard, almost the same as the ones for Unified Gateway and NetScaler Gateway. Just take a look at the next steps and I’ll walk you through!
Just to get an clear view of all the steps that are now all consolidated in the wizard, can be useful for troubleshooting later on,see below:
Before we start – Check, double check…
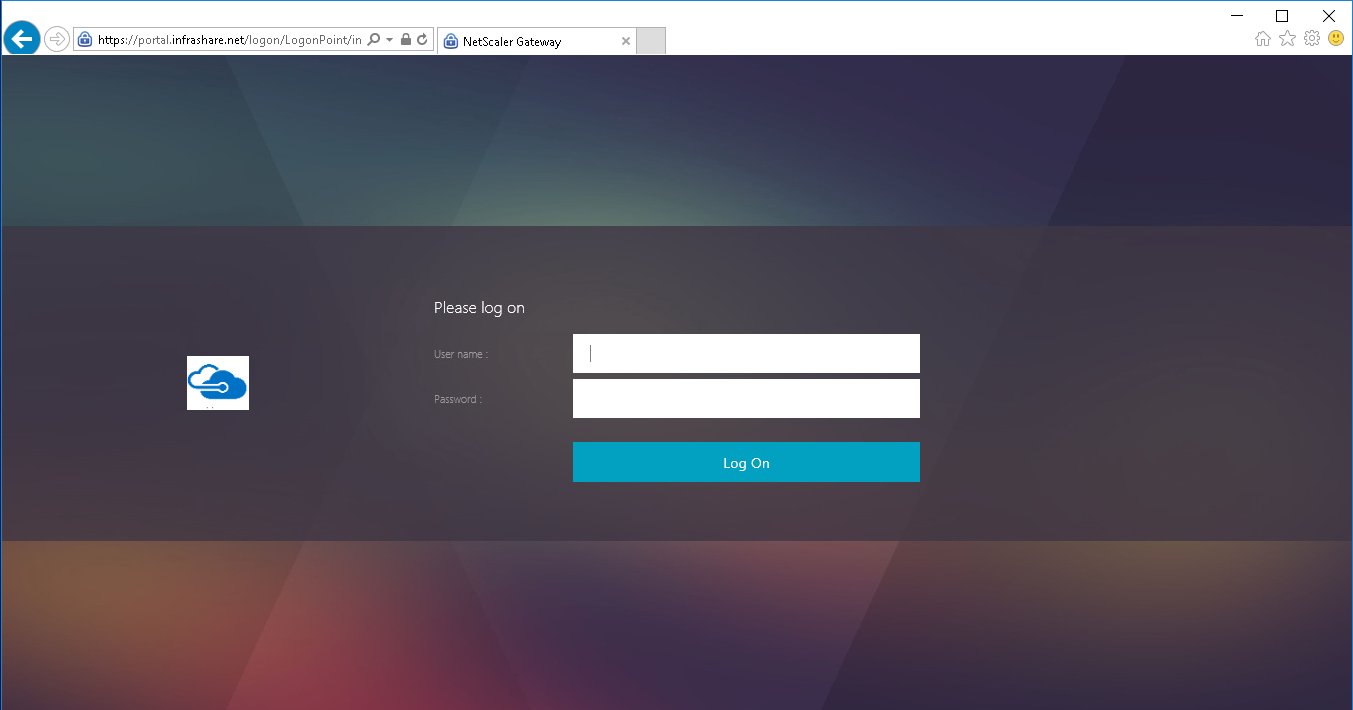
Before we start, I assume that you already have a pre-configured NetScaler 12.0 device in your on-premises environment with a ICA Proxy / VPN vServer configured on both NetScalers. This article only operated on the near front-end of the external connection to your NetScaler. So make sure that your NetScaler is all ready for setup for ICA Proxy, with on both sites the same external url configured, for example portal.infrashare.net or citix.infrashare.net, this is all up to you.
When u setup the NetScaler in an active-passive scenario built up in Azure Recovery Server, just like I do. Then just make sure that the passive NetScaler in Azure holds all the right (new DNS and/or IP addresses for example) configuration items of the Citrix environment in Azure, so you are completely sure that the configuration works in case of a failover!
Make also sure that your on-premises firewall/router is already prepared for GSLB. I will walk you through the most steps in this article, but just to clear things out first, I made up a list:
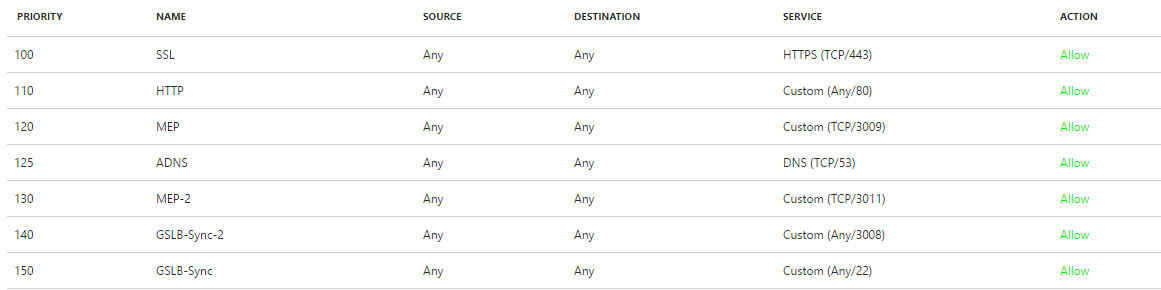
- The communication process between GSLB sites uses TCP port 3011 or 3009, so this port must be open on firewalls that are between the NetScaler appliances
- Port 53 needs to be NAT’d to the inside SNIP, that is configured on the ADNS service to resolve the external DNS entry’s
- Make sure that the ports TCP 22 and TCP 3008(Sync) ports are accessible from the SNIP (Subnet IP) to the remote SNIP public IP and vice versa.
Need help with the ICA Proxy / NetScaler Gateway part on this, please check one of my earlier blogs. (Only skip the Load Balancing part, and replace them with next following steps below.)
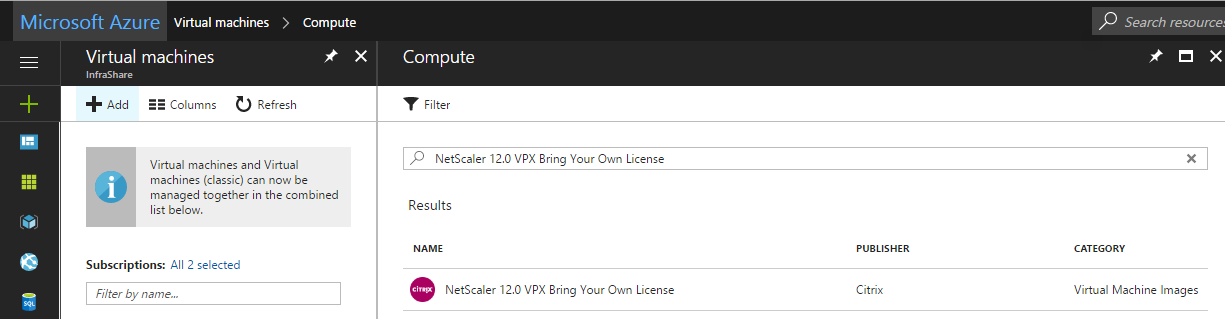
Step 1: Deploy the NetScaler in Azure, perform the same pre-configuration for the NetScaler device in Azure. This article only covers the GSLB configuration items that are required.
Attach the Network Addresses to the NetScaler (Azure)
Since the support (April this year) of multiple addresses in Azure for NetScaler, we are able to use GSLB in Azure. To do so, we need to Add the addresses in the IP Configuration menu of the Network Interface properties of the NetScaler Virtual Machine.
Note: There is also a possibility to add extra network interfaces instead of extra addresses on the same interface. For this article is it not required, but when u need to create separate Network Security rules per network address, just to make it more secure, this is one way to solve this. I cover the PowerShell cmdlets for doing this in one of my earlier articles.

Step 2: Click on the + Add button for the GSLB IP Configuration

Note: Make sure to select the Static IP assignment option, to make sure the external network addresses will be the same after you reboot/shutdown the NetScaler in Azure!

Step 3: At the end, we need have the following 3 IP Addresses configured on the Network Interface in Azure. One for the NSIP, one for the SNIP and one for the VIP.
Note: Don’t forget to remove the ipconfig1 public IP after the configuration steps, you’re management portal will be open for everyone. You can solve this by creating another interface through PowerShell – or just make use of a IPsec VPN or ExpressRoute to Azure – so you can connect through the internal “private” address.

Add the network addresses to the NetScaler IPs
Step 4: Open the System->Network->IPs settings screen and click on the add button to add the network addresses
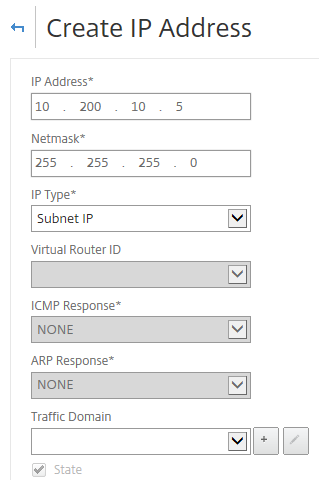
Step 5: Add the ipconfig2 private address as Subnet IP for the ADNS service, click create
Step 6: Add the private ipconfig3 address as Virtual Server for the ICA Proxy VPN vServer, click Create
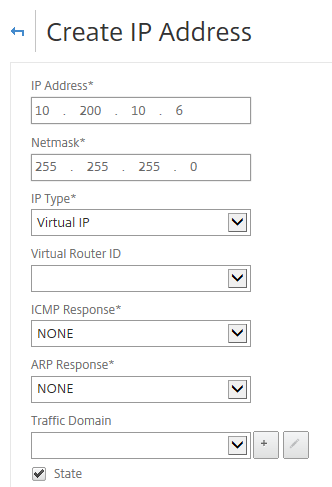
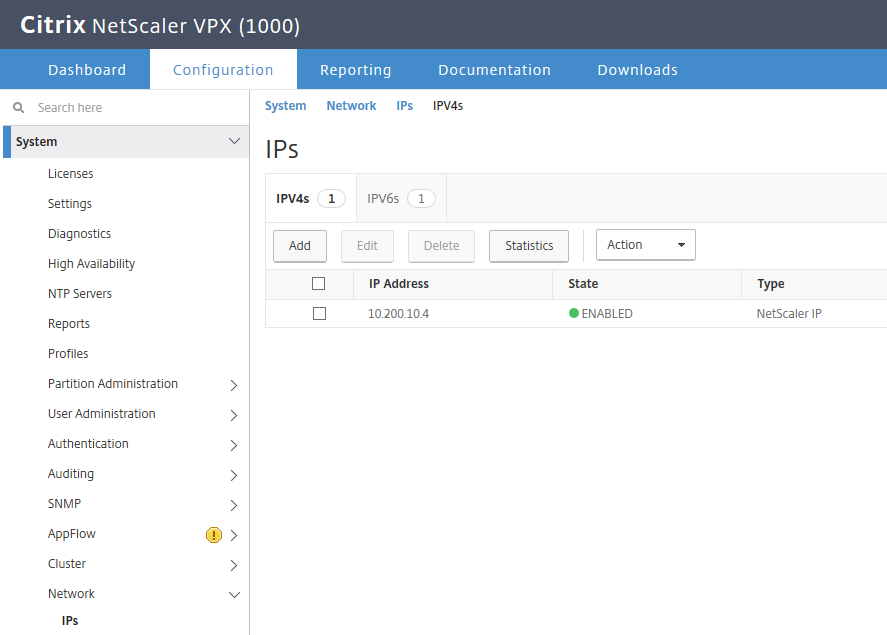
Step 7: Make sure that 3 address types are listed, just as the picture below
Note: The Virtual IP is already listed, the reason for that is that I already did the pre-configuration of my ICA Proxy VPN vServer.

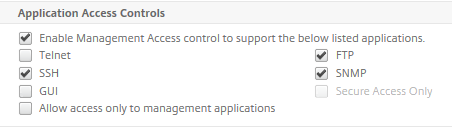
Step 8: Activate the following Application Access Controls options on the GSLB Subnet IP, otherwise the GSLB IP configuration will not succeed.
Add the required ports to the Network Security Group
Step 9: Search forthe Network Security Group in the marketplace and add the following NSG, click on Create

Step 10: Open the Network Security Group menu and open the settings and add the following inbound rules
Step 11: Click on the – Network Security Group – in the Network Interfaces screen of the NetScaler to attach the NSG, click on Edit
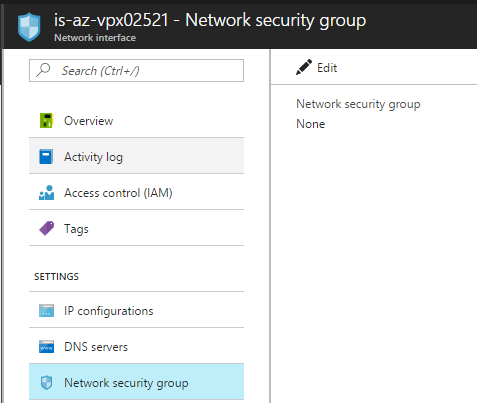
Step 12: Click on the created NSG – named NetScaler NSG and click on Save

Attach the Network Addresses to the NetScaler (on-premise)
Step 13: Perform the same steps for the on-premises NetScaler. At the end there must be at least one NetScaler IP, one Subnet IP (for ADNS / GSLB Site IP) and one Virtual server for the ICA Proxy service.

Note: Configure GSLB in an environment with the limitation of only one Public IP? NAT’d only the specific GSLB and ADNS ports to the Subnet IP and port 80 and 443 for the ICA Proxy VPN vServer.
The following TCP ports needs to be redirected to the internal Subnet IP are: 3009, 3011, 53, 22
Step 14: Activate the same Application Access Controls options on the GSLB Subnet IP , otherwise the GSLB IP configuration will not succeed.
NAT rules (on-premises Router/Firewall)

Configure Global Server Load Balancing (GSLB) on-premises site A
We start the wizard on the “Active” on-premises site, the network preparation is required to do first.
Step 15: Open the Traffic Management -> GSLB option and click on Get Started
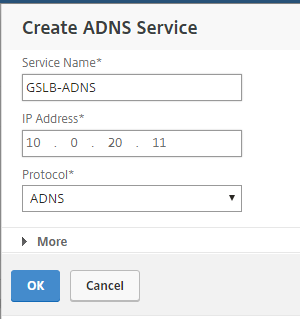
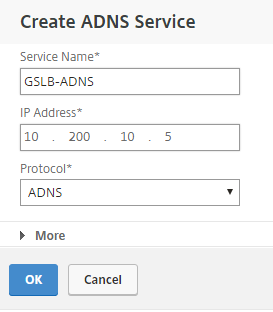
Step 16: Click on the – Configure ADNS Service – option

Step 17: Enter in a name for the Service and the Subnet IP, leave the protocol on ADNS and click on Ok
Note: I’ll recommend you to deploy the NetScalers in a HA setup to make the ADNS service redundant on site A/B level.
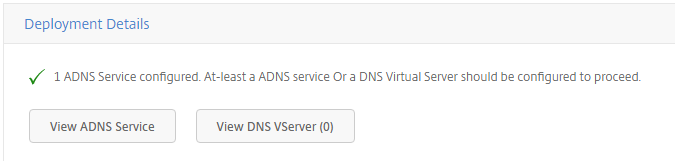
The green checkmark is now visible
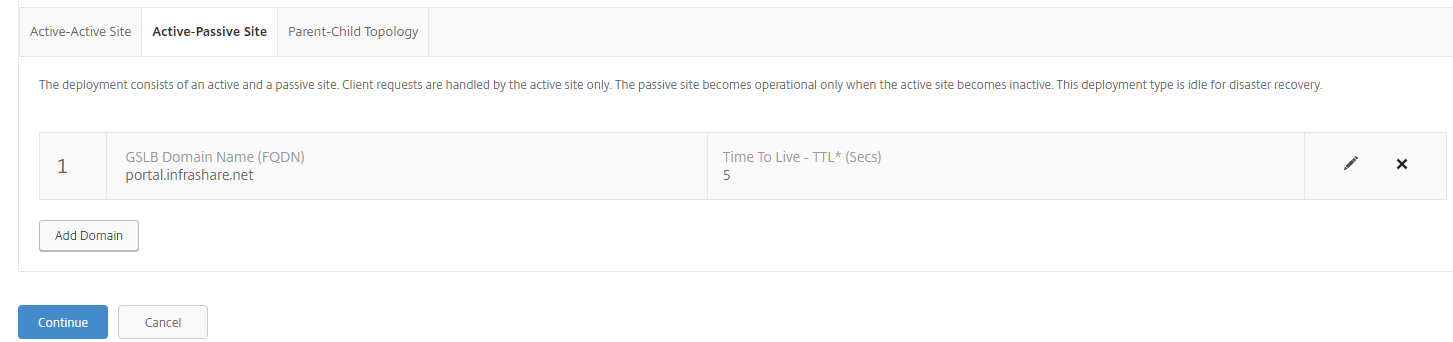
Step 18: Select Active-Passive Site and enter the ICA Proxy FQDN that you want to use, for this article I’ll use the portal.infrashare.net record. Let the TTL on 5 sec. what will result in a update of the external DNS record within 5 seconds, very important in case of an site outage to come back online again! Click on Save
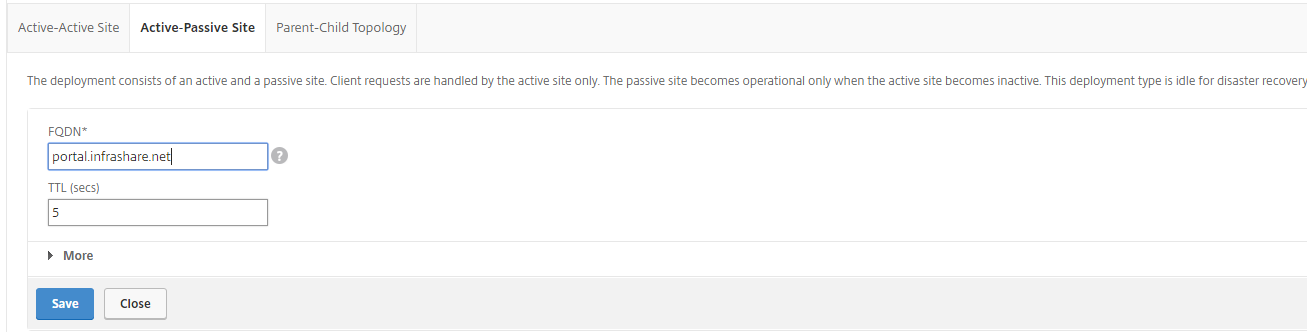
Step 19: The FQDN is now listed, confirm the name and click on Continue

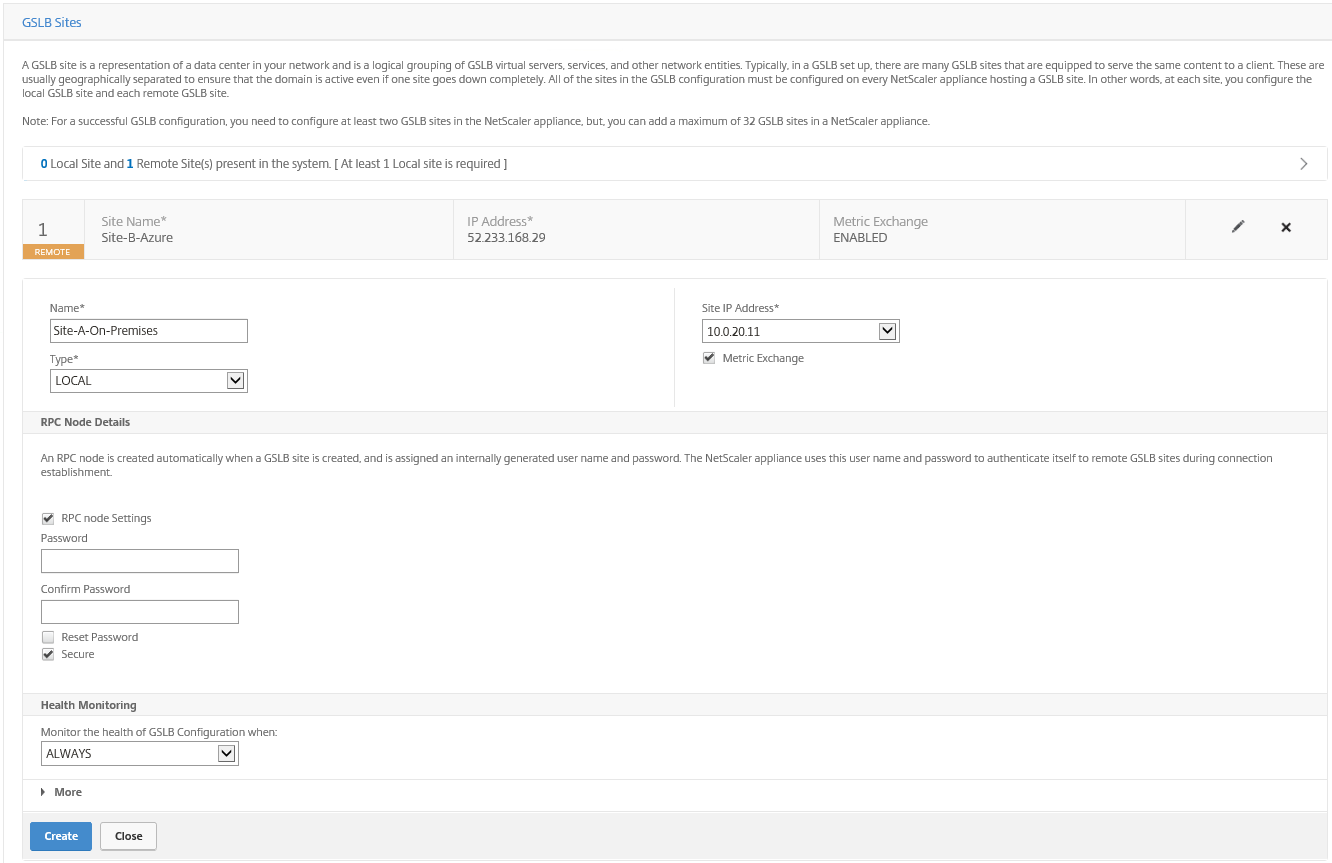
Step 20: Click on Add Sites to add the Azure Remote Site B

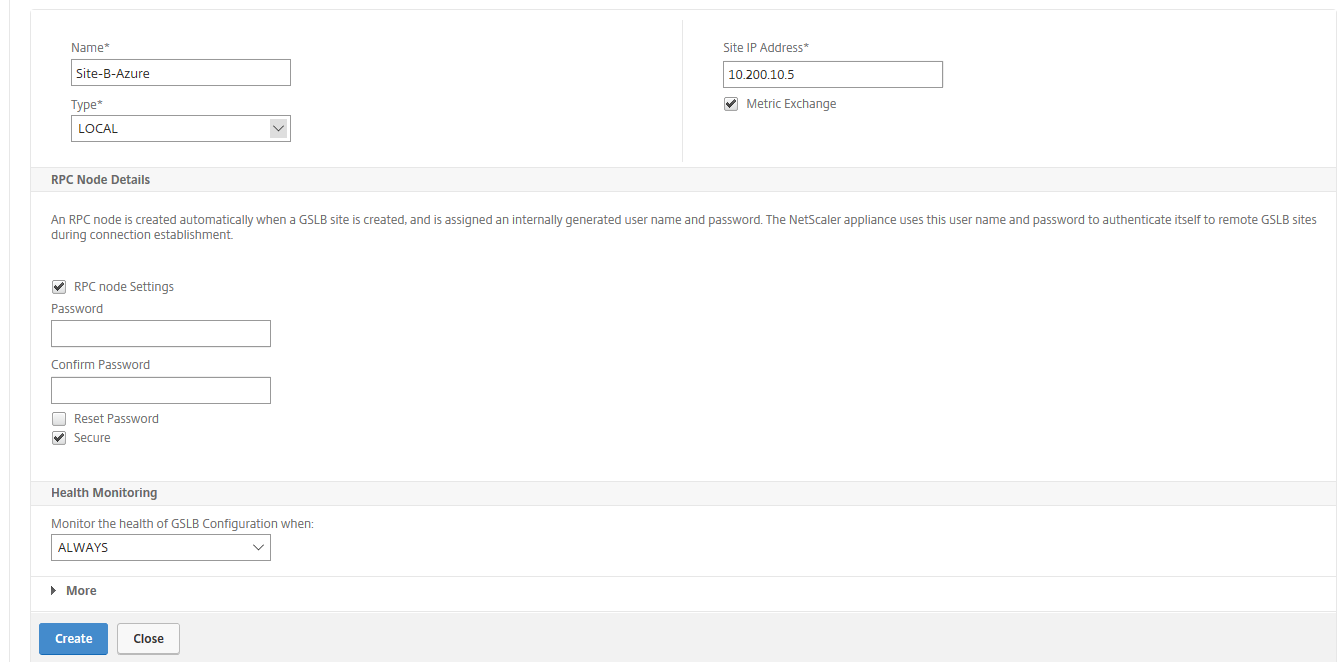
Step 21: Enter the requested information for the Azure (passive) remote site B. Give in a name, enter in the Public IP Address of the SNIP / GSLB IP ipconfig2 interface. Select the RPC node option to sync on the secure reliable TCP 3009 port. Click on Create
Note: Make sure that the nsroot password is the same as the local on-premises NetScaler(s).

Step 22: Click on Continue

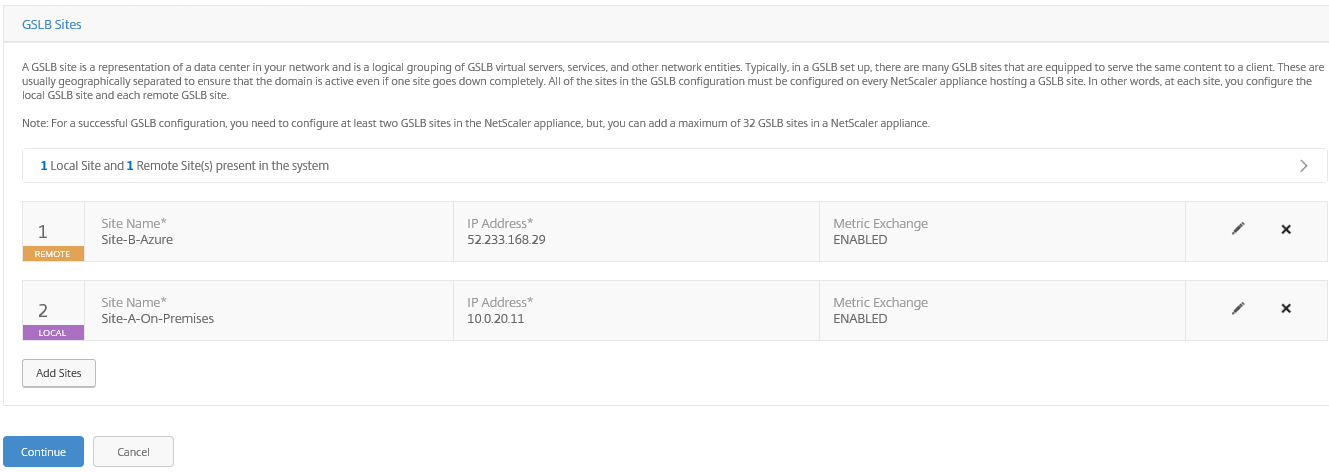
Step 23: Click on – Add Site – to add the local on-premises site A – enter the local Subnet IP. Click on Create
The following 2 sites must be listed now, just like picture below. Click Continue
Step 24: Now we need to add the GSLB services for both sites; Add the information for the (ICA_Proxy) VPN vServer for the Local Site A, use ping as monitor to use as detecting when the MEP service fails. Select the option virtual servers and add the existing Local VPN vServer. Add the public IP and 443 SSL port and Click on Create
Using HTTP -> HTTPS redirection, then you must repeat the same steps for HTTP. Also later on for the Site B configuration.
Note: Using a IPsec VPN tunnel, NetScaler SD-WAN or ExpressRoute, then the MEP sync can also take place over the private address instead of the public address. Without an VPN, you can still fill in the private address and the public.

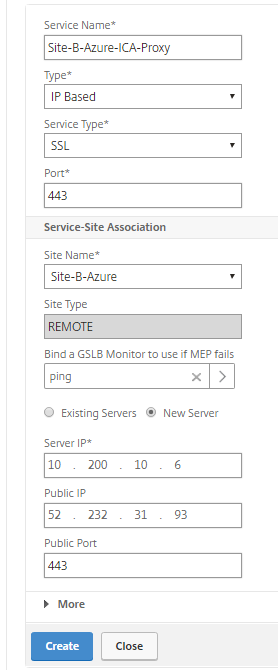
Click again on – Add Service – to add the Remote Site service. This will be the ipconfig3 Virtual Server Private and Public address and port (see below). Click create
The following 2 Services are now listed. Click on Save and Continue

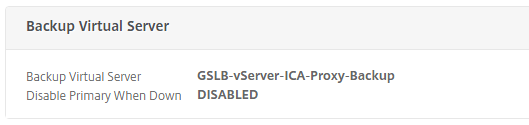
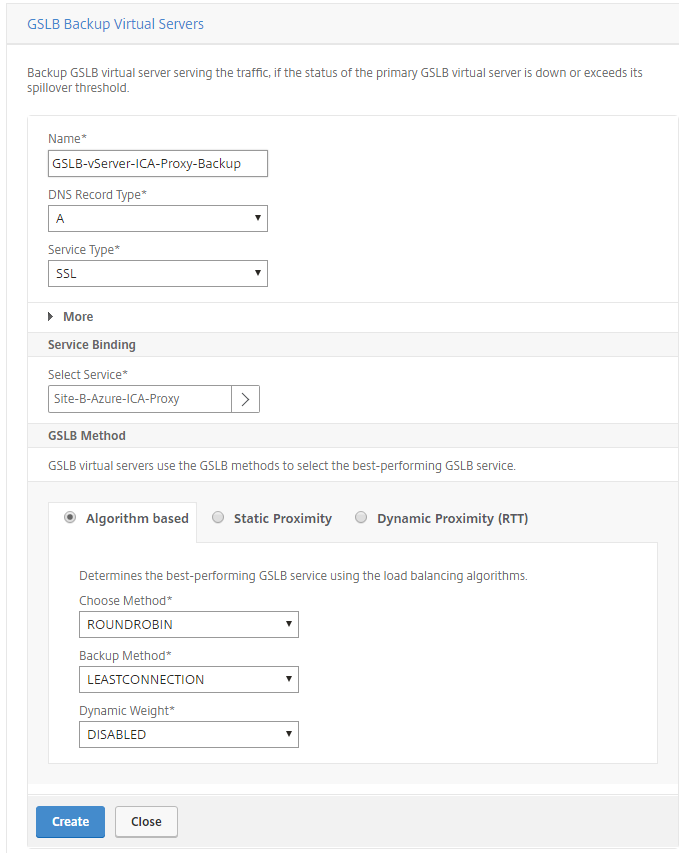
Step 25: Define first the Backup GSLB Virtual Server, give in an name, enter the SSL protocol and select the correct ervice binding. Click on Create
Note: The Backup GSLB virtual server serves the traffic, if the status of the primary GSLB virtual server is down or exceeds its spillover threshold. After the setup, the following backup setting will be activated on the primary GSLB Virtual Server.

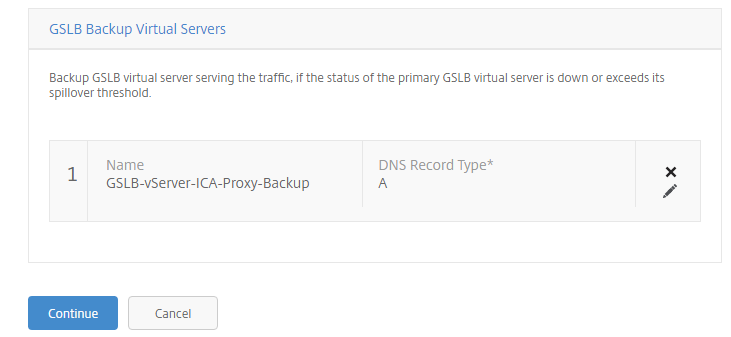
Check the settings, click Continue

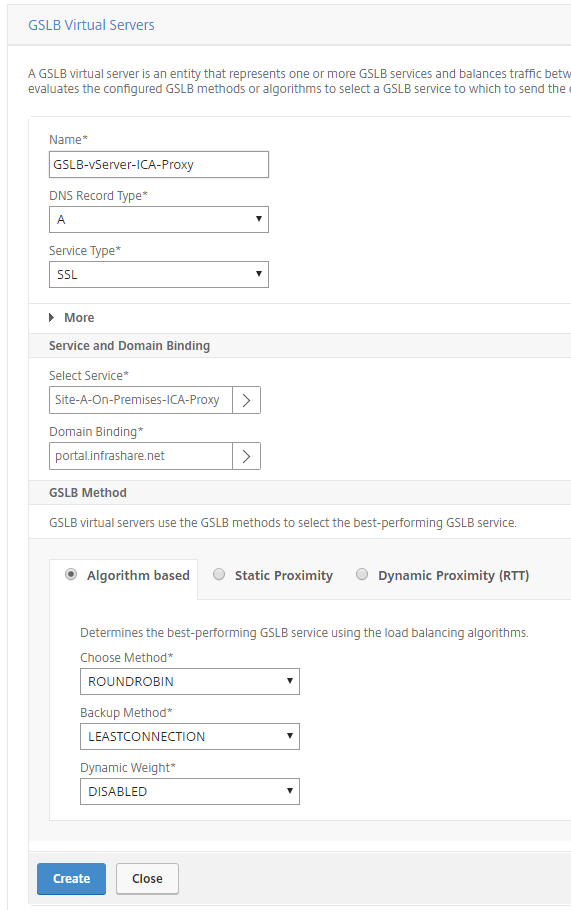
Now we need to add the Active GSLB Virtual Server, please take over the settings from the picture below

Select the correct domain binding

Step 26: Selectthe correct GSLB site service and bind them to the Virtual GSLB server. Click Create when finished
Note: Select only the On-Premises ICA Proxy Service!

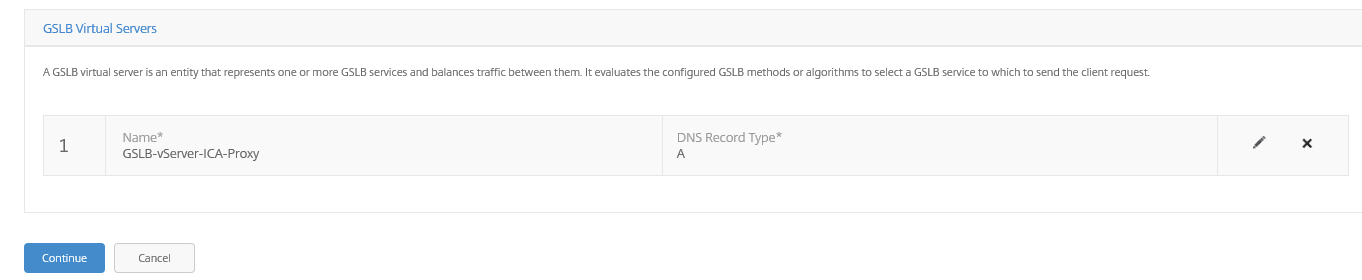
The following GSLB Virtual Servers needs to be listed in the summary.

All the settings are confirmed? Please click on Done…

Step 27: Confirm that the Sites status is UP (2), just like the picture below. Then we can go proceed the same steps on the Azure NetScaler servers.

Configure Global Server Load Balancing (GSLB) Azure site B
Step 28: Create the ADNS Service, just the same as the Local site, use the SNIP ipconfig2 private address for this one. Click on Ok
Step 29: Go again to Traffic Management -> GSLB and click on Get Started. Enter the ICA Proxy FQDN that you want to use, for this article I’ll use the portal.infrashare.net record. Let the TTL on 5 sec. what will result in a update of the external DNS record within 5 seconds, very important in case of an site outage to come back online again! Click on Save

The FQDN is now listed, confirm the name and click on Continue
Step 30: Click on Add Sites

Step 31: Enter a Name for the on-premises – Remote site A and give in the External Site IP Address, click on RPC to select the secure option. Click on Create

Click on Yes
Click again on Add Sitesto add the local site

Step 32: Give in a name for the Local site, and proceed the ipconfig2 private IP. Activate the RPC secure option again, Click on Create
Note: Get the error invalid IP address? Select the option Reset Password to force the settings.
The following 2 sites need to be listed now… Click on Save and Continue

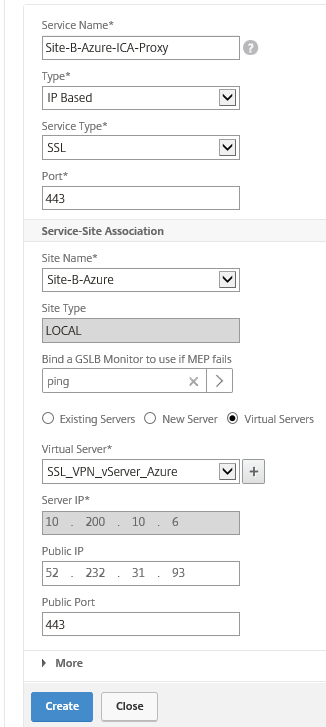
Step 33: Enter in the Service Name for the specific LB service, for example Site-B-Azure-ICA-Proxy. The server IP needs to be the VIP address of the VPN vServer and the NAT’d or directly redirected IP Address. Use ping to monitor the availability and give in the 443 port. Click on Create
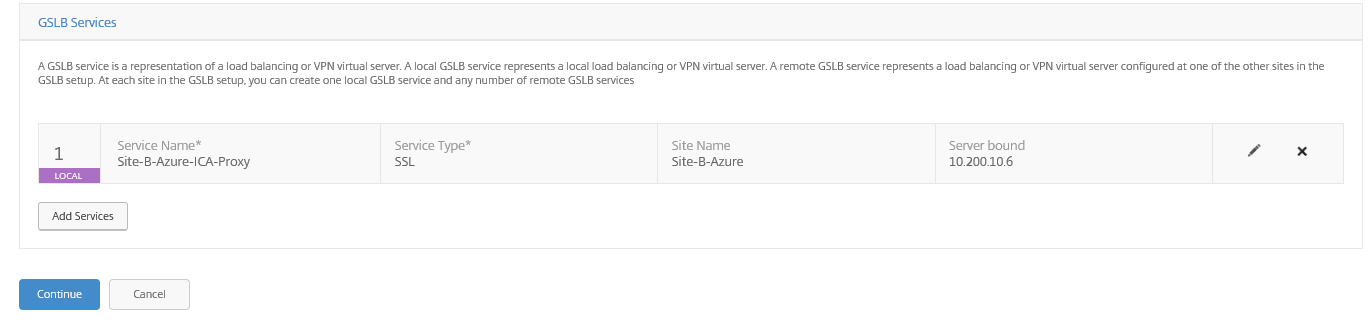
Click on Add Services and repeat the same steps for the Site A On-premises site
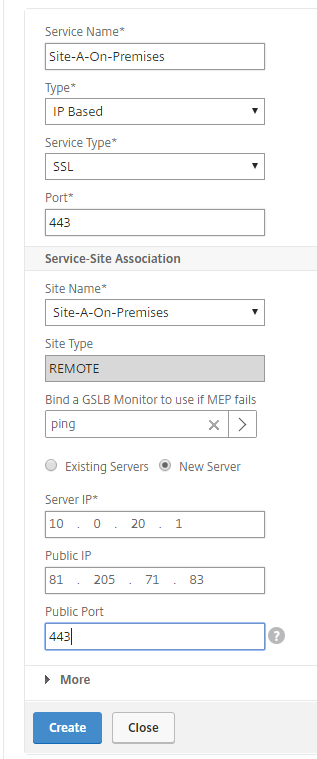
Enter in the settings for the On-premises Service, click on Create
Confirm that both services are listed, Click on Continue

Step 34: Enter the name and required settings for the GSLB Backup Virtual Server (On-Premises Service), just like the on-premises NetScaler. Click on Create
Confirm the settings, Click Continue
Click on Add Sites
Enter a Name for the on-premises – Remote site A and give in the External Site IP Address, click on RPC to select the secure option. Click on Create
Click on Yes
Click again on Add Sitesto add the local site
Step 35: Give in a name for the Local site, and proceed the ipconfig2 private IP. Activate the RPC secure option again, Click on Create
Note: Get the error invalid IP address? Select the option Reset Password to force the settings.
The following 2 sites need to be listed now… Click on Save and Continue
Step 36: Enter in the Service Name for the specific LB service, for example Site-B-Azure-ICA-Proxy. The server IP needs to be the VIP address of the VPN vServer and the NAT’d or directly redirected IP Address. Use ping to monitor the availability and give in the 443 port. Click on Create
Click on Add Services and repeat the same steps for the Site A On-premises site
Enter in the settings for the On-premises Service, click on Create
Confirm that both services are listed, Click on Continue
Step 36: Enter the name and required settings for the GSLB Backup Virtual Server (On-Premises Service), just like the on-premises NetScaler. Click on Create
Confirm the settings, Click Continue
Now we need to enter the Active GSLB Virtual Server, take over the settings and make sure to select only the Site A On Premises service. Click on Create
Click on Continue
Click on Done to finish the GSLB setup wizard

Confirm that the Sites status is also on status: UP (2)
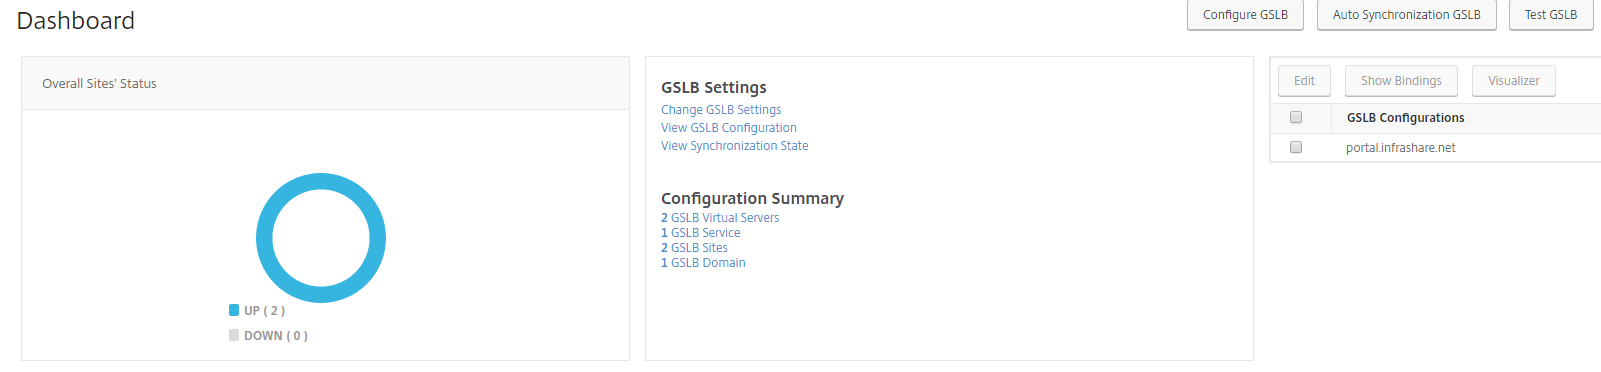
Select the GSLB Configuration and click on the Visualizer button to see what actually is created during the wizard.

Please verify on both NetScalers that the DNS entry is created as GSLB domain.

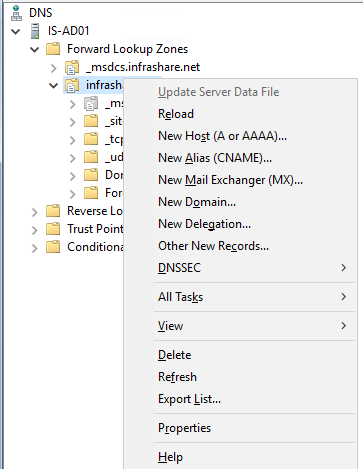
Create the internal DNS Delegation Zone
Using an internal DNS server, for example Microsoft DNS. When you can answer this with an yes, you’ll need to create an internal DNS Zone, please follow the next steps doing this.
Note: Need/want more in detail information about the DNS configuration part, how it actually works etc.. Please check out this Citrix article.
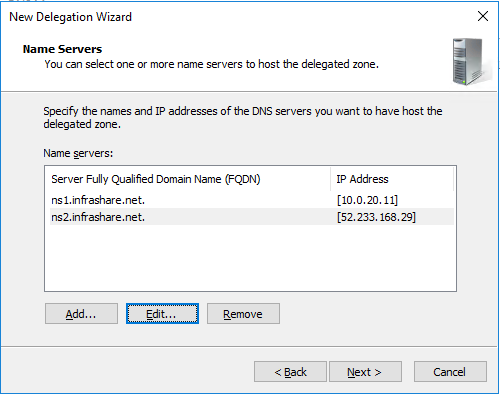
Step 37: First create 2 new DNS A records, for example ns1.infrashare.net and ns2.infrashare.net. For the internal DNS zone you can choose to place the records to the internal ADNS Subnet IP address, to put the Azure ADNS to internal a IPsec VPN tunnel, NS SD-WAN or ExpressRoute is required.
For on-premises: ns1.infrashare.net -> Type A -> ADNS SNIP 10.0.20.11
For Azure: ns2.infrashare.net -> Type A -> ADNS SNIP 52.233.168.29 (ipconfig2)
Note: There is also an option to skip this and only fill in the IP Addresses into the delegation field.


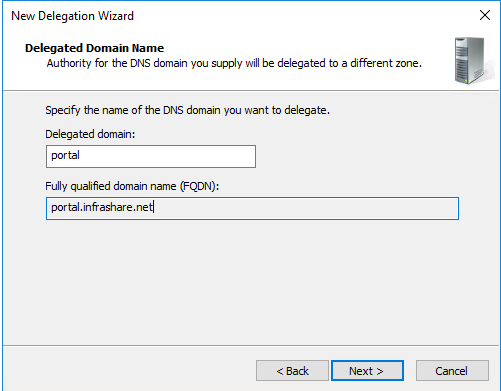
Step 38: Now we need to Create a new delegation for the DNS zone that u are using for the specified DNS record – GSLB service.
Step 39: Enter the GSLB DNS record, for me that will be portal(infrashare.net). Click Next
Click on Add
Click Next and Finish

Create the external DNS Zone
Step 40: We now need to perform the same steps for the external DNS record, but now with only the external/public addresses configured. First we need to create the same DNS A records:
For on-premises: ns1.infrashare.net -> Type A -> ADNS SNIP 81.205.71.83
For Azure: ns2.infrashare.net -> Type A -> ADNS SNIP 52.233.168.29 (ipconfig2)

Step 41: Contact your DNS hosting ISP to create the same DNS delegation for the external domain. Mostly you’re not allowed to do this yourself. The delegation needs to be point to the 2 external DNS records you’ve create in the previous step.
How does it works? When u are resolving the external DNS record, for example portal.infrashare.net, the request first goes to the zone of the hosting. Those DNS servers return to the two NetScaler ns1 and ns2 ADNS services. The DNS client then chooses one of the ADNS services at random and submits the DNS query to it. The NetScaler then looks for a GSLB vServer that matches the DNS query and provides an IP address response.
Note:Don’t forget to remove the “old” external DNS A record that you pointed to the NetScaler!
Simulate and test a failover to Azure – Site B
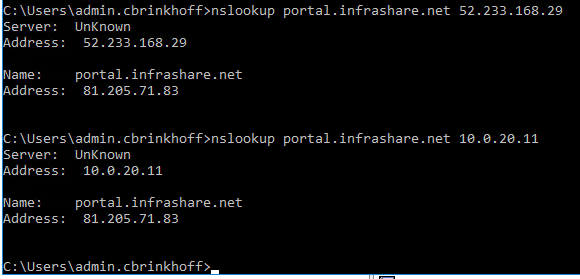
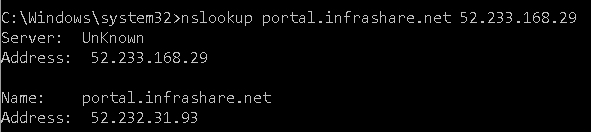
Step 42: Open up a Command prompt and run the following command. If everything went well, the primary Site A external IP address must return.
nslookup portal.infrashare.net 52.233.168.29 (SNIP | GSLB Site IP On Premises)
nslookup portal.infrashare.net 10.0.20.11 (SNIP | GSLB Site IP On Premises)
As trademark, I’ve uploaded 2 logo’s to a custom per site NetScaler theme, just to see which NetScaler is active. For the on-premises I used the blue home icon.

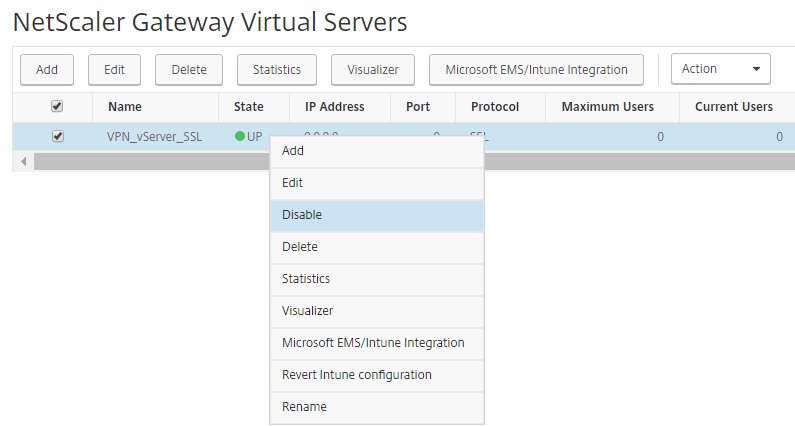
Step 43: To simulate the failover, we actually simply disable the VPN vServer and/or the Primary GSLB Virtual Server on the Active site A.
Note: Using Content Switching as VPN vServer? Disable then the CSW vServer!
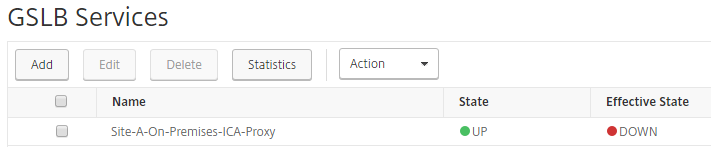
Results in: GSLB Service Effective State = DOWN
Step 44: Perform the same steps again, and check if the records are changed. The Public IP Address of ipconfig3 (52.232.31.93) needs to return now.
nslookup portal.infrashare.net 10.0.20.11
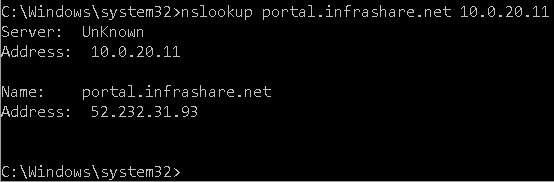
nslookup portal.infrashare.net 52.233.168.29
And yes, the NetScaler now perform as Active-Passive Global Load Balancers between Site A and Site B in Microsoft Azure!
Like this article? Please share the article with the #MyCUGC hashtag, to share your love for the Citrix User Group Community!
That’s it for now, I’ll hope to see you back soon!
Cheers,
Christiaan