Azure Virtual Desktop technical deployment (Classic – non-ARM-based model) walkthrough


This walkthrough article only applies to the classic version – non-ARM-based model of Azure Virtual Desktop. Are you looking for the NEW 2020 – ARM-based model, which integrates in the Azure Portal with more Management capabilities? Click here.
A lot of you know that Azure Virtual Desktop (AVD) is now Generally Available (GA) for almost 6 months and the interest is enormous. AVD can be a good fit for different kind of scenario’s. Lots of people wrote articles about it, and so did I. Most articles are covering information that is available everywhere, or just a subset of the service…
“If You Never Try, You’ll Never Know” – Ben Francia
With this article, I’d like to cover the things you might not have caught. Some are deep(er) technical points, while some are just not part of the public message but still way too important not to share. It’ll hopefully help you as consultant or architect to bring the technical (and functional) message around Azure Virtual Desktop to your customers 😊! Continue reading…
Find here a list of all my other Azure Virtual Desktop related articles.
Table of Contents
Click on the title to jump to that spot in this article:
- The Desktop-as-a-Service market is growing
- Once more – What is Azure Virtual Desktop?
- The architecture behind it all
- AVD User connection Traffic Flow
- Windows 10 multi-session – sizing templates
- Azure Automation: Up and Downscale host pools – Breadth and Depth-first mode
- How to use your existing Windows 10 or Windows Server image for Azure Virtual Desktop
- Expand your host pool – add extra machines to your host pool
- Update your host pool – image updates
- Microsoft Teams and OneDrive
- Why using OneDrive Known Folder Move with AVD?
- New Azure Portal – Management Console
- Future Application Management – MSIX app attach
- Azure Virtual Desktop and Azure Log Analytics
- Walkthrough Guidance: How to enrol Azure Virtual Desktop on Azure
- Pre-requisites for Azure Virtual Desktop
- Assign privileges to create the Tenant
- Create the Azure Virtual Desktop tenant
- Assign Desktops to your users
- Enrol the Windows 10 Enterprise multi-session + Office 365 ProPlus master image
- Finalize (sysprep) the Windows 10 image
- Enrol your Azure Virtual Desktop Host Pool
- How to activate, publish and assign RemoteApps to your users
- Install the Azure Virtual Desktop Agent
- Use the HTML5 WebAccess portal
The Desktop-as-a-Service market is growing
Garner and IDC expect a potential growth of 50% in the year 2019 of new DaaS customer choosing it over traditional VDI, pushing DaaS over 3 billion in revenue by the end of this year.
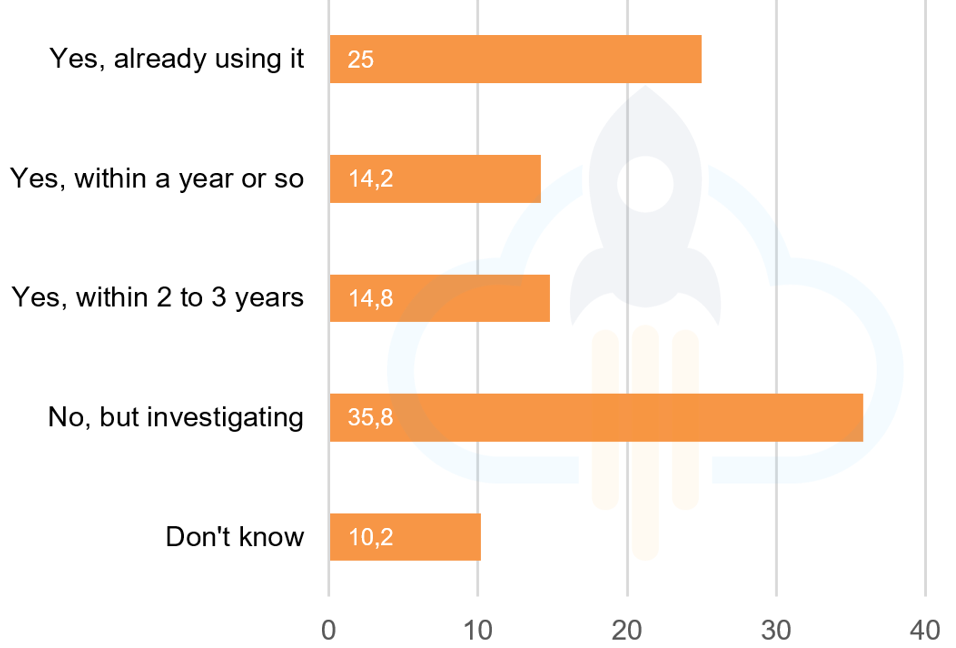
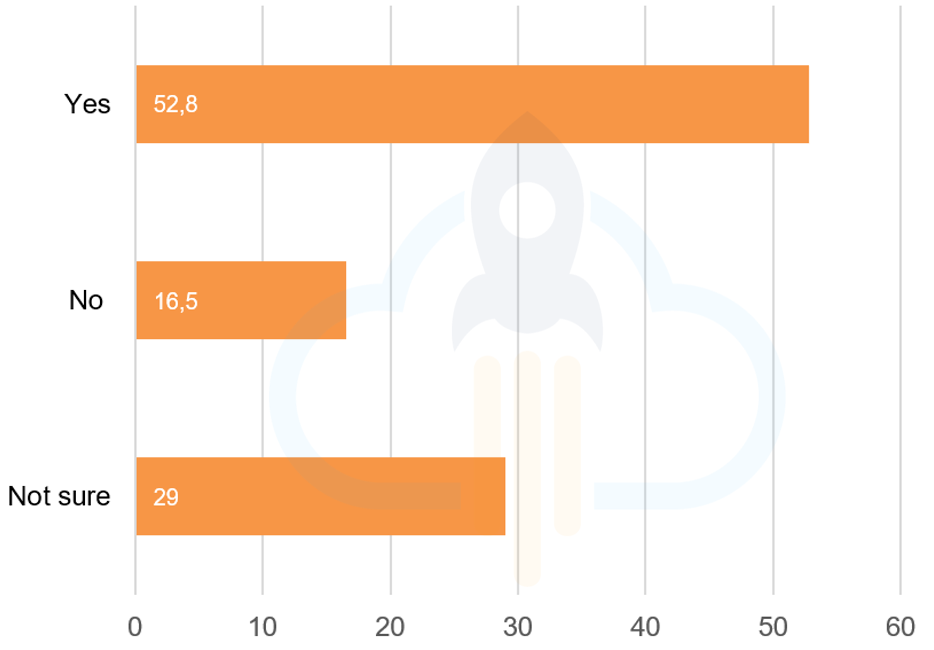
The EUC/VDI community acknowledged this number. During our relatively small Byte-Sized Community survey, we asked almost 200 independent people if they already use Desktop-As-a-Service solutions and if they expect that Azure Virtual Desktop will have a major impact on DaaS going forward.
“Q1 – Are you considering Desktop-As-a-Service (DaaS) anytime soon?”
“Q2 – Once released, the Microsoft Azure Virtual Desktop #AVD will have a major impact on DaaS going forward“
Once more – What is Azure Virtual Desktop?
People that follow my blogs know that I explained the services and benefits earlier. However, for the people who didn’t catch that yet, here is a short run-over.
“Azure Virtual Desktop, or AVD in short – is a born in the cloud Desktop-As-a-Service platform service offering on top of the Microsoft Azure Cloud. All the infrastructure services, such as brokering, web access, load-balancing, management and monitoring is all setup for you as part of the control plane offering. It also gives you access to the new Windows 10 Enterprise multi-session Operating System – which is completely optimized for the sake of Office 365 ProPlus services, such as Outlook, OneDrive Files on Demand (per-machine), Teams etc.“
The only responsibility in terms of management effort is the golden images on top of Azure Infrastructure-As-a-Service (IaaS). The rest is all managed for you through the Azure service SLAs. Sounds pretty cool, right?
Let’s first start with the things you might not know about it
For the people who lived offline the past 2 months, here are some things you must know before you start reading this article!
- Azure Virtual Desktop gives you the only multi-session Windows 10 experience, including compatibility with Microsoft Store and existing Windows line-of-business apps, while delivering cost advantages.
- Allows you to virtualize both Full desktops and RemoteApps.
- You can also use to for persistent Windows 10 – single user virtual desktops.
- AVD will support Windows 7 virtual desktops and is the only way you can safely run Windows 7 after its End of Life on 14 January 2020. Windows 7 desktops on AVD will be the ONLY systems that receive free extended security updates.
- Customers with the following license SKUs are entitled to use AVD with no additional charge apart from Azure compute, storage, and network usage billing:
- To run Windows 10 multi-session, Windows 10
- Microsoft 365 F1, E3, E5, A3, A5, Business
- Windows 10 Enterprise E3, E5
- Windows 10 Education A3, A5
- Windows 10 VDA per user
- To run Windows 7
- Microsoft 365 E3, E5, A3, A5, F1, Business
Windows E3, E5, A3, A5
- Microsoft 365 E3, E5, A3, A5, F1, Business
- To run Windows Server 2012 R2, 2016, 2019
- Remote Desktop Services (RDS) Client Access License (CAL) with active Software Assurance (SA)
- To run Windows 10 multi-session, Windows 10
- Azure Virtual Desktop session host VMs are not exposed to the internet directly. They can run using a private IP address and run isolated from other workloads or even the internet. The reverse connect technology allows the VMs to be accessed
- When a user connects to the AVD service, the use of Azure Active Directory (AAD) as the identity provider allows you to leverage additional security controls like multifactor authentication (MFA) or conditional access;
- Deeply integrated with the security and management of Microsoft 365, such as Intune Modern Management
- From a best practices point of view; Make sure all Azure resources are in the same region
- All the Nvidia vGPU / and the recent announced AMD EPIC CPU/GPU graphical enhanced N-Series virtual machines on Azure are supported with Azure Virtual Desktop.
- Citrix is adding their own Citrix Cloud stack as well to Azure Virtual Desktop, read more about this here.
- VMware Horizon Cloud is now also available as extension to Azure Virtual Desktop, read more about this here.
The architecture behind it all
The first step that you must do is creating the Azure Managed image, or golden image in VDI terms (or use one pre-build from the gallery). Most often, this will be based on the new Windows 10 Enterprise multi-session Operating System, which is now available from the Azure Marketplace. After enrolling the server, you can start installing the application on the machine. When you’re done, you must capture the machine as an image to use as a base for your Azure Virtual Desktop deployment.
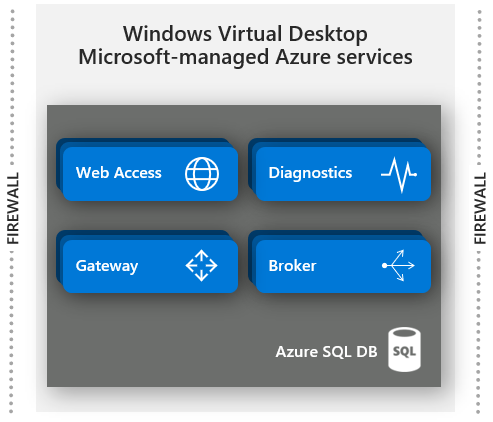
The Microsoft-managed control-plane is a completely redesigned infrastructure which leverages native Azure platform services to scale automatically. Think about Azure front-door as global load-balancer for the RDP connection, Azure App Services in Azure for hosting the infrastructure services, and Azure SQL DB for hosting the RDS Brokering databases. Leveraging these services is the main reasons why this service is so cost-effective, which is the purpose of the Cloud and what it’s built for!
AVD User connection Traffic Flow
To give you a better understanding of how Azure Virtual Desktop connections work, I’m sharing the traffic flow (the traffic flow requires the following network URL and protocol access). This is also useful for troubleshooting purposes.
Connecting from your virtual machine in Azure to your Host Pool (session hosts in Azure Infrastructure-As-a-Service) works differently with Azure Virtual Desktop. It uses Reverse Connect, which means that no inbound ports need to be opened on the VM to setup the RDP connection. Once the connection flow proceeds, bidirectional communication between your session hosts/host pool will go over port https (443). This port is almost always open from the inside to the outside, so it’s perfect for a remote connection to Azure Virtual Desktop!
Azure Virtual Desktop is a global load balanced service via Azure front-door. This means that the traffic flow below always goes via the nearest management control-plane/service location – which you can see in the middle bucket below.
The service is globally available with management plane in:
Central US, East US, West US 2, North Europe, West Europe, India, Singapore, Australia, and South America – as of 22.03.2020.
See below in more depth how the traffic flow works.
- User launches RD client which connects to Azure AD, user signs in, and Azure AD returns token
- RD client presents token to Web Access, Broker queries DB to determine resources authorized for user
- User selects resource, RD client connects to Gateway
- Broker orchestrates connection from host agent to Gateway
- RDP traffic now flows between RD client and session host VM over connections 3 and 4

Azure Virtual Desktop service network access requirements
To make this traffic flow possible – you need to have at least firewall rules / NSGs / service tags in place for the following network addresses – otherwise AVD won’t work correctly. When you use an ExpressRoute with force-tunnelling to your local gateway, make sure to configure the routing tables correct, as described for KMS in this article. Within configuring this – your virtual machines won’t be able to communicate to our Azure KMS server. There’s also the option to use Azure Service Tags with all the URLs/Ports pre-configured and auto-updated for you – this could make your life a lot easier.
Note: If you don’t arrange access at the VNET level to the URLs/Ports below – your deployment most likely will fail!
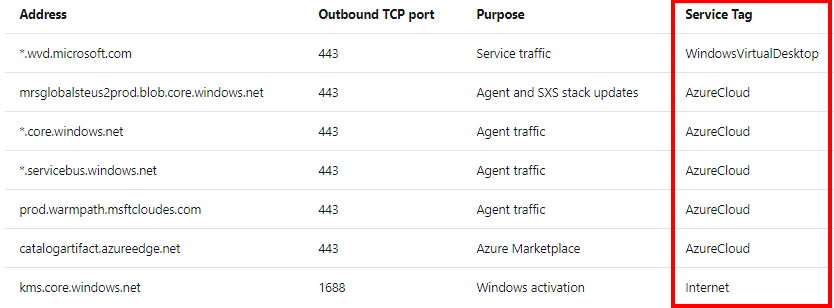
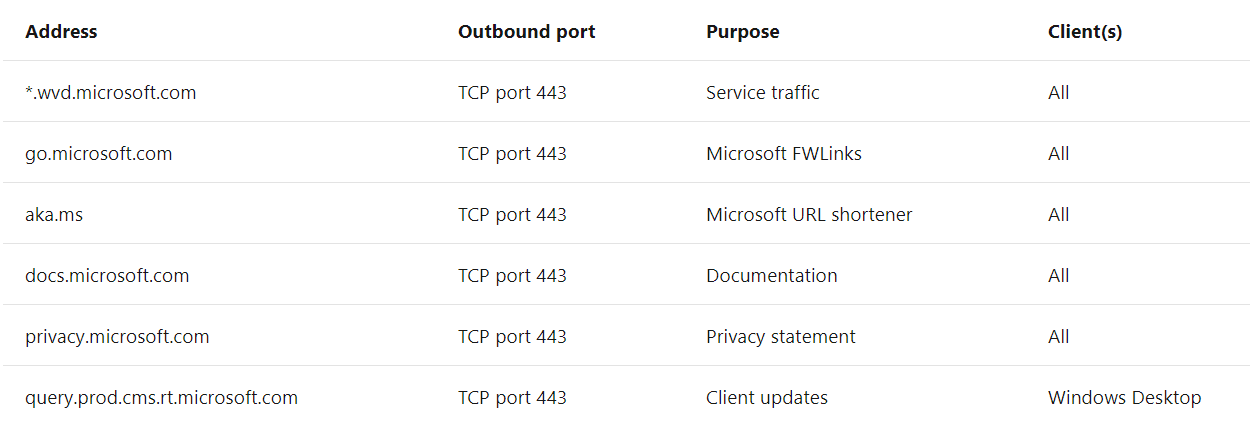
To connect from the client – endpoint location. The following network access is required to setup the session to the AVD service.
Measure your latency
We can use the online Experience Estimator tool to measure your latency to the nearest control-plane location (as described above) – without deploying a host pool. The tool is web-based and can be found here. The tool measures to the nearest control-plane the latency and as well from the control-plane to the (over the Azure backbone) Azure datacenter region you select to deploy your host pools in.
Note: Round-trip (RTT) latency from the client’s network to the Azure region where host pools have been deployed should be less than 150 ms. The tool below will soon be transported to Azure front-door.

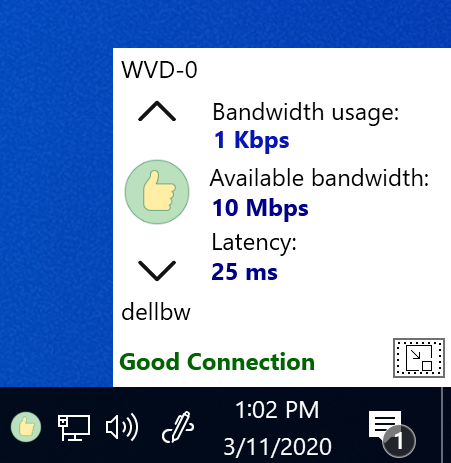
Measure your latency – community tool
Community Rockstar – and Microsoft MVP – Bram Wolfs created not so long ago the Connection Experience Indicator for RDS & AVD. The tool supports both Remote Desktop Services (RDS) and Azure Virtual Desktop (AVD). The tool does require that you have a AVD host pool running on Azure because the tool is active on the session host. Read more about it here.
This tool does the following:
- Support users by pointing out issues that affects the user experience
- Reduce the number of help desk calls related to user experience issues
- Show notifications about the latency to the virtual desktop. Notify when the latency is good and warn when latency is high or very high
- Show notifications about the available bandwidth. Notify when the available bandwidth is good and warn when the available bandwidth is weak or poor
Integrated in the Windows 10 notification center - Integrated in the taskbar and when you click on the icon a small window will be shown that provides real-time information about the connection to the virtual desktop
- Single exe (no installation required) can be easily started with login script or other mechanism
- The tool can be configured with parameters so it can be adjusted to your environment (please find all settings below)
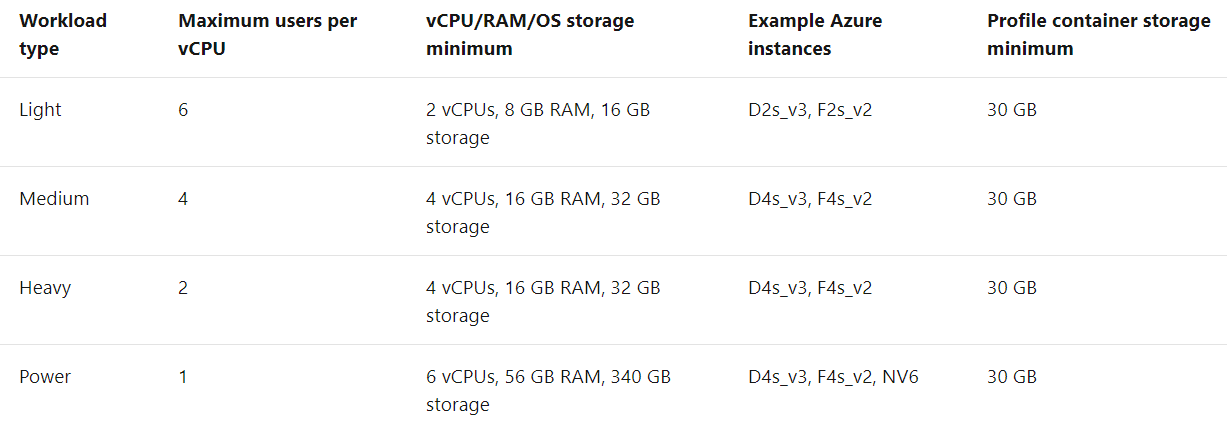
Windows 10 multi-session – sizing templates
Having the best end-user experience for your users is probably one of the most important goals when using Desktop-As-a-Service. Though the cloud takes over a lot of management tasks after migration, you’ll still need to handle image management. The following matrix gives a good baseline on how your Windows 10 Enterprise multi-session must be sized for 4 types of users. The amount of data in your profile is depending on your settings, think about Outlook retention slider settings for example. Due to the support of OneDrive Files On-Demand, the storage allocation for files sync should be minimal.
The Azure Virtual Desktop Host Pool enrolment of the Azure Marketplace also advises your which Virtual Machine SKU in Azure fits best for the number of users you need/going to use. See all the information on Virtual Machine sizing here.
What about GPUs?
Azure Virtual Desktop – supports graphics acceleration, check out for more information Choose your graphics rendering technology. Azure has other graphics acceleration deployment options and multiple available GPU VM sizes. Learn about these at GPU optimized virtual machines sizes – especially the new Nv4 virtual machines enhanced by a AMD EPIC CPU/GPU are interesting to test due to the fact it supports GPU-P and Premium SSD. More info here.
How to use your existing Windows 10 or Windows Server images for Azure Virtual Desktop?
Azure Virtual Desktop is very flexible in terms of using new or existing images. The vast majority of customers are going greenfield and start leveraging AVD with Windows 10 Enterprise multi-session from scratch. However, in some scenarios, it could be useful to use your existing Windows 10 single-session or existing RDS 2019/2016 images to Azure – without going over the re-imaging process again. All the steps that you have to do for that are pretty simple and can be used in the extend of this blog article.
The most important step to remember is that you must convert your image to a format that is supported on Azure, such as VHD – and you must remove all your hypervisor-specific agents because we won’t need them anymore on Azure. After you are done with uploading your image and have your virtual machine up and running on Azure, you can take it from here to continue your steps in preparation. Keep in mind that you have to stop after you created the Azure Managed Image because we have to create the Azure Virtual Desktop tenant first before we can start the Azure Marketplace enrolment. You can then start from the beginning here.
We do have tools such as Azure Migrate that you can use for the migration process to Azure. The alternative option is to use Hyper-V and Sysprep and export your Virtual Hard Disk directly to your storage account blob with programs such as Azure Storage Explorer. After that, you can create a VM based on that disk, and create an Azure Managed image afterward. Read here how that works.
Please consider reading one of my previous Microsoft Tech Community articles on this topic as well.
Expand your host pool – add extra machines to your host pool
You could come in the scenario when you want to expand your host pool to add more capacity for your end-users. There are multiple options to do this and I’ll explain them here.
Note: Keep in mind that during the enrolment process a Availability Set (AS) is automatically created for that batch of VMs. The current Azure platform limitation of 200 VMs per AS could hit you during the deployment of more than 200 session hosts per enrolment. Make sure to create batches of 200 – or create different host pools to work around this limitation.
- You can use the following Azure ARM (recommended) approach to expand your host pool. You need to fill in the number of machines that you want to add + the existing amount of virtual machines. The process leaves your existing machines in place and adds extra machines based on your machine prefix to your host pool. The complete procedure for this can be found here or watch this video here.
- The simplest solution (via the Azure Portal) to explain is to follow the same host pool enrolment steps via the Azure Marketplace (as explained later in this article). Enter in the same host pool and e.g. Managed image/gallery image and use a new virtual machine prefix. All your new machine will be created and added to your host pool.
- Terraform can also be used as an Automation solution for Azure Virtual Desktop. Terraform is a tool that enables you to completely automate infrastructure builds through configuration files. It provides versioning for configurations, which makes it easy to deploy and maintain your existing Azure Virtual Desktop deployments on Microsoft Azure. Learn here how to use it for AVD or this video – created by co-worker Stefan Georgiev from AVD Engineering.
- Via Azure DevOps is one of the methods that you could use. Read more about it here (article from co-worker Tom Hickling).
- Azure Image Builder is a fairly new service on Azure that you can leverage to enrol, expand or update your Azure Virtual Desktop environment. Learn more about it here and here – and use this GitHub resource to kick the tires from co-worker Jim Moyle.
- You can also add machines manually to the host pool by installing the AVD Agent and bootloader on your virtual machine – during the installation it will ask for a token. You can request (or create a new one) via this PoSH command Export-RdsRegistrationInfo. Download the Azure Virtual Desktop Agent and bootloader the Azure Virtual Desktop Agent Bootloader here. You can use the silent (automated) commands below to install the AVD agents without manual interaction in each VM! One for the AVD agent and the other one for the AVD bootloader agent.
AVD Agent command
Start-Process -FilePath "msiexec.exe" -ArgumentList "/i $AgentInstaller", "/quiet", "/qn", "/norestart", "/passive", "REGISTRATIONTOKEN=$RegistrationToken", "/l* C:\Users\AgentInstall.txt" -Wait -Passthru
Bootloader command
Start-Process -FilePath "msiexec.exe" -ArgumentList "/i $AgentBootServiceInstaller", "/quiet", "/qn", "/norestart", "/passive", "/l* C:\Users\AgentBootLoaderInstall.txt" -Wait -Passthru

Update management – update existing host pool
The Microsoft AVD team created Azure ARM templates that remove or stop the old (drain mode) instance of AVD Hostpool session hosts and creates new virtual machines and registers them as session hosts to AVD host pool. Extra information around the Azure ARM .json template can be found here. Or click on the Deploy to Azure button below to directly inject the .json ARM template in your Azure environment.
Note: All these features will later be integrated into the Azure Portal, as part of the new Azure Virtual Desktop management console.
There are different sets of parameters you must enter to successfully deploy the template:
- ActionOnPreviousVirtualMachines
- VM image Type
- RDSH VM Configuration in Azure
- Domain and Network Properties
- Authentication to Azure Virtual Desktop
See below an example of the ARM template. Consider using the “CustomImage”, variable to use the image as we prepare an Azure Managed Image as part of this blog. Download the full .JSON file here.
"$schema": "https://schema.management.azure.com/schemas/2015-01-01/deploymentTemplate.json#",
"contentVersion": "1.0.0.0",
"parameters": {
"_artifactsLocation": {
"type": "string",
"metadata": {
"description": "The base URI where artifacts required by this template are located."
},
"defaultValue": "https://raw.githubusercontent.com/Azure/RDS-Templates/master/wvd-templates/"
},
"_artifactsLocationSasToken": {
"type": "securestring",
"metadata": {
"description": "The sasToken required to access _artifactsLocation when they're located in a storage account with private access."
},
"defaultValue": ""
},
"rdshImageSource": {
"type": "string",
"metadata": {
"description": "Select the image source for the session host vms. VMs from a Gallery image will be created with Managed Disks."
},
"defaultValue": "Gallery",
"allowedValues": [
"CustomVHD",
"CustomImage",
"Gallery"
]
"defaultValue": ""
},
"rdshGalleryImageSKU": {
"type": "string",
"metadata": {
"description": "(Required when rdshImageSource = Gallery) Gallery image SKU. Values without a numeric suffix, such as 1903, will use the latest release available in this template."
},
"allowedValues": [
"Windows-10-Enterprise-multi-session-with-Office-365-ProPlus",
"Windows-10-Enterprise-multi-session-with-Office-365-ProPlus-1909",
"Windows-10-Enterprise-multi-session-with-Office-365-ProPlus-1903",
"Windows-10-Enterprise-multi-session",
"Windows-10-Enterprise-multi-session-1909",
"Windows-10-Enterprise-multi-session-1903",
"Windows-10-Enterprise-Latest",
"Windows-10-Enterprise-1909",
"Windows-10-Enterprise-1903",
"2016-Datacenter"
],
Azure Automation – Up and downscale host pool resources – Breadth and Depth-first mode
For many Azure Virtual Desktop deployments in Azure, the virtual machine costs of the Azure Virtual Desktop session host VM represent the most significant portion of the total deployment cost. To reduce cost, the AVD Depth-first mode automatically fills up the first session host server maximum amount of users before spinning up the next one, and so on. The other option is to use it to shuts down and de-allocates RDSH server VMs during off-peak usage hours and then restart them during peak usage hours. This can be a huge cost saver!
Breadth mode is the standard – default mode, which is based on Reserved Azure instances (IaaS). With Breadth mode, the users will spread across host pool collection.
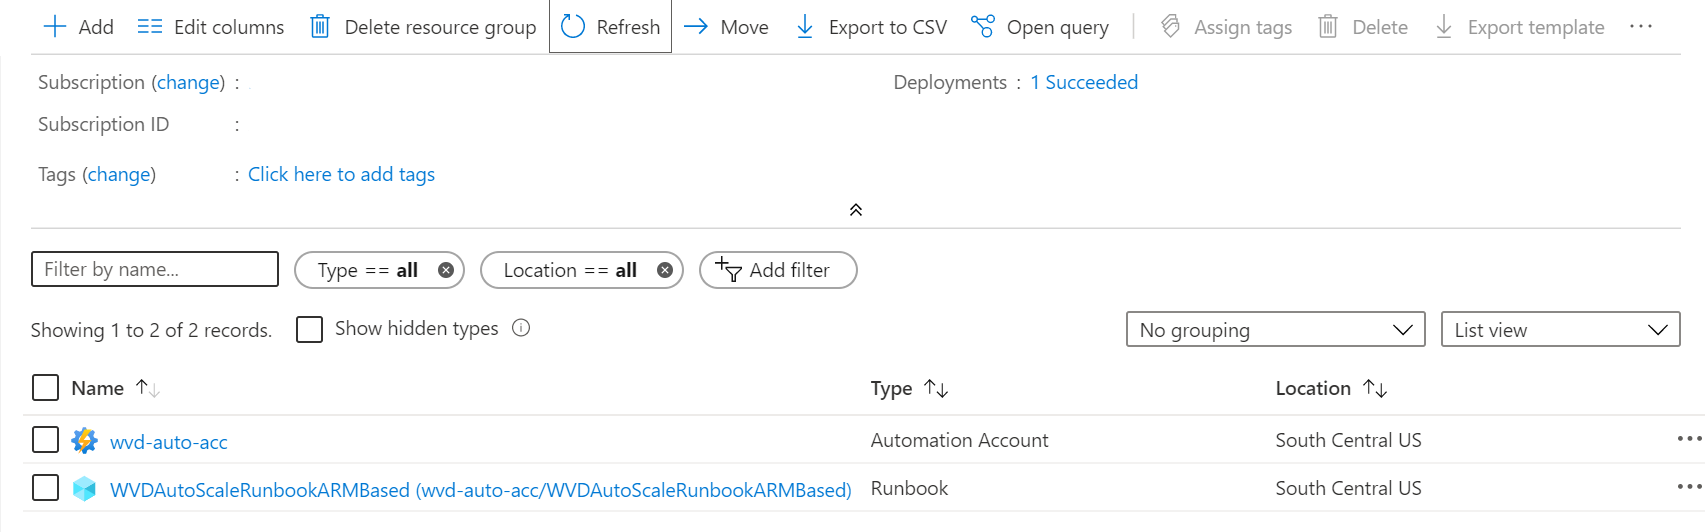
Read more about this feature, and download the new Azure Automation Runbook script here.
Note: All these features will later be integrated into the Azure Portal, as part of the new Azure Virtual Desktop management console. Get a sneak preview here.
You can use the scaling tool to:
- Schedule VMs to start and stop based on Peak and Off-Peak business hours.
- Scale-out VMs based on the number of sessions per CPU core.
- Scale in VMs during Off-Peak hours, leaving the minimum number of sessions host VMs running.
Microsoft Teams
Microsoft released a new Per-Machine (Machine-Wide) version of Teams and will place the Teams application back to the Program Files directory.
However, Audio and Video aren’t that optimal – you still can use Teams within AVD for chat, presence and screen sharing. Alternatives to using Teams within Azure Virtual Desktop are currently using Citrix Cloud (CVAD) + Azure Virtual Desktop.
- Use your local endpoint to use Teams for audio and video
- Use your mobile device to use Teams for audio and video
- Redirect your audio and USB device from your AVD session to your Windows (only) endpoint (this situation is not giving you the best quality, however, some customers are happy with it). Please use the settings below as RDP property within your host pool. More info here.
Set-RdsHostPool -TenantName <tenantname> -Name <hostpoolname> -CustomRdpProperty "audiomode:i:0;audiocapturemode:i:1;camerastoredirect:s:*;devicestoredirect:s:*"
Per machine installation
OneDrive Per-Machine is now available in GA – the steps for doing this are listed here.
Teams Per-Machine installations steps:
Download Teams – and run the following command
msiexec /i <msi_name> /l*v < install_logfile_name> ALLUSER=1
Note: Teams per-machine only installs on AVD when the following registry key is active in the session host before you start the installation.
[HKEY_LOCAL_MACHINE\SOFTWARE\Microsoft\Teams\IsAVDEnvironment] Type: REG_DWORD Value: 0x1
Read here more about the Teams on VDI scenario use-cases, to install Teams Per-Machine – please look over here.
New Per-Machine installation locations are:
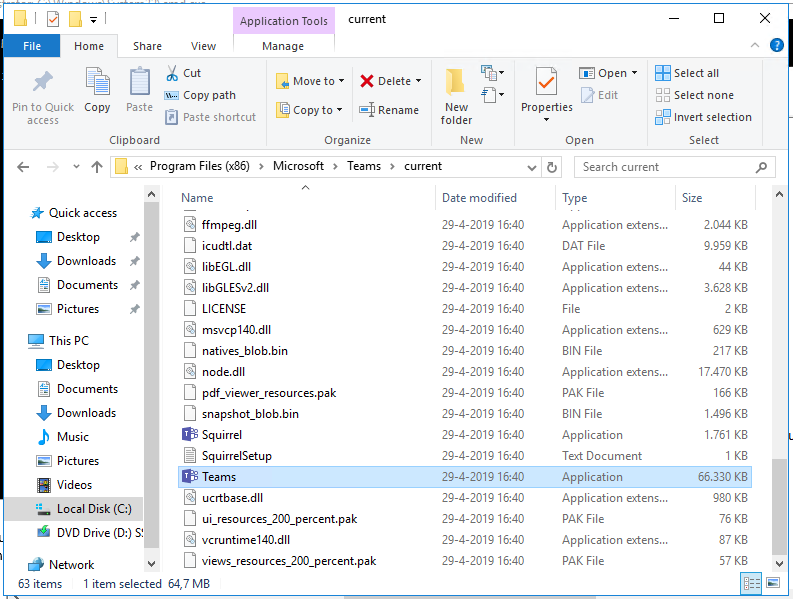
Teams installation folder location – %ProgramFiles(x86)%\Microsoft\Teams\
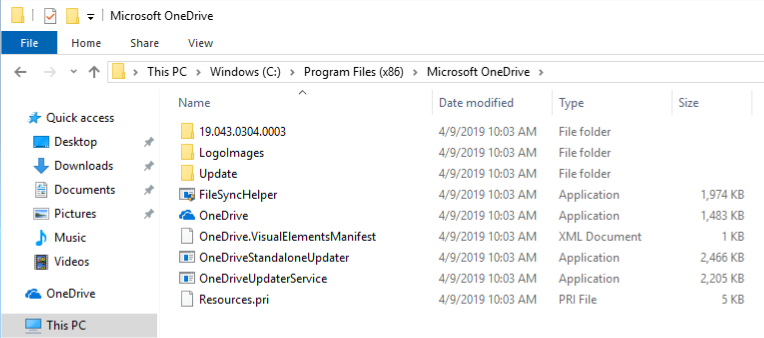
OneDrive installation folder location – %ProgramFiles(x86)%\Microsoft OneDrive\
OneDrive per-Machine is (also) available
By default, the OneDrive sync client installs per user on Windows, meaning OneDrive.exe needs to be installed for each user account on the PC under the %localappdata% folder. With the new per-machine installation option, you can install OneDrive under the “Program Files (x86)” directory, meaning all profiles on the computer will use the same OneDrive.exe binary.
See here how to install OneDrive Per-Machine on Windows 10 multi-session.
(Why using) OneDrive Known Folder Move together with AVD?
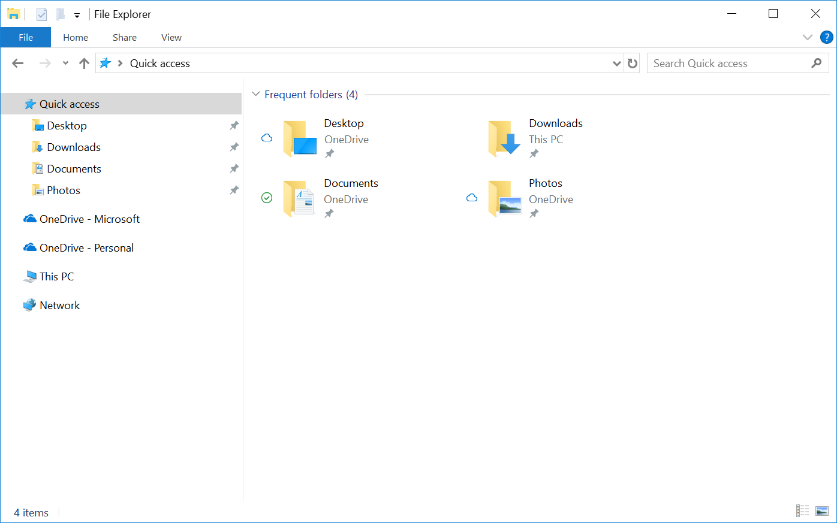
Recently, the OneDrive team added Known Folder Move functionality support to OneDrive, which is very useful to create the same end-user experience for our users on Azure Virtual Desktop as they would have on a Modern Desktop with all profile folders, such as My Documents, Pictures, Favorites, Desktop, etc. redirected to OneDrive. Also, with the use of OneDrive Files On-Demand, you’ll be able to save storage space from your profile folders due to the possibility to work with tiering for your hot and cold data.
While using Known Folder Move on different devices or VDI environments in conjunction with the same OneDrive account. You ensure to always have your Office 365 documents on the same location, everywhere you go! Even on your mobile device, without any notice 😊
Activating Kown Folder Move is relatively easy. You can use the manual approach by opening the OneDrive client from the Start menu and click on Update Folders.

You can also use the automated approach
Enabling this policy sets the following registry keys:
[HKLM\SOFTWARE\Policies\Microsoft\OneDrive]"KFMSilentOptIn"="1111-2222-3333-4444"
(where “1111-2222-3333-4444” is the AzureAD Directory – tenant ID, which you can find in the Azure Portal – under the properties menu of your Azure AD tenant)
In the end, your profile folders will look like this, and are completely in sync with your OneDrive account.
New Azure Portal – Management Console
Are you looking for the NEW 2020 spring update – ARM-based model, which integrates in the Azure Portal with more Management capabilities? Click here.
Note: The new AVD management Portal below is now available in public preview.
Future AVD Application Management – MSIX app attach
MSIX app attach is a newly announced sub-feature of MSIX, however now more efficient and optimized for virtual desktop technology due to the fact we use app streaming via MSIX, take a closer look at the bullet points below.
- Native format is MSIX (no re-packaging)
- Minimal performance impact
- MSIX Apps can be stored off the windows disk
- Remotely mount the apps to the VM on-demand
- Apps groups are assigned to users, and they’re available instantly on the login
- Looks and feels local to the user and to windows
- For both Azure and On-Premises workloads (not specific to AVD only)
UPDATE 01.12.19: You can now kick the tires on this new MSX app attach! Learn here how to use it in your environment!
Learn more about app attach at this Microsoft Ignite breakout session here.
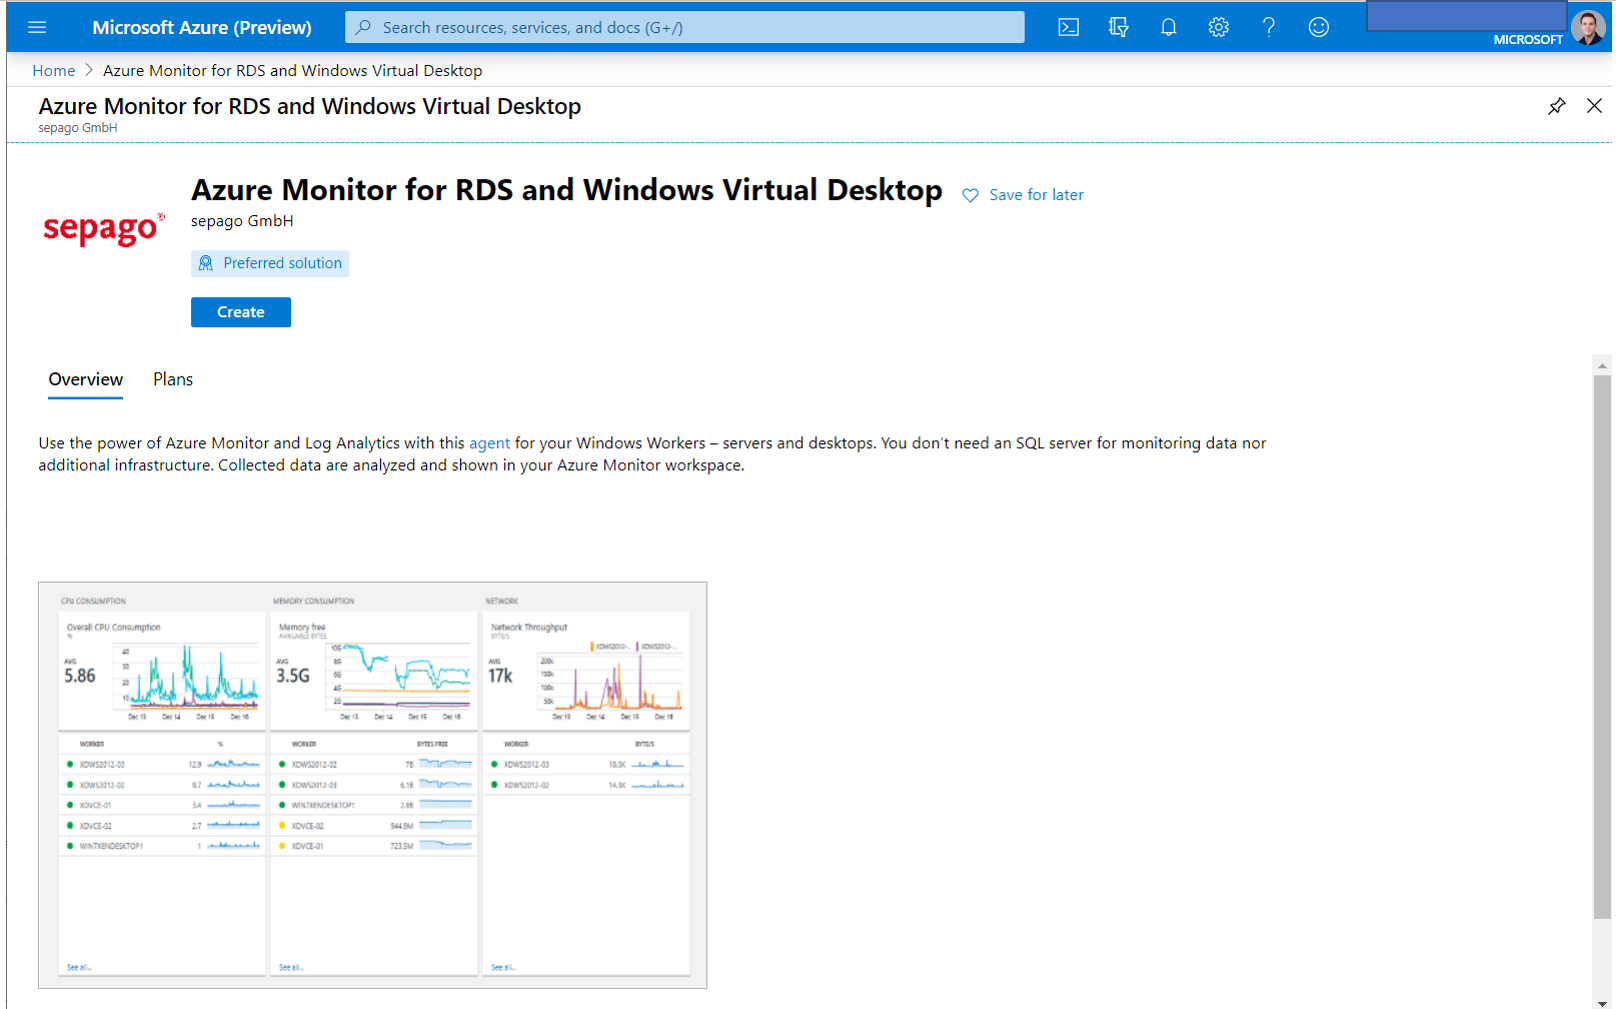
Azure Virtual Desktop and Azure Log Analytics
The main purpose of leveraging Public Cloud is not saving money. It’s around leveraging platform services to adopt as much as services to create the digital workspace for your business.
One of those platform services in Azure is LogAnalytics, the service to gather metrics in your environment and bring them down to one single pane of glass dashboard. LogAnalytics gives you all the information about sessions. This includes e.g. bandwidth and latency for every single user and session on your site. This can be relevant for troubleshooting or just monitoring purposes, and it doesn’t require any additional investments.
Note: This solution is offered as–is for community purpose and for testing. To get the full stack – including Power BI templates – and professional support contact sales@sepago.de
Search for Azure Monitor for RDS and Azure Virtual Desktop in the Marketplace
Walkthrough Guidance: How to enrol Azure Virtual Desktop on Azure
In the next steps, I’ll explain how you enrol Azure Virtual Desktop from scratch with a customer created Windows 10 Enterprise multi-session image among tips and tricks.
Pre-requisites for Azure Virtual Desktop
The following requirements are needed for the use of Azure Virtual Desktop on Azure.
- Entitled for licensing
- Azure Subscription
- Azure Active Directory setup
- Global Administrator rights
- Granting consent to the AVD service / Azure AD Enterprise Applications
- Azure AD Connect
- ADFS (optional for the best SSO end-user experience)
- Domain controller
- This AD must be in sync with Azure AD so users can be associated between the two
- VMs must domain-join to Active Directory
- Optional: Azure AD Domain Services (in replacement for domain controller)
- Profile Containers network share on Azure Files or Azure NetApp Files (See here our recommended Azure Managed options)
- Network must route to a Windows Server Active…Directory (AD). See here all the required ports and URLs. – same for the endpoints/client access, find them here.
- Optional: Networking/on-prem connectivity – express route, VPN, etc.
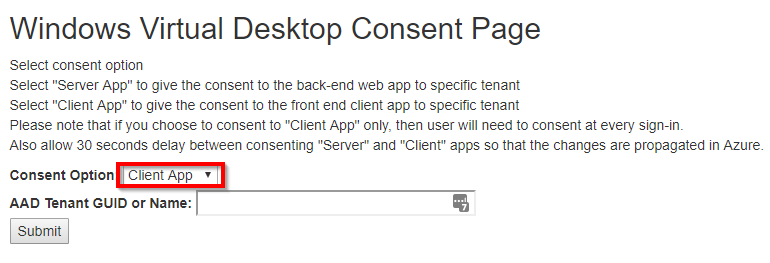
Pre-steps: Give Consent to your Azure AD tenant
Before you can create a AVD tenant, you must consent to have the AVD services access your Azure AD. The way AVD is designed requires explicit Azure AD consent. The process is much like how Azure requires you to enable non-standard resource providers before being able to use them.
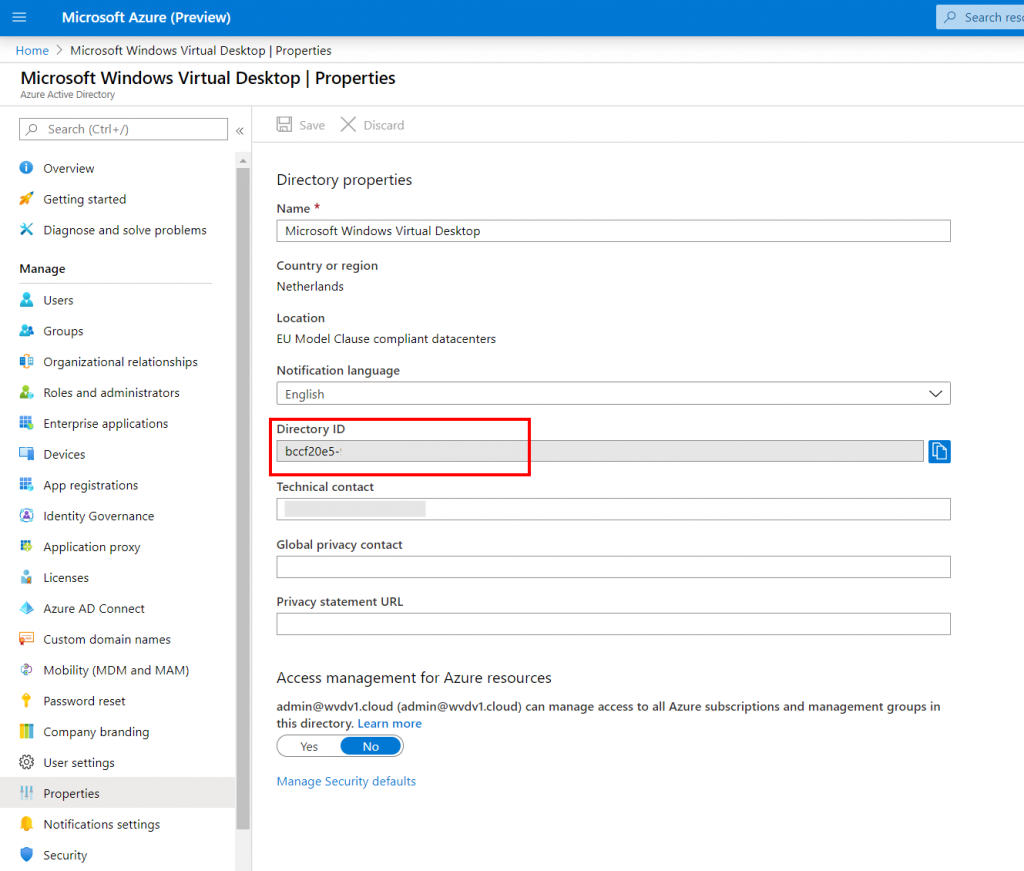
Go to your Azure AD Properties in the Azure Portal, and copy your Directory ID.
After that, go to https://rdweb.wvd.microsoft.com/
Paste your Azure AD Directory ID in the text field and click on Submit
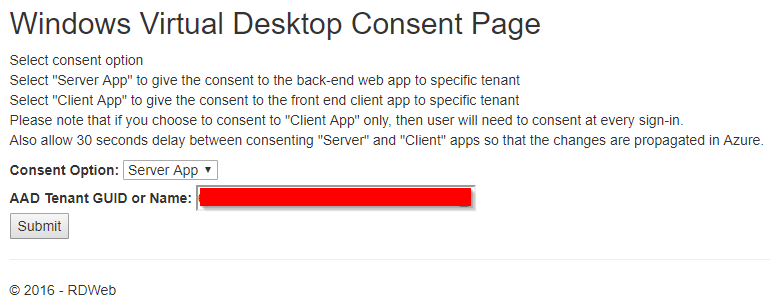
Logon with your Azure Global Administrator credentials of your Azure AD tenant

Accept the permissions request for your organization to finalize the principal creation process
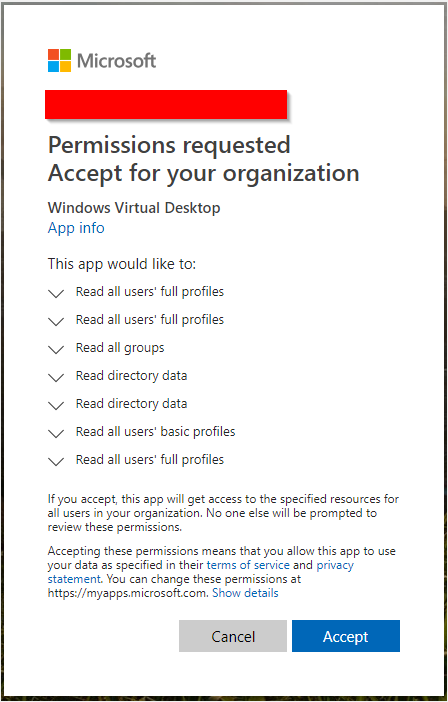
And the application is created successfully

Repeat the same steps for the client app
https://rdweb.wvd.microsoft.com/
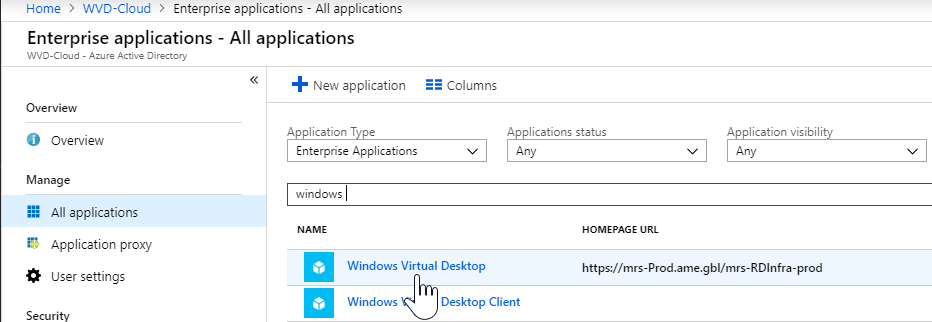
Assign privileges to create the Tenant
These steps are required to perform the next “create the AVD tenant” steps through PowerShell. Grant permissions for a user to create a Azure Virtual Desktop tenant.
Open Azure Active Directory
Click on Enterprise applications

Search for and then select Azure Virtual Desktop
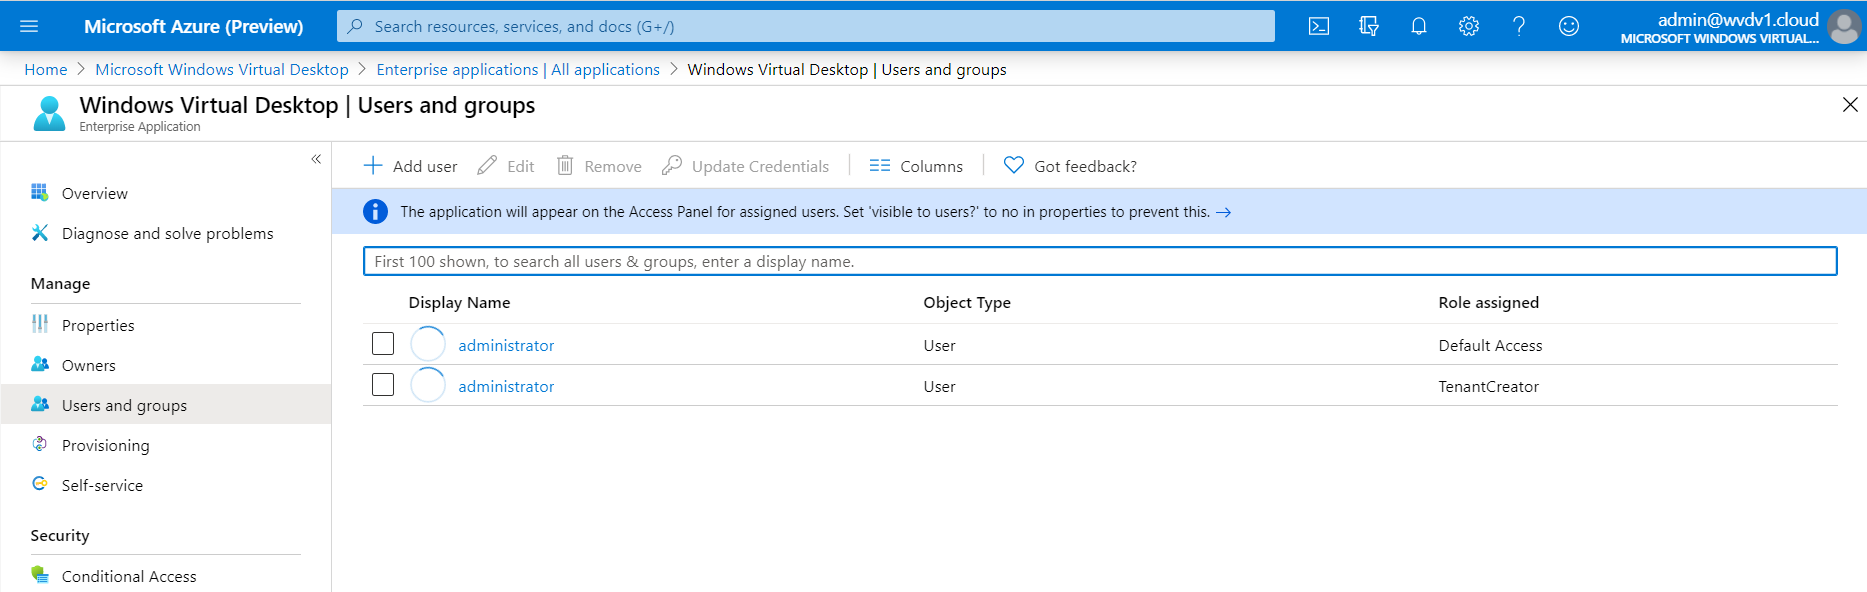
Select Users and Groups
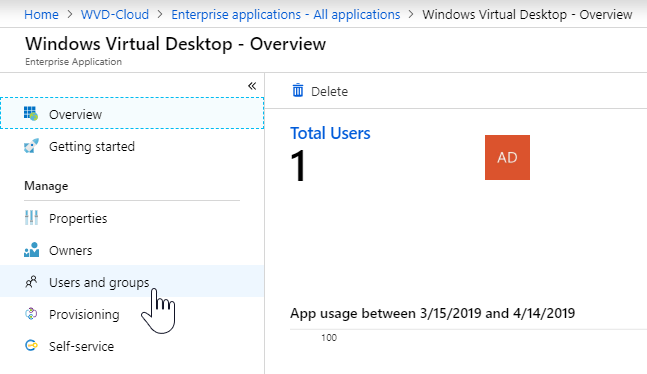
Select Add User, select Users and Groups and search for a user that you want to give permissions to perform AVD tenant creation

Click on assign

Make sure that the TenantCreator role is assigned
Create the Azure Virtual Desktop tenant
First, we need to prepare your client to run the Azure Virtual Desktop PowerShell module.
To do so, please run the following PowerShell command
Note: don’t forget to start your PowerShell console with administrator privileges
Install-Module -Name Microsoft.RDInfra.RDPowerShell
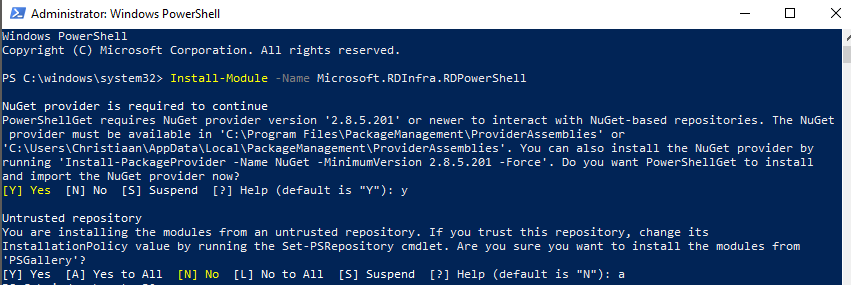
Also, make sure to import the module as well
Import-Module -Name Microsoft.RDInfra.RDPowerShell
![]()
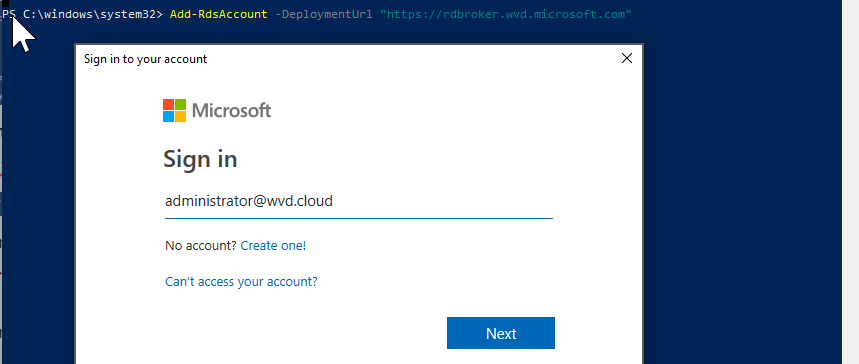
Run the following command.
Add-RdsAccount -DeploymentUrl "https://rdbroker.wvd.microsoft.com"
Login with your TenantCreator administrator account
If everything goes as expected, you must see the following info in return

Now, run the following command below.
Name is your tenant name.
You can randomly create a tenant name, suggest using your organization name.
Use your AzureAD Directory ID in the AadTenantID section.
Where to find? Go to your Azure Portal > Azure Active Directory > Properties > Directory ID.
Secondly, use the Azure subscription ID of your Azure tenant where you need to deploy your virtual machines in for the AzureSubscriptionId section.
Where to find?
Azure Portal > search for Subscriptions, copy the subscription ID
New-RdsTenant -Name tenantname -AadTenantId 00000000-1111-2222-3333-444444444444 -AzureSubscriptionId 55555555-6666-7777-8888-999999999999
Make sure your tenant name returns successfully, like picture below.
Note: The name must be unique, make up a new name when it’s already in use!

Run the following command to create a host pool
Note: Create your own random hostpool name, such as AVD-Host-Pool01
New-RdsHostPool -TenantName TenantName -Name HostPoolName

Assign AVD Desktop Application group
We can now assign users to the host pool – to provide for instance the Windows 10 multi-session desktop.
Note: You can either assign Desktops or RemoteApps to one host pool, not both.
To assign a Desktop Group to a user, please run
Add-RdsAppGroupUser -TenantName TenantName -HostPoolName HostPoolName -AppGroupName “Desktop Application Group” -UserPrincipalName UPNuserAccount
![]()
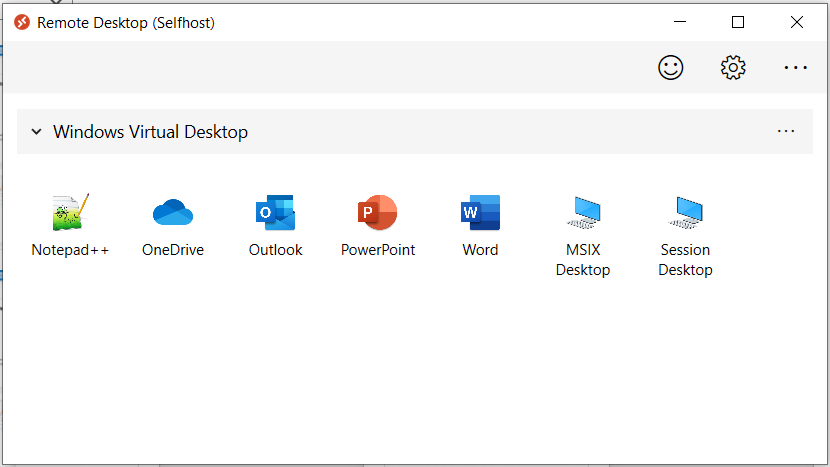
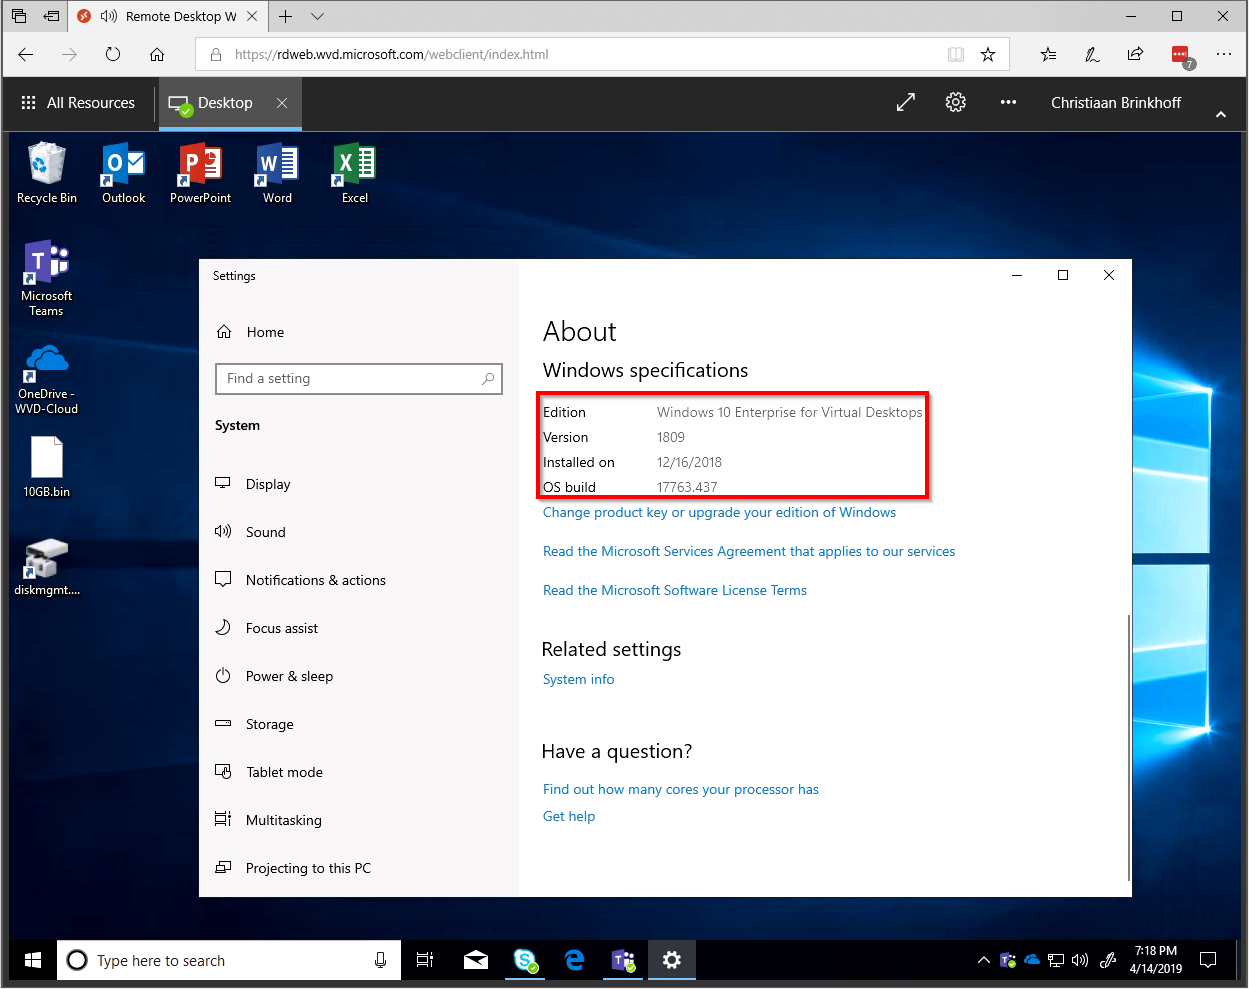
Go to https://rdweb.wvd.microsoft.com/webclient/index.html and logon with your user account that your applied the desktop group to – to see if the Session Desktop icon is applied.
Assign AD Groups to AVD Desktop Application group
Currently, you cannot directly assign AD groups to Desktop and/or Application Groups as part of your host pool. The PoSH script below converts AD group members into a separate entry to add them to the AppGroupName prefix as part of your host pool.
Note: Azure AD Group support is coming for Azure Virtual Desktop.
foreach($UPN in (Get-AzureADGroupMember -ObjectId ((Get-AzureADGroup | Where-Object DisplayName -Like "All AVD Users").ObjectId)).UserPrincipalName)
{
Write-Output $UPNuserAccount
add-RdsAppGroupUser -TenantName TENANTNAME -HostPoolName HOSTPOOLNAME -AppGroupName "Desktop Application Group" -UserPrincipalName $UPNuserAccount
Enrol the Windows 10 multi-session + Office 365 ProPlus master (managed) image
There are different approaches to configure Azure Virtual Desktop. This manual below explains how you can create a base/golden image via the Azure Managed image functionality.
See here where you could select a prepared Azure gallery image. When you prefer that, please skip these steps and start directly here.
Go to Virtual Machine
Click on + Add

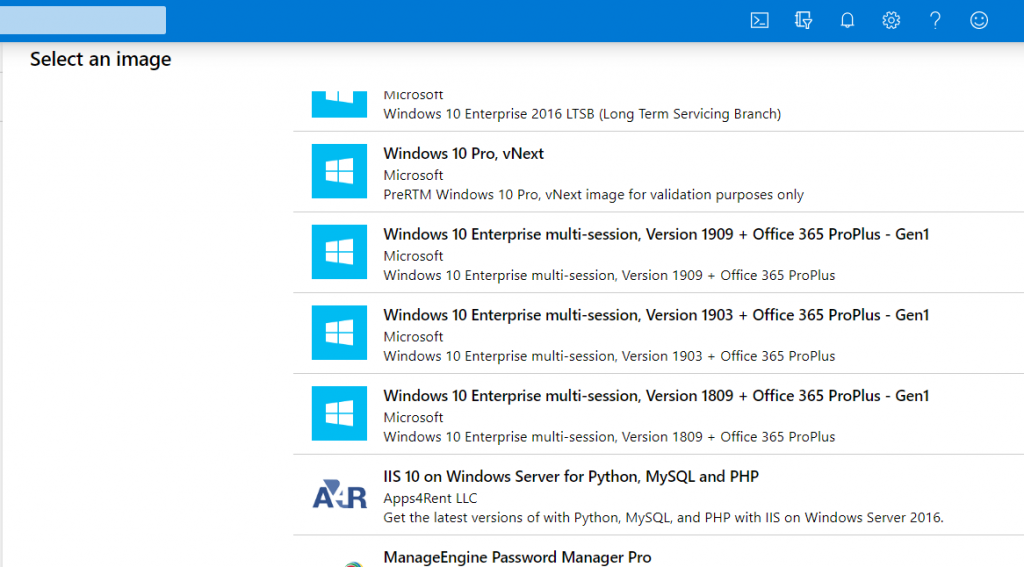
Click on Browse all images
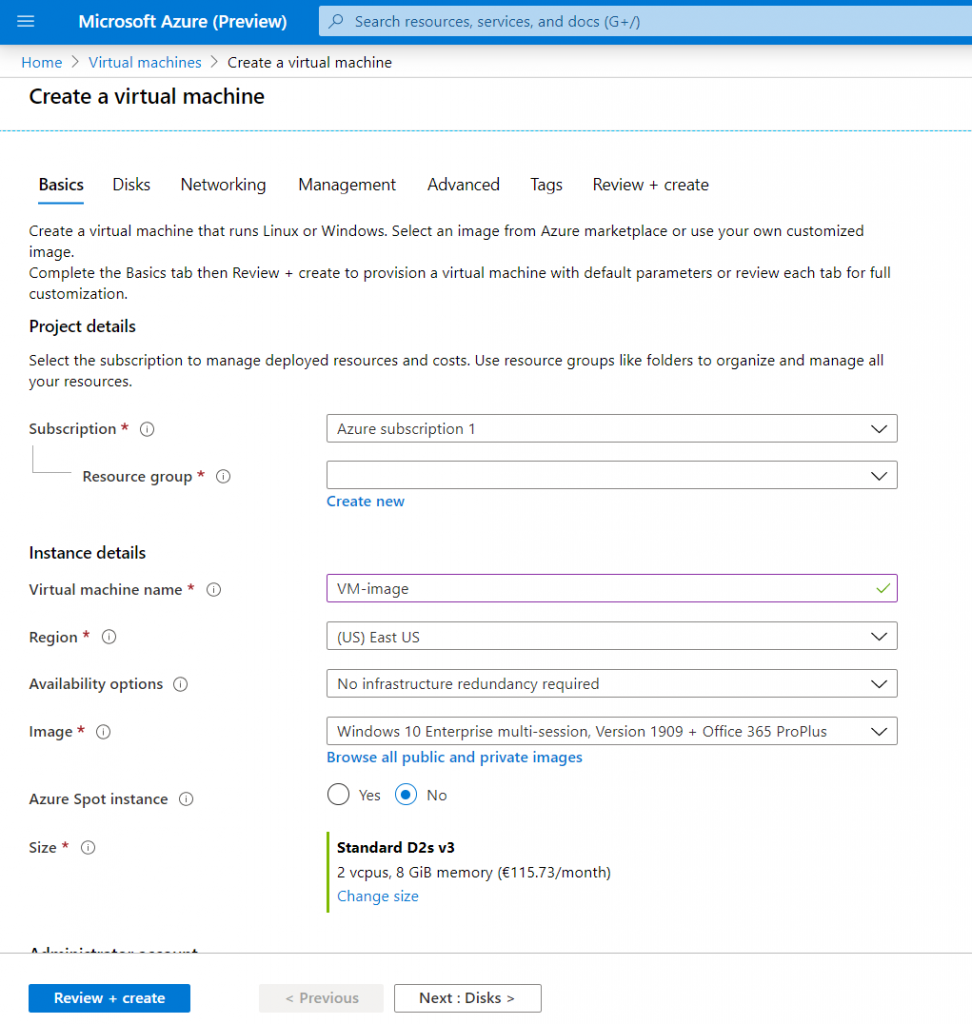
Select Windows 10 Enterprise multi-session + Office 365 ProPlus
Once the virtual machine is enrolled and up and running:
Connect – your VM-Image – through Azure Bastion – or RDP to the machine – this can be internally or externally.
Once you are logged on to your master image. Now we can add our agents to the image, such as the FSLogix Apps Agent, plus your own agents and line of business (LOB) – applications.
Install OneDrive Per-Machine
You can download the new per-machine version of OneDrive below:
https://go.microsoft.com/fwlink/?linkid=2083517
Make sure to re-install the application by using the following command.
OneDriveSetup.exe /allusers
Also, when running this on a multi-session environment, this means that on that same session host, all the different user-profile – OneDrive versions will update simultaneously – which can get messy in terms of network throughput. This is also solved with the per-machine version.
The per-machine version will update itself by a service/account which injects itself during the installation. Therefore, you always need to run the installation as local administrator with UAC privileges.
Add FSLogix Profile Container for profile management
Note: If you are interested in how you could Azure Files or Azure NetApp Files within AVD. Please consider one of the two articles below in addition to this blog. You can find ALL the differences between the two options here.

In general IOPS between 5 and 15 (depending on workload/amount of Office 365 applications) per user’s FSLogix Profile Container, with ~10x during sign in and sign out is adequate to use as a rule of thumb – preferred below the 5 ms (the lower the better).
- Getting started with FSLogix profile containers on Azure Files in Azure Virtual Desktop
- Create an FSLogix profile container for a host pool using Azure NetApp files
Download the FSLogix agent and install it in your Azure Virtual Desktop image – virtual machine. FSLogix is available for download here
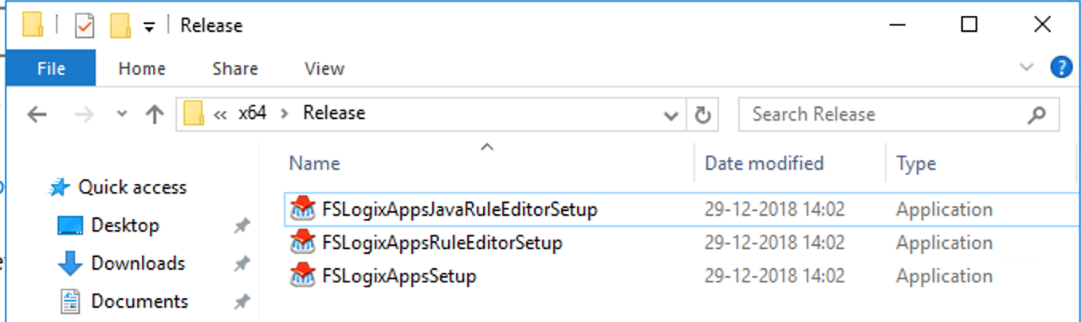
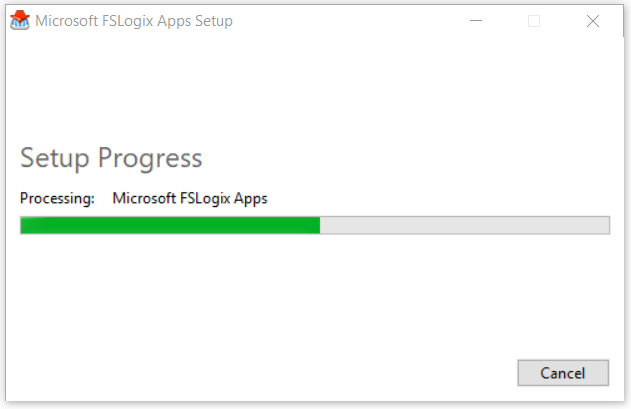
Install the FSLogixAppsSetup agent in the image

Wait for the installation to be finished…
The configuration part of FSLogix Profile Container can be performed in either registry settings or group policy files. The most simple and effective method is using the registry settings below.
Open regedit.exe and browse to “HKEY_LOCAL_MACHINE\Software\FSLogix\Profiles”
Create a REG_SZ value name “VHDLocations” and enter new Azure Files network file share path (e.g. \\fslogixwvddemo.file.core.windows.net\fslogixprofiles)
Create a DWORD value name “Enabled” and give it value 1.
Create a DWORD value name “DeleteLocalProfileWhenVHDShouldApply” and give it value 1. The one deletes existing local profiles before logon – this avoids errors.
Create a DWORD value name “FlipFlopProfileDirectoryName” and give it value 1. The one changes the folder name to USERNAME-SID which is much easier during troubleshooting or maintenance search-related work.
Tip: The most important settings for the usage of FSLogix Profile Container are the Enabled and VHDLocations registry setting. There are some other settings that I default recommend to enable. The VolumeTypesetting changes to disk type to VHDX. You can provide more maintenance tasks via PowerShell with VHDx so I advise changing that from default VHD to VHDx.
Note: If you are using Windows 10 Enterprise single and multi-session or Windows Server 2019, you don’t have to enable the RoamSearch setting. The Search DB is already stored in your user profile.
See here all the other advanced registry settings for FSLogix Profile Container. The example below is with Azure Files.

Make sure to configure the following Antivirus exclusions for FSLogix Profile Container.
- Exclude Files:
- %ProgramFiles%\FSLogix\Apps\frxdrv.sys
- %ProgramFiles%\FSLogix\Apps\frxdrvvt.sys
- %ProgramFiles%\FSLogix\Apps\frxccd.sys
- %TEMP%\*.VHD
- %TEMP%\*.VHDX
- %Windir%\TEMP\*.VHD
- %Windir%\TEMP\*.VHDX
- \\server\share\*\*.VHD
- \\server\share\*\*.VHDX
- Exclude Processes
- %ProgramFiles%\FSLogix\Apps\frxccd.exe
- %ProgramFiles%\FSLogix\Apps\frxccds.exe
- %ProgramFiles%\FSLogix\Apps\frxsvc.exe
Add extra languages
Community Rockstar Patrick van den Born created a very comprehensive blog to add new languages to your Azure Virtual Desktop image. You can find the article over here.

Finalize the Windows 10 image
Sysprep (Generalize) your image and shut down the virtual machine.

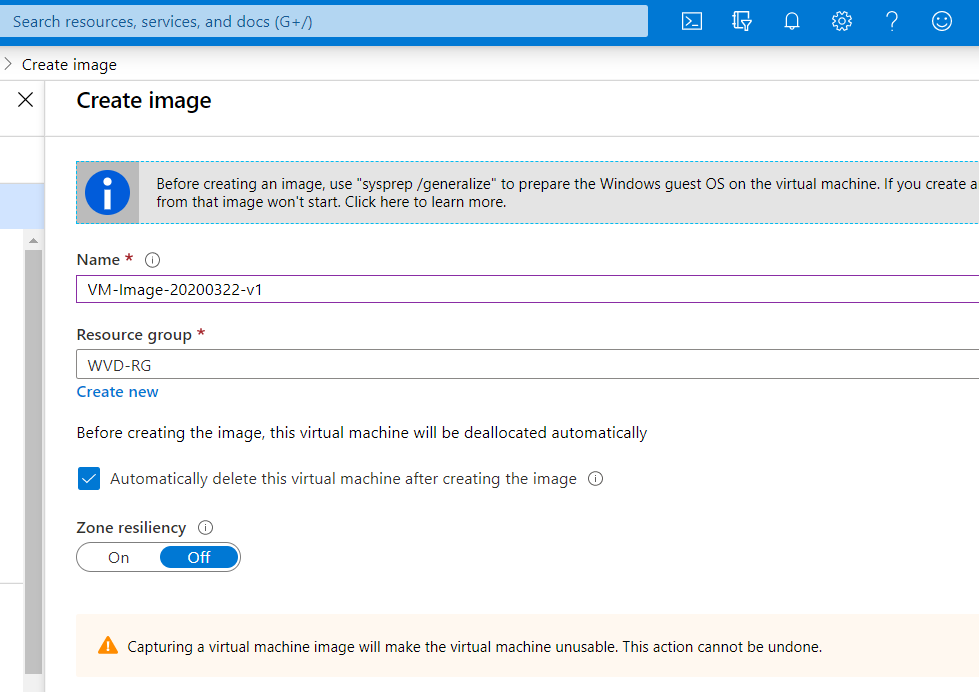
Create an Azure Managed Image
To wrap the Windows 10 Enterprise multi-session image up and start the host pool enrolment process from the Azure Marketplace, we must shut down the virtual machine to release the image.
Create a managed image from the VM in the Azure portal. Click on Capture
Note: The benefits of using a Azure Managed Image is that everything what you install will be used as baseline for the enrolment later during the Azure Marketplace procedure. All the virtual machines you select to enrol will include all the same software as you now install. For 500 virtual machines that saves a lot of post-installation work. Of course you can use your own automation solution and build images from scratch and add your software afterwards (post-installation) – it’s all up to you!

Create the image. Enter the Name and Resource group. You can provide your own versioning in the name.
Note: If the enrolment fails based om the Managed Image your created, it could be that the VM on Azure didn’t pick up the Generalized status on the VM level. You can force this by running the PowerShell command below.
Set-AzVm -ResourceGroupName $rgName -Name $vmName -Generalized
Enrol your Azure Virtual Desktop Host Pool
Now we come to the point where we can use our master image as baseline of our deployment. A host pool is a collection of session hosts (right now based on Windows 10 – Multi User, however Windows 7 and Server 2012 R2 and higher is supported as well). We can use them later to assign our Desktops and Published Apps to.
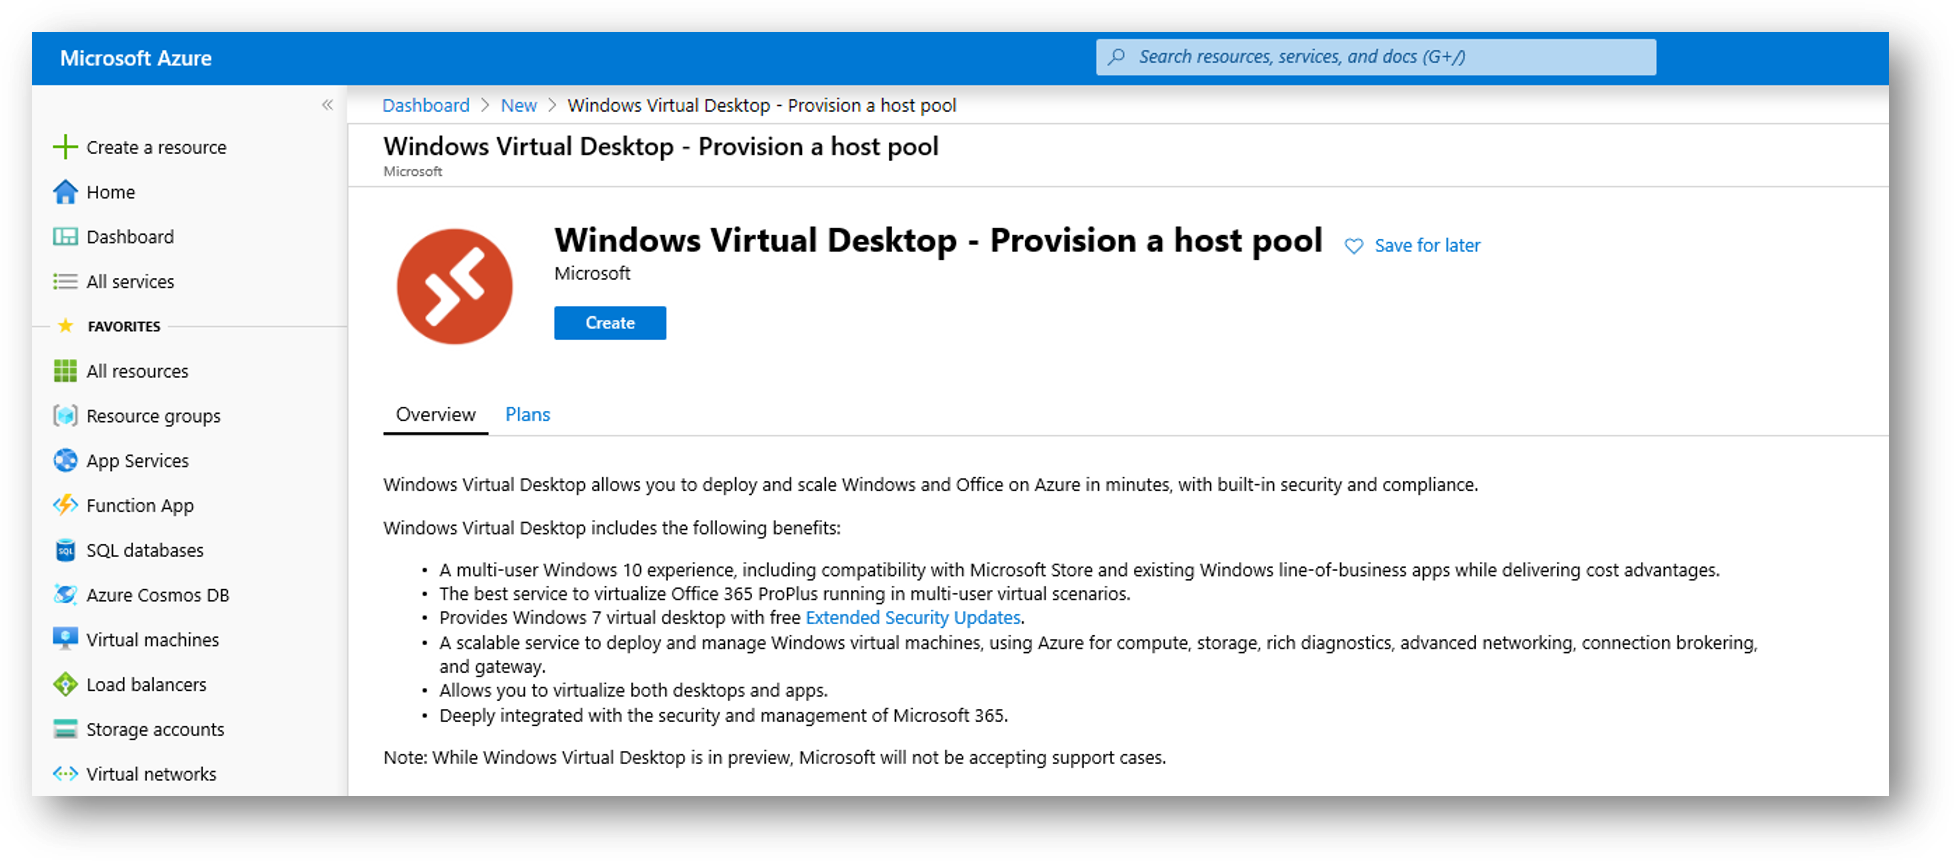
First, go to the Azure Marketplace
Search for Azure Virtual Desktop
Click on Create
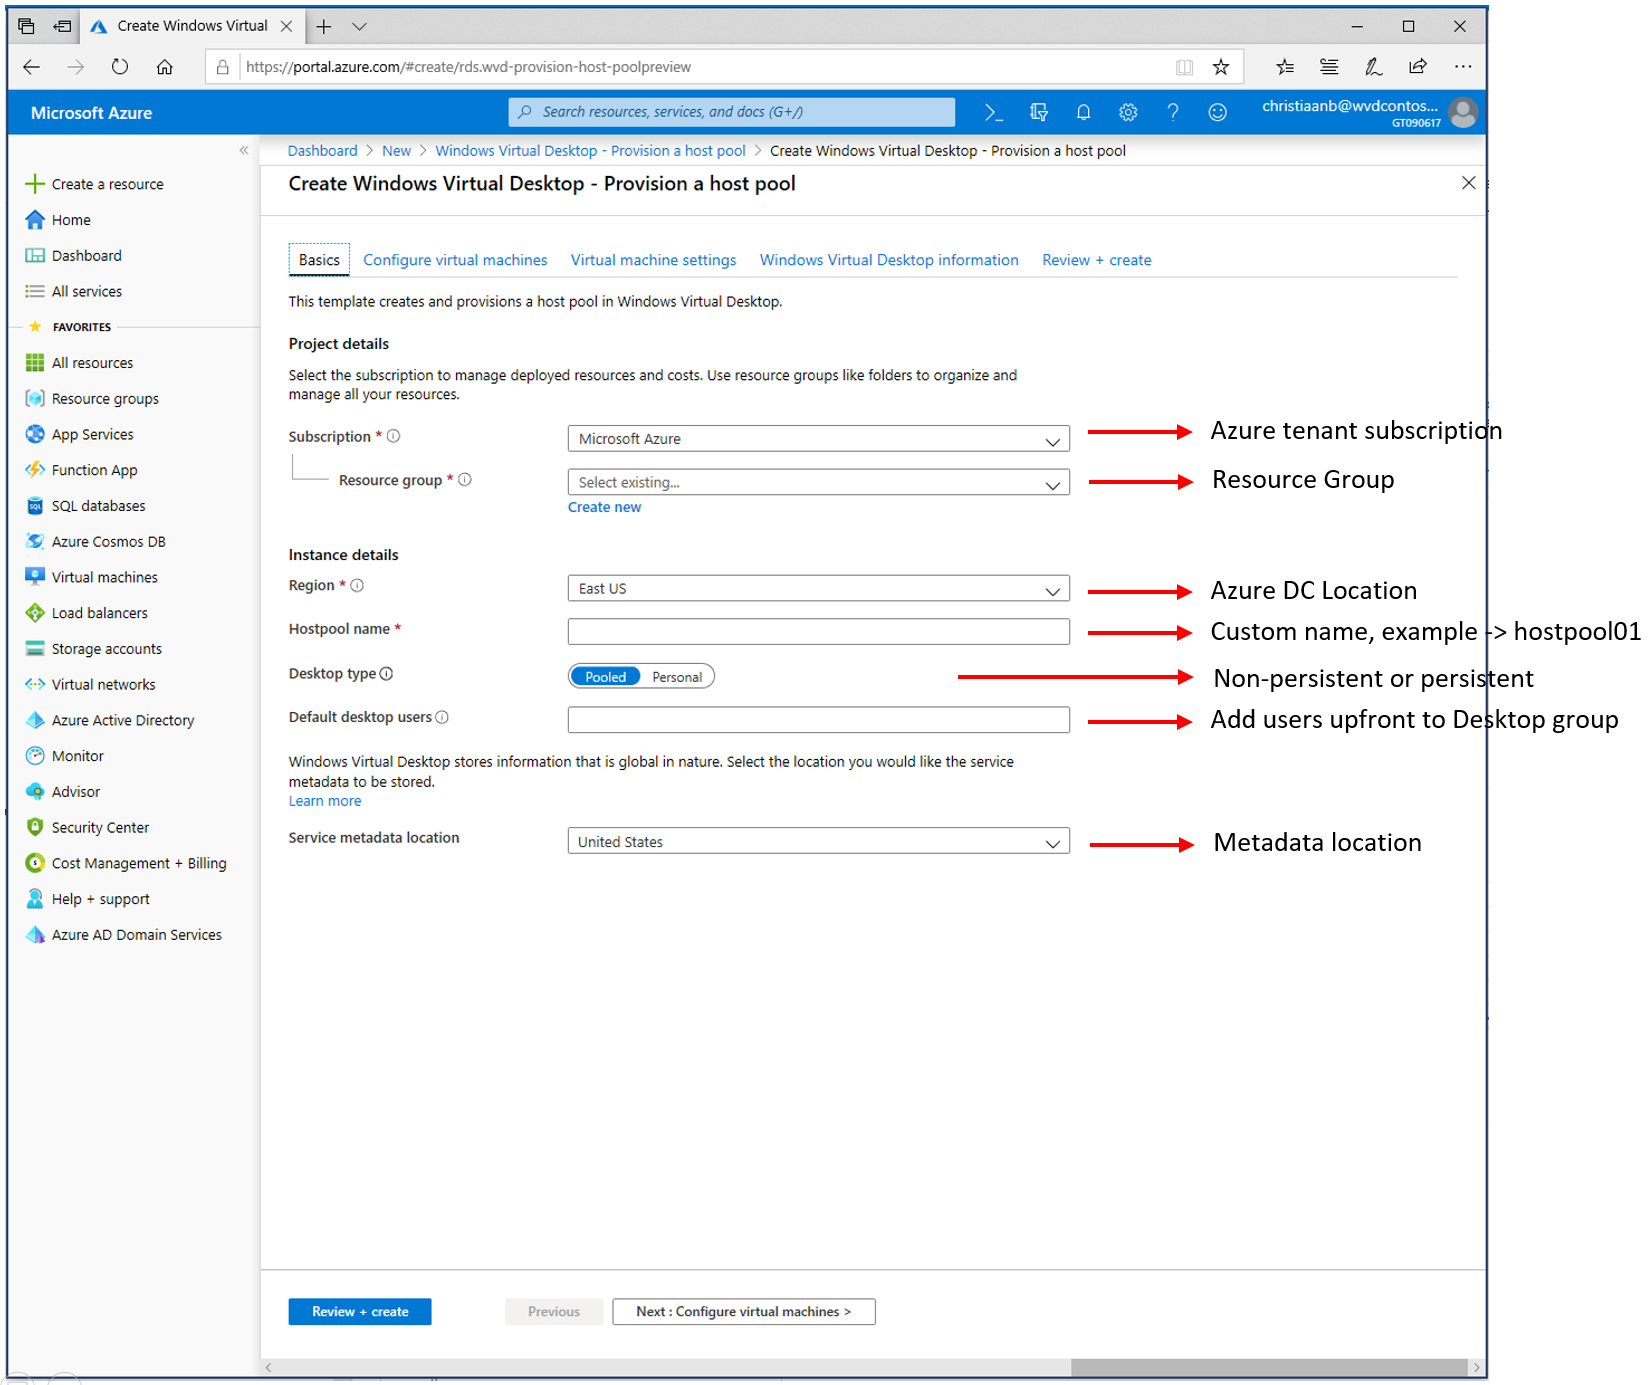
Basics
Note: Enter a comma-separated list of users to be automatically assigned to the desktop app group for the host pool. For example, ‘user1@contoso.com,user2@contoso.com,etc.’.
Click on Next
Configure virtual machines
This prefix will be used in combination with the VM number to create the VM name. If using ‘AVD‘ as the prefix, VMs would be named ‘AVD-0′, ‘AVD-1′, etc. You should use a unique prefix to reduce name collisions in Active Directory and in Azure Virtual Desktop.
Note: Make sure to consider the sizing recommendations we published from here…
Click on Next

Virtual machine settings
Now we come to the point where we define our Managed image, which we create earlier. Select Managed Image.
Enter your Azure Managed image name
Enter in the resource group where the Managed image is created in
Note: The benefits of using an Azure Managed Image is that everything that you install will be used as a baseline for the enrolment later during the Azure Marketplace procedure. All the virtual machines you select to enrol will include all the same software as you now install. For 500 virtual machines that saves a lot of post-installation work. Of course, you can use your own automation solution and build images from scratch and add your software afterward (post-installation) – it’s all up to you!
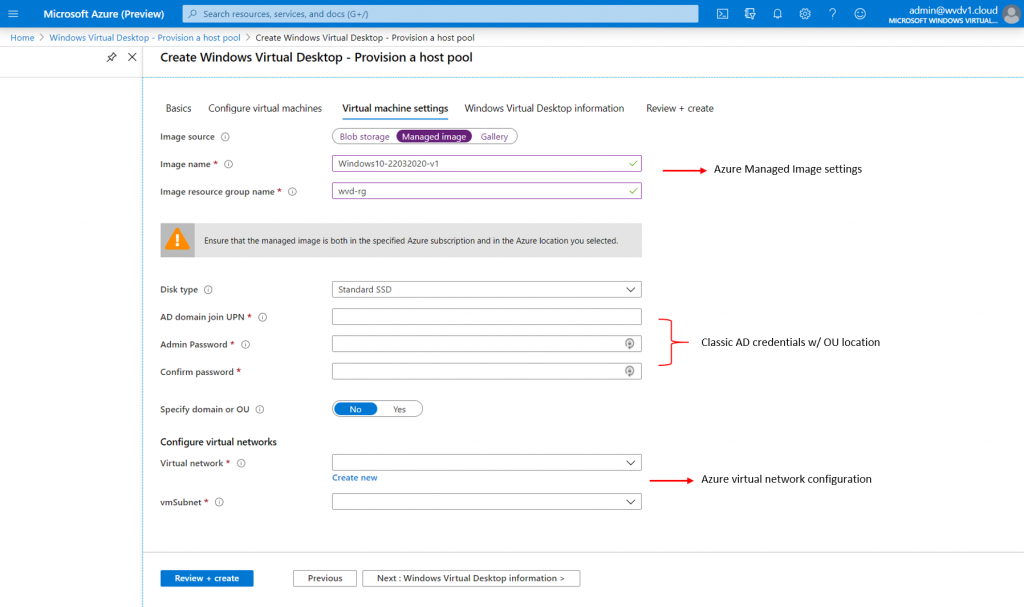
Select your disk type – preferably SSD
Enter your normal (classic) Active Directory credentials for the computer account domain join
Select your Azure Virtual Network.
Note: You must select an existing virtual network that has access to the Active Directory. If you do not see it listed, you must re-start the deployment with the correct Azure location selected.
Click on Ok
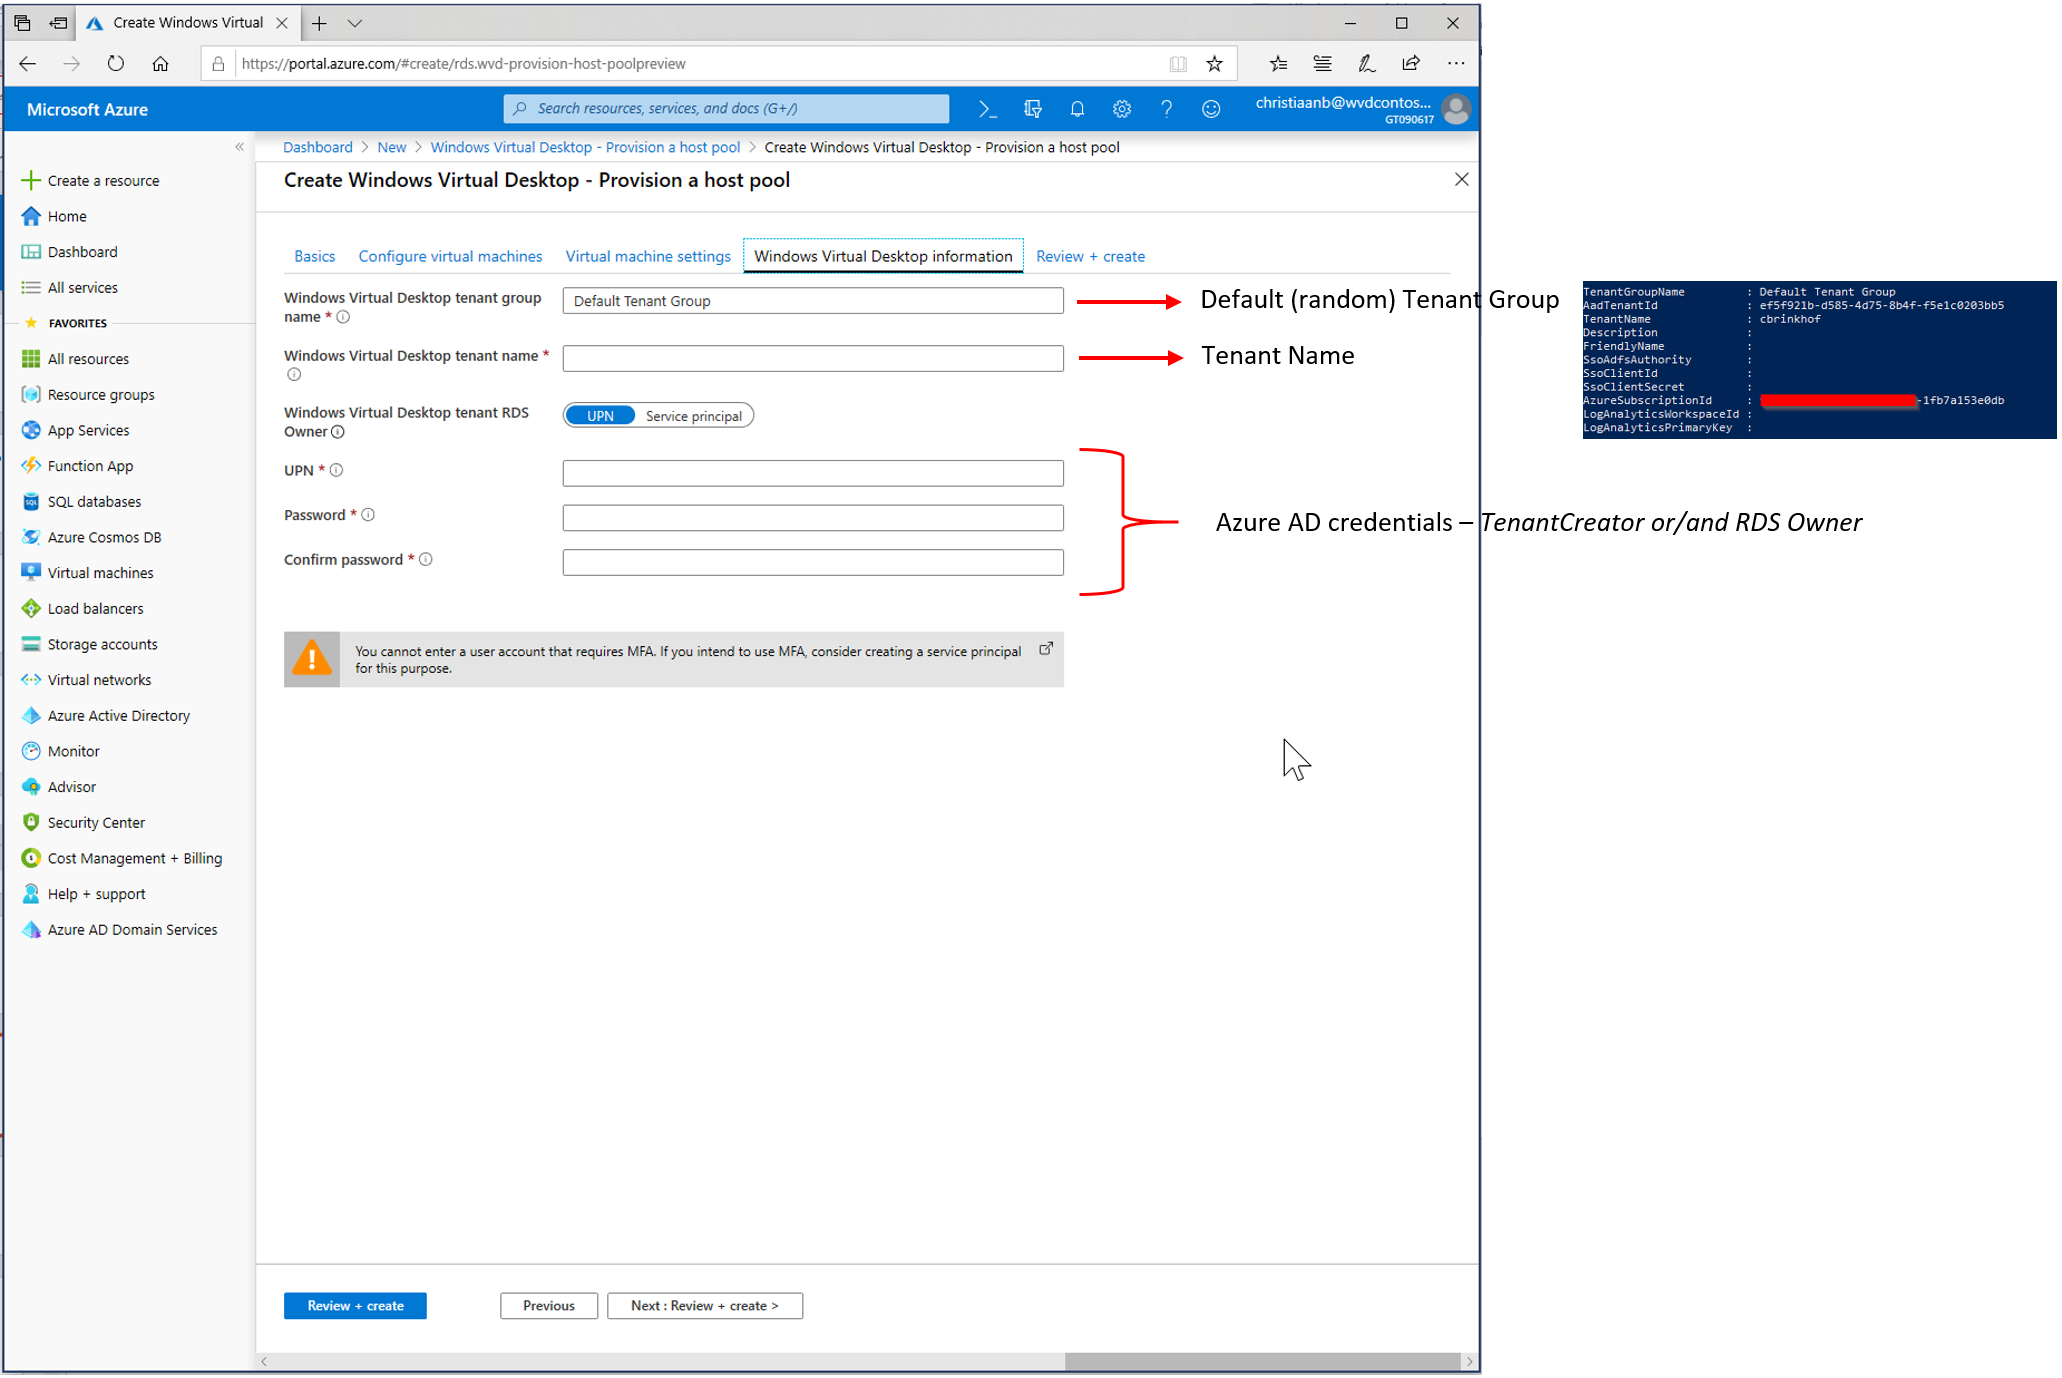
Azure Virtual Desktop information
Now we switch to the Azure AD – requirements.
First enter the name of the tenant group name associated with your Azure Virtual Desktop tenant. If you were not given one, leave it as ‘Default Tenant Group’.
Enter the name of your Azure Virtual Desktop tenant.
Select the type of account you would like to use to authenticate to Azure Virtual Desktop. This user must have ‘RDS Owner’ or ‘RDS Contributor’ permissions on the Windows Virtual Deskt
op tenant.
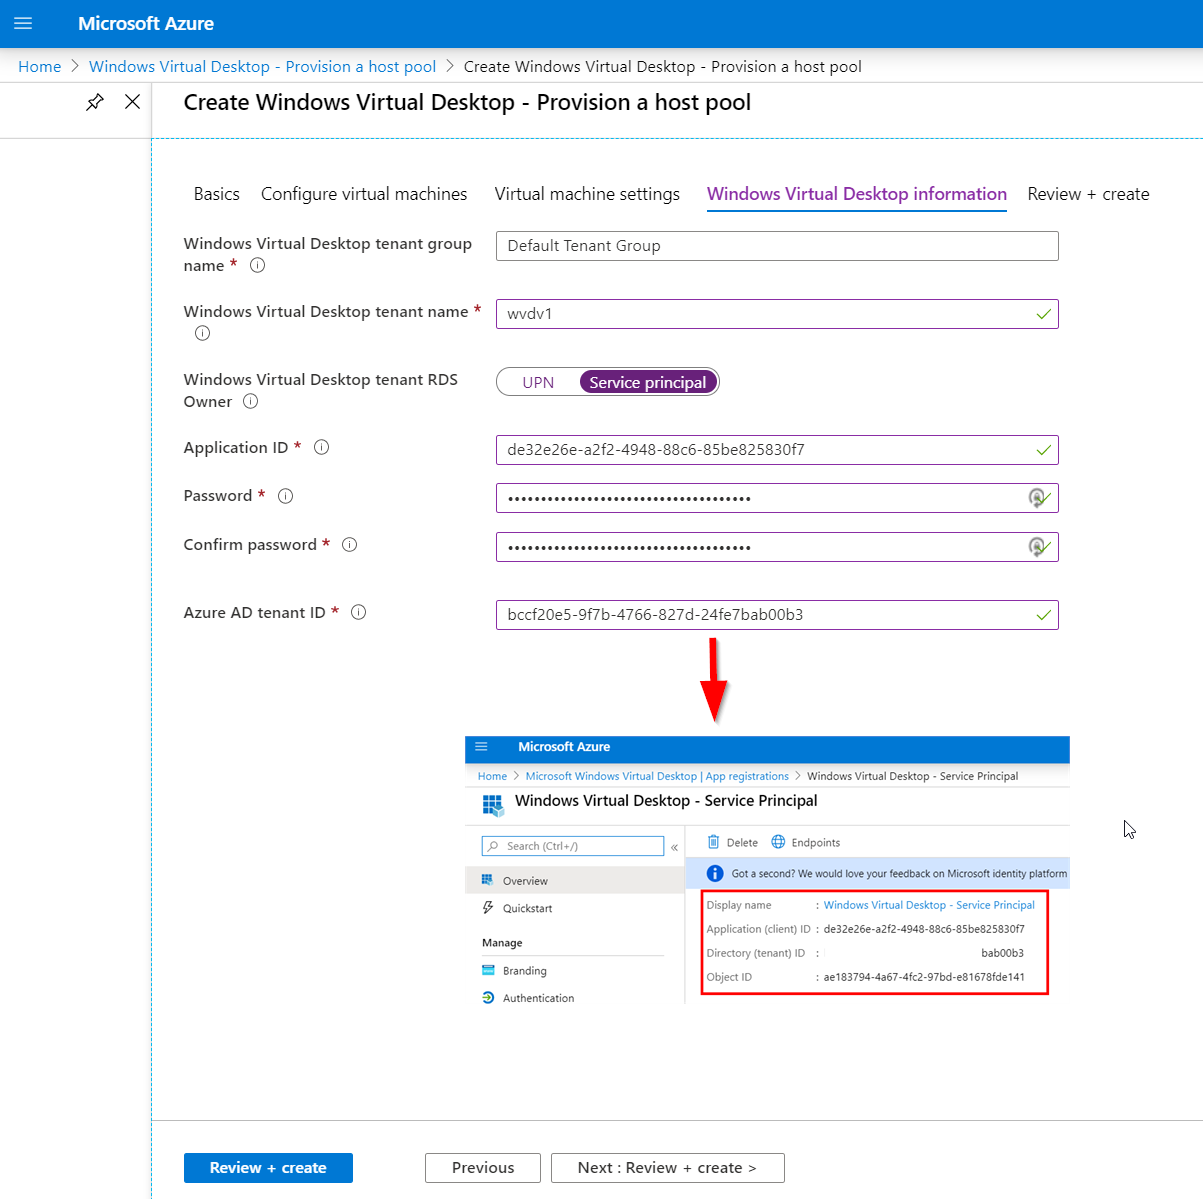
Note: You cannot enter a user account that requires MFA. If you intend to use MFA, consider creating a service principal for this purpose. I’ll explain as well how you can create this after this picture here.
Optional: How to create a Azure AD Service principal
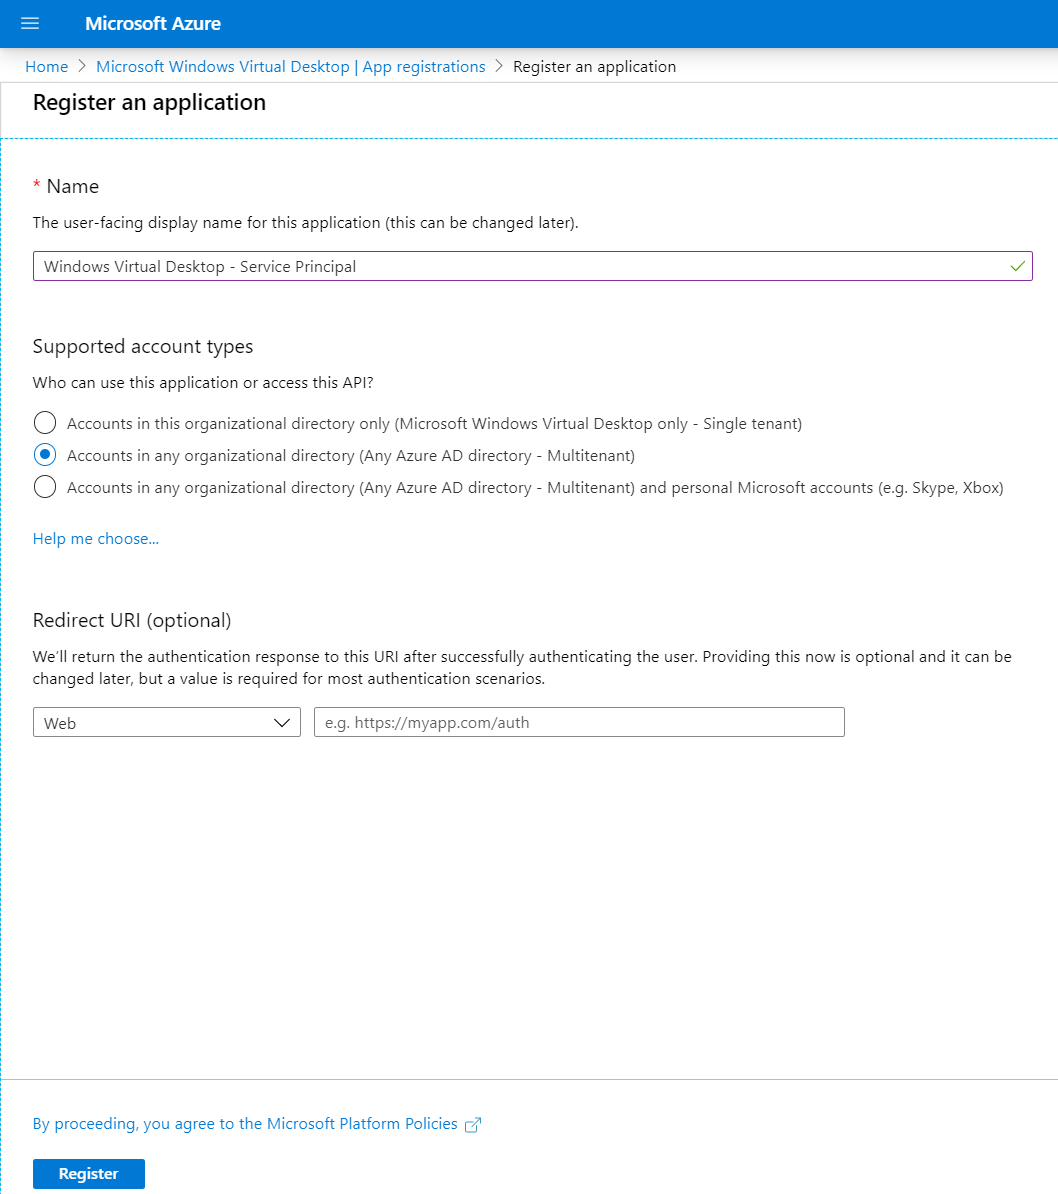
When your organization is enforcing Azure MFA on every account, the only option to successfully deploy Azure Virtual Desktop via the Azure Marketplace – host pool enrolment is by using a Service principal instead of a AAD service account. You can skip these steps when you use a normal Azure AD account as tenant creator.
Open Azure Active Directory – App registrations
Click on + New registration

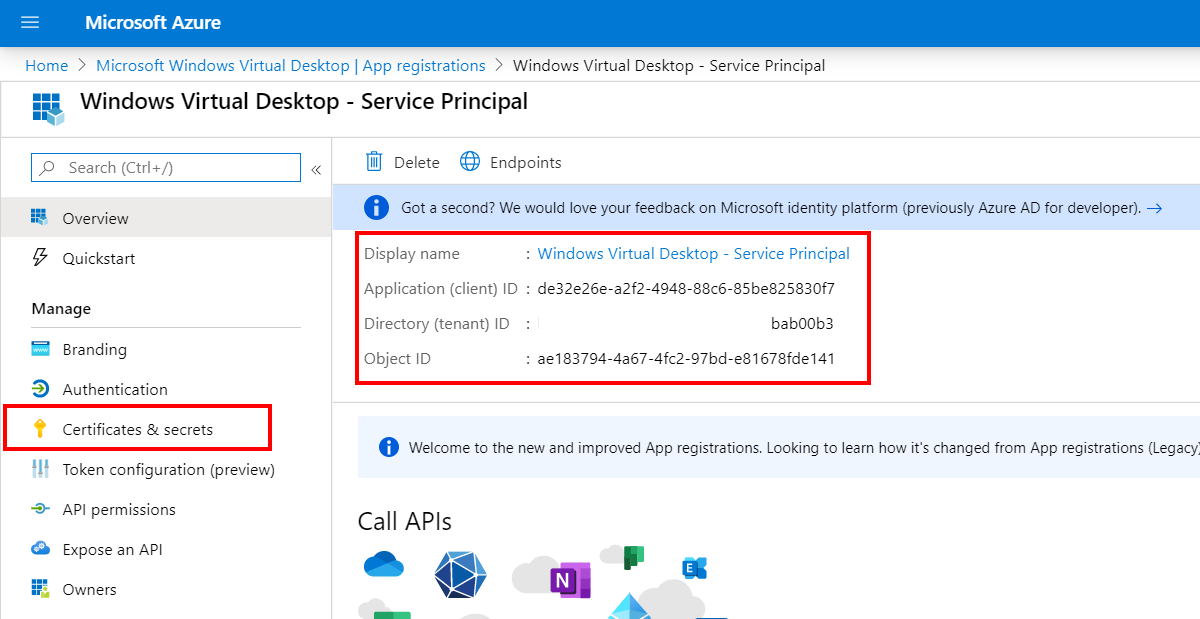
Create a name for the Service Principal e.g. Azure Virtual Desktop – Service Principal
Click on Register
The information such as Application ID and Directory ID are required to use during the host pool enrolment. Please note them somewhere for later.
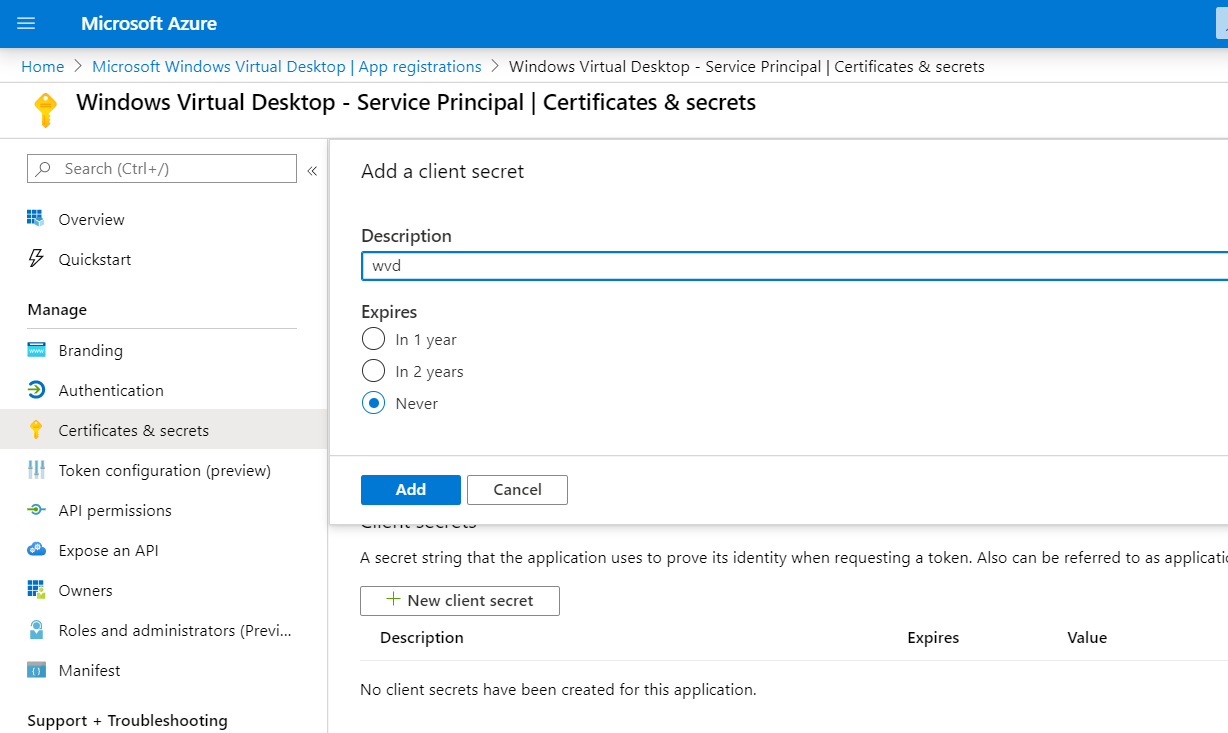
We have to create the secret (password) – click on Certificates & secrets.
Click on + New client secret

Create a (random) description and time to expire.
Click on Add
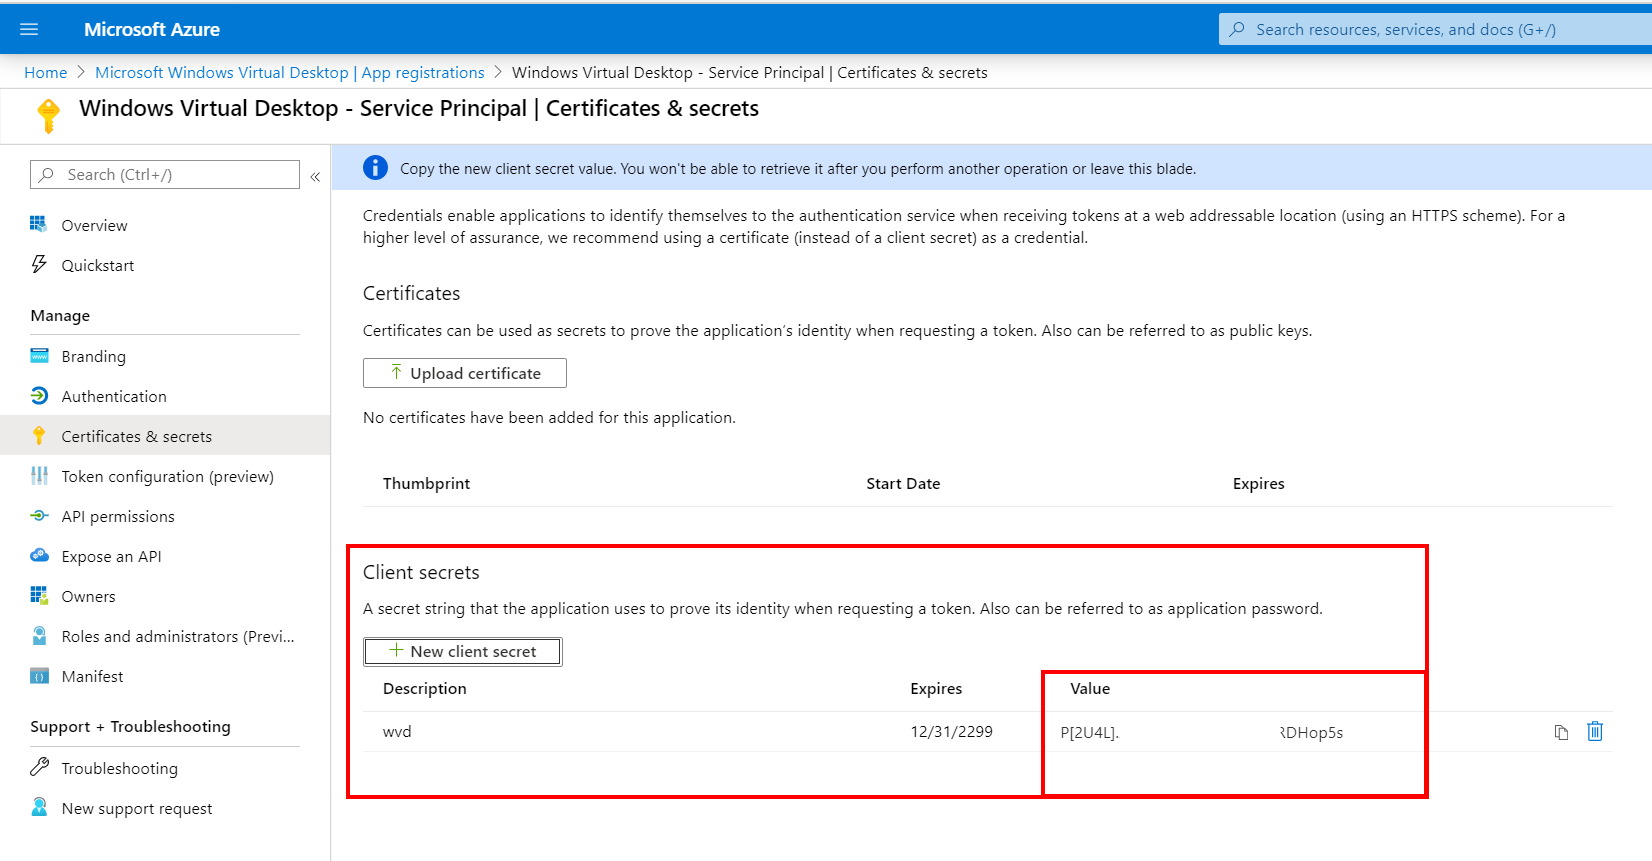
Make sure to note the secret passcode somewhere save. After closing this screen you won’t be able to request it again.
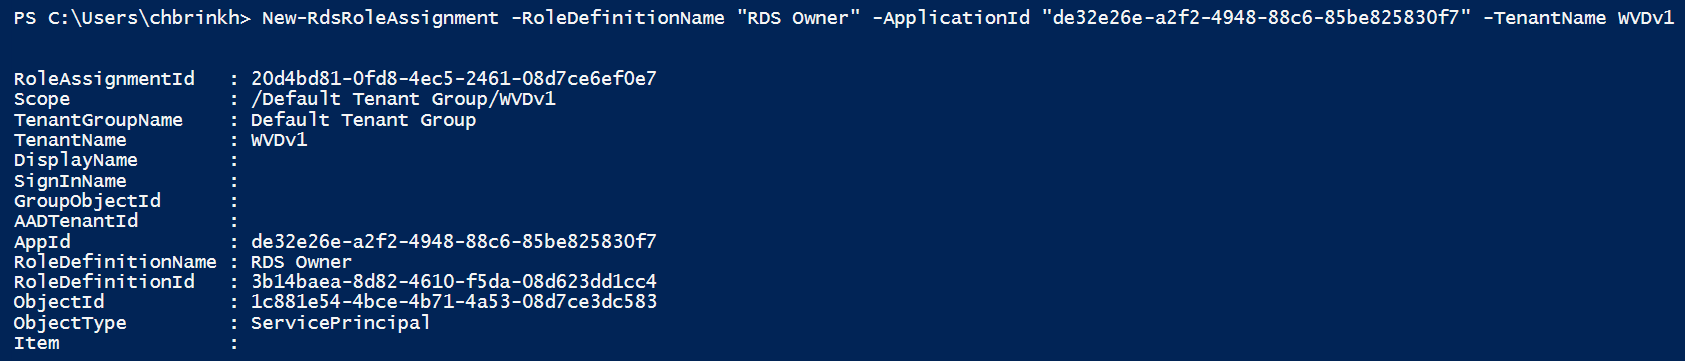
We are done with the creation of the service principal. The last step is around assigning rights. You need to assign RDS Owner rights to the service principal in order to use it at the Azure Virtual Desktop information section during the deployment.
New-RdsRoleAssignment -RoleDefinitionName "RDS Owner" -ApplicationId "Application (client) ID" -TenantName TENANTNAME
Return to the Azure Marketplace – and switch to Service principal.
Enter in the required App ID, Azure AD Directory (tenant) ID and secret password from the app registration.
Review + create
Check the summary, and click on Ok
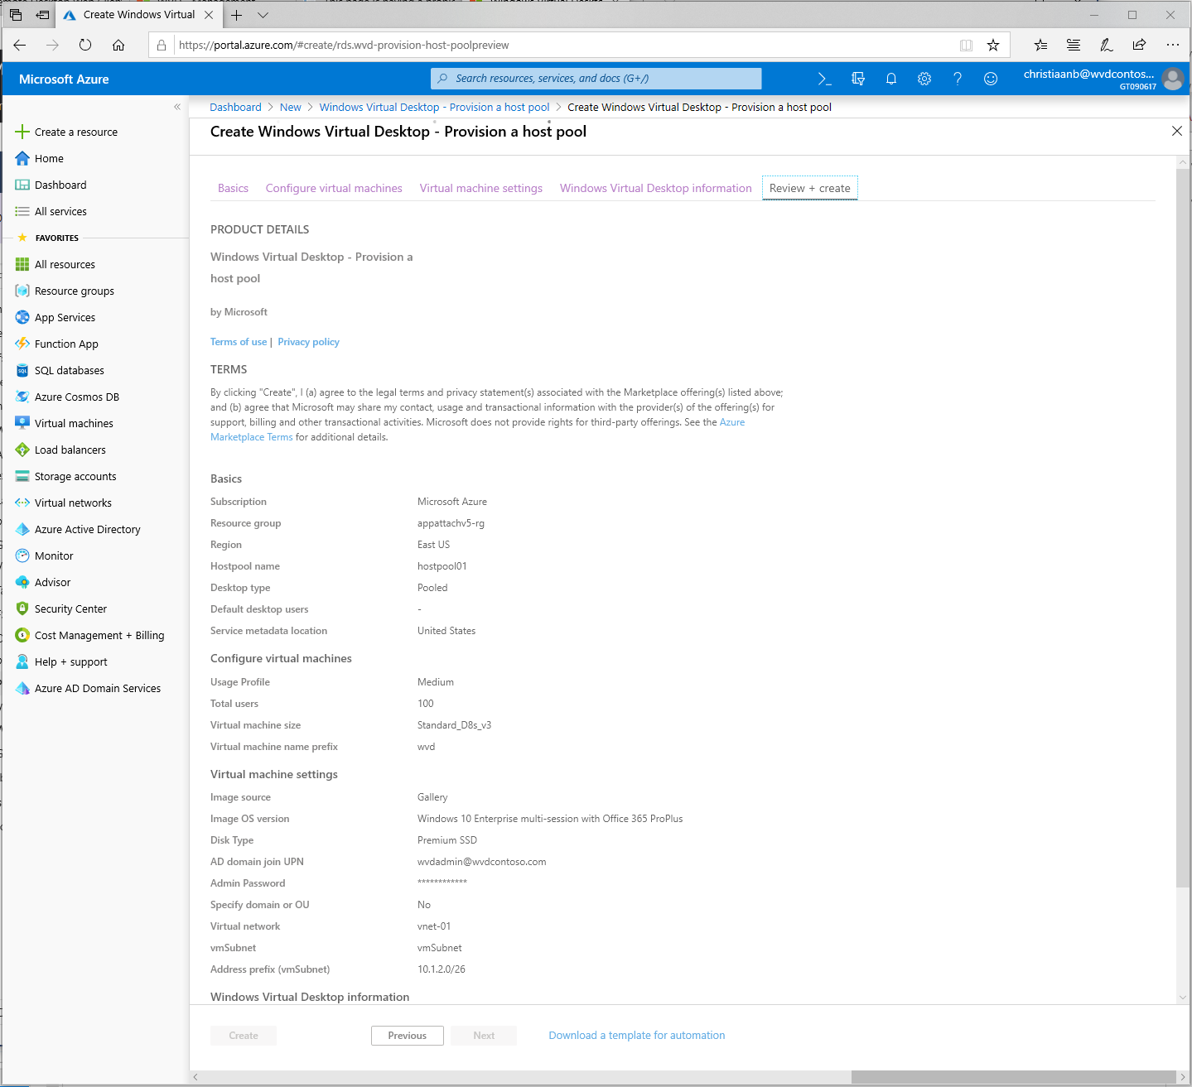
Click on Create to start the host pool enrolment – wait for all the machines to enrol. The enrolment process will create all the machines based on the Managed Image. so all the images will include all the agents and other software you installed.
Troubleshooting: Solve common deployment errors
This section will list the most common errors that could occur while deploying Azure Virtual Desktop. I’d like to start with explaining how the enrolment process works – to give you a clear understanding before troubleshooting.
The host pool – enrolment process itself works like this:
- First it creates the Availability Set
- The virtual machines are created
- The domain join process runs to join the computer to your Active Directory
- DSC Extension starts with the agent and bootloader installation
- Registration to your Azure Virtual Desktop tenant/Workspace host pool is completed.
DSC Extension errors
When you run into enrolment or DSC issues, please check the C:\Windows\Temp\ScriptLog.log logfile to see what is going wrong. Also, consider reading this article. It includes the most common errors.
DSC Failure: The user isn’t authorized to query the management service
Cause: The user who’s signed in hasn’t been assigned the TenantCreator role in their Azure Active Directory. Please perform the following steps to solve this issue.
- Follow the instructions in Assign the TenantCreator application role to a user in your Azure Active Directory tenant. After following the instructions, you’ll have a user assigned to the TenantCreator role.
Error: User requires Azure Multi-Factor Authentication (MFA)
Cause: The specified Azure Virtual Desktop tenant admin requires Azure Multi-Factor Authentication (MFA) to sign in. Please perform the following steps to solve this issue.
- Create a service principal and assign it a role for your Azure Virtual Desktop tenant. Follow the steps here.
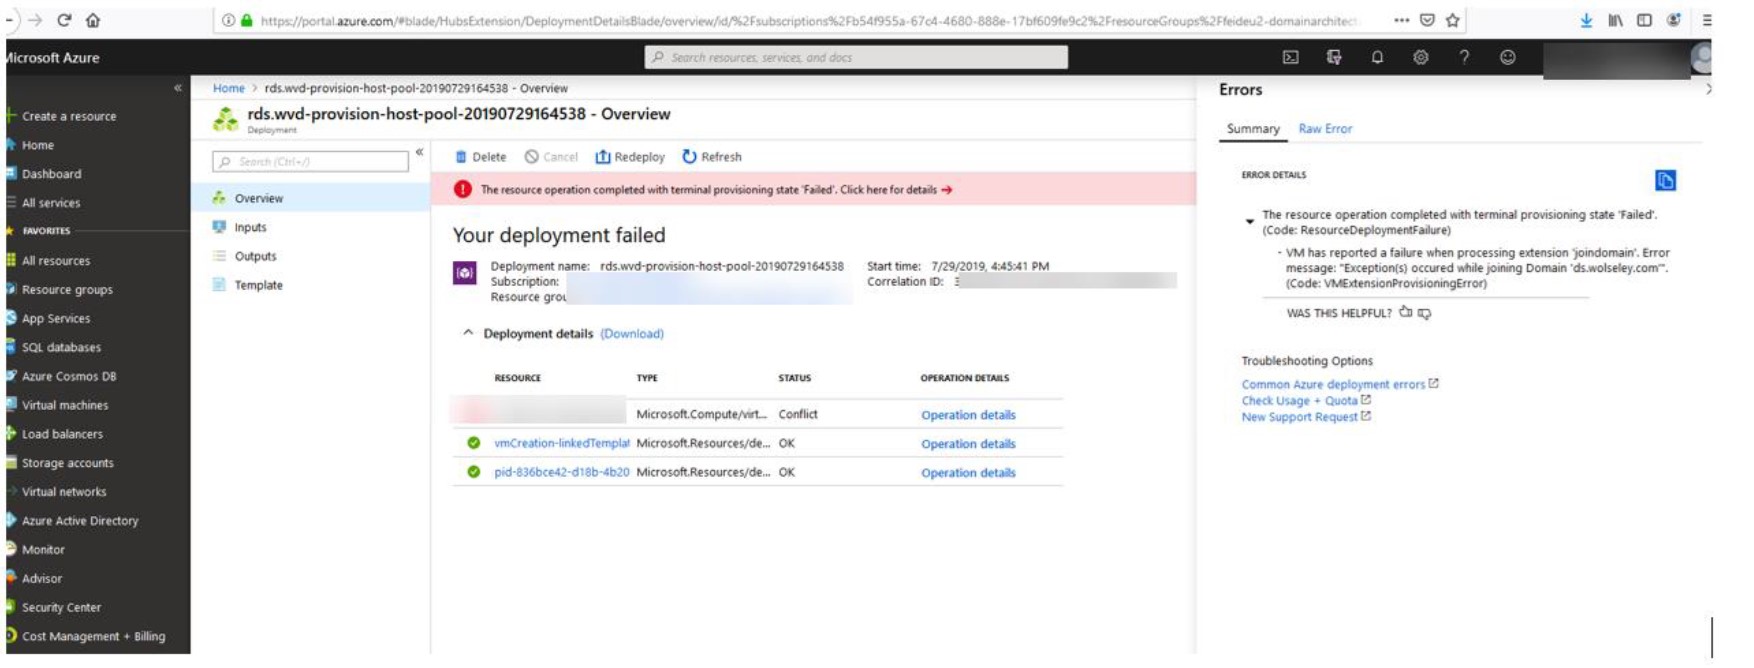
Domain join errors
If you run in the following error (or similar messaging), it is most likely that the AD account you configured doesn’t have the rights to join the virtual machines (computer accounts) to the domain. It also could be that the user doesn’t have the rights to access the Organizational Unit (OU). Please perform the following steps to solve this issue.
- Verify the AD permissions for the domain account. In some enterprises the account being used to join the domain is not a domain admin and only has limited rights to a specific OU for create and delete of objects
- If you receive a domain join failure ensure that credentials are correct.
- Attempt to provision a new windows machine with just the Azure portal and manually domain join the machine in the exact OU that the admin states he/she has permissions to.
- Attempt to use another elevated account from an IT person that has rights with other OU
\”VMExtensionProvisioningError\”,\r\n \”message\”: \”VM has reported a failure when processing extension ‘joindomain’. Error message: \\\”Exception(s) occured while joining Domain ‘ds.CUSTOMERDOMAIN.com’\\\”.\”\r\n }\r\n ]\r\n }\r\n}”}]}
Assign Azure Virtual Desktop Remote Application group – RemoteApps
First we have to create a new RemoteApp Group that we will use to publish our application to. To publish resources to users, you must assign them to app groups. When assigning users to app groups, consider the following things:
- A user can’t be assigned to both a desktop app group and a RemoteApp app group in the same host pool.
- A user can be assigned to multiple app groups within the same host pool, and their feed will be an accumulation of both app groups.
Note: When a user needs a full desktop and Remote Apps you must create two host pools with additional session hosts to follow the steps below.
First, create the new (Remote) Application Group via PowerShell – search for the available applications on the session host and then publish them to your users via the commands below.
# Create a new RemoteApp Group
New-RdsAppGroup -TenantName TENANTNAME -HostPoolName HOSTPOOLNAME -AppGroupName "Remote Application Group" -ResourceType RemoteApp
# Retrieve available applications from image
Get-RdsStartMenuApp -TenantName TENANTNAME -HostPoolName HOSTPOOLNAME -AppGroupName "Remote Application Group"
# Add Notepad to a RemoteApp Group
New-RdsRemoteApp -TenantName TENANTNAME -HostPoolName HOSTPOOLNAME -AppGroupName "Remote Application Group" -Name "Notepad PlusPlus" -AppAlias Notepad
# Add user to RemoteApp Group
Add-RdsAppGroupUser -TenantName TENANTNAME -HostPoolName HOSTPOOLNAME -AppGroupName "Remote Application Group" -UserPrincipalName UPNuserAccount
Currently you cannot directly assign AD groups to Application Groups as part of your host pool. The PoSH script below converts AD group members into a separate entry to add them to the AppGroupName prefix as part of your host pool.
Note: Azure AD Group support is coming next quarter for Azure Virtual Desktop.
foreach($UPN in (Get-AzureADGroupMember -ObjectId ((Get-AzureADGroup | Where-Object DisplayName -Like "AD GROUP NAME").ObjectId)).UserPrincipalName)
{
Write-Output $UPNuserAccount
add-RdsAppGroupUser -TenantName TENANTNAME -HostPoolName HOSTPOOLNAME -AppGroupName "Remote Application Group" -UserPrincipalName $UPNuserAccount
The steps above are also possible (and perhaps easier) within the Management UX that is available today, read more here.

Install the Azure Virtual Desktop Agent
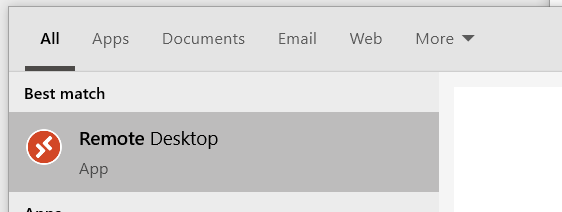
To run your Azure Virtual Desktop – Full Desktops or RemoteApps directly from the client and/or start menu, you must install the AVD Client.
Download the AVD client below
http://aka.ms/wvd/clients/windows
Start the AVD Client – Desktop app
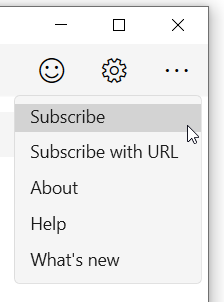
Subscribe to the feed using the URL
https://rdweb.wvd.microsoft.com
Click subscribe
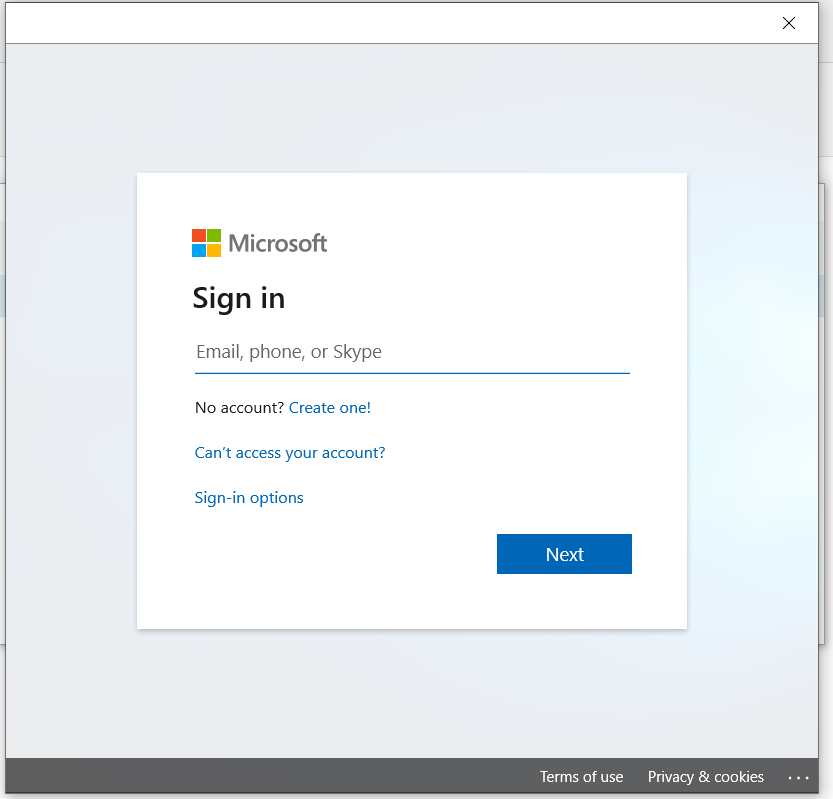
Enter a user that has a desktop or apps applied.
Click on Next
Enter your credentials
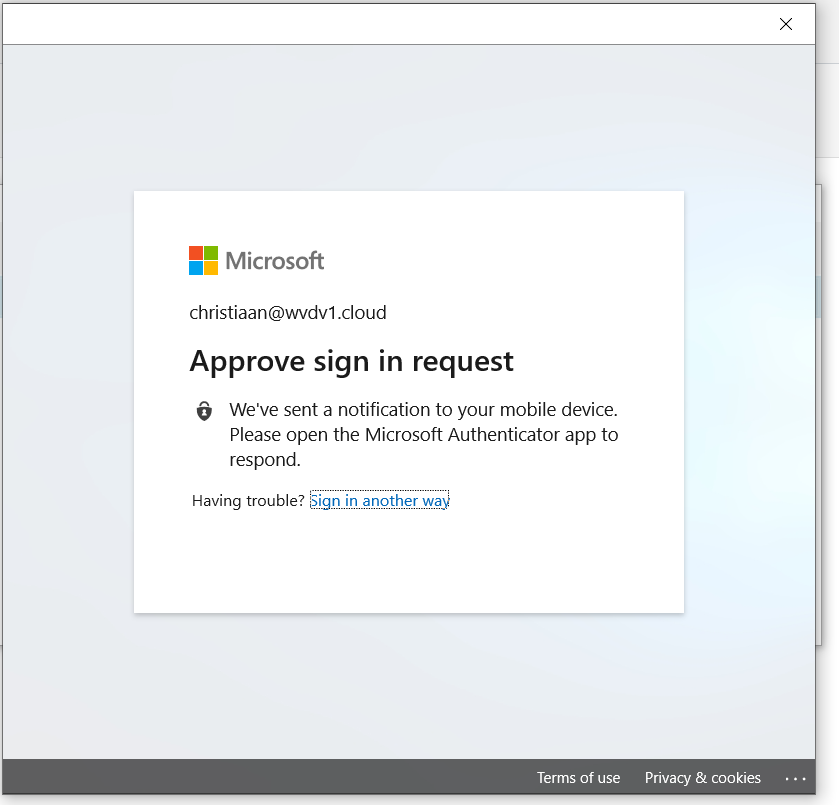
Provide Azure MFA (if activated.
Note: When you use Azure MFA you might want to take a look at one of my other articles here as well to enforce or whitelist Azure MFA for your end-users for the Windows Client.
Your RemoteApps and Desktops are ready to use!
Use the HTML5 WebAccess portal
AVD can be accessed without a client or agent from a web browser, which can be beneficial when you need to do some work without having your own device with you.
To access the RDWeb portal, please go to the short link https://aka.ms/wvdweb or https://rdweb.wvd.microsoft.com/webclient/index.html in full lenght.
Logon with your credentials.

Azure MFA can be added to this as well. Azure AD Conditional Access features are supported!
If you get access, you’ll see all your Desktops and RemoteApps

We are inside our Windows 10 multi-session – session host, including OneDrive, Teams and Outlook – everything just works 😊!
Some extra information regarding client supports; Azure Virtual Desktop supports the following clients as of today.
This URL goes directly to the official Microsoft download page to download the AVD client.
- Windows 10
- Windows 7
- Android
- Chromebook*
- Samsung DeX
- HTML5 Web client on Windows, macOS and Linux
- Linux SDK – zero /thinclients (via IGEL Next-gen OS)
- Which basically means every device is supported with a HTML5 browser installed.
Keep in mind to open up the URLs and ports below from your client network environment to make AVD work.
See here a comprehensive troubleshooting overview and what to do when for feedback and support!
https://docs.microsoft.com/en-us/azure/virtual-desktop/troubleshoot-set-up-overview
Hope to see you back soon – and feel free to leave a comment if you’ve any questions.
Thank you,
Christiaan Brinkhoff